Get Ready for the Ultimate Chocolate Indulgence!
Are you dreaming of a dessert that’s rich, creamy, and ridiculously easy to make? Imagine layers of crushed Oreos, a cloud-like cream cheese filling, double chocolate pudding, and a mountain of whipped topping, all without ever turning on your oven. Stop dreaming and start making our incredible Decadent No-Bake Chocolate Dream!
This show-stopping dessert is a true crowd-pleaser, perfect for potlucks, parties, or simply satisfying that intense chocolate craving. It’s so simple, you’ll wonder why you haven’t made it every weekend. Get ready to embark on a sweet adventure that promises pure bliss with every single bite.
Why You’ll Love This Decadent No-Bake Chocolate Dream
Prepare to fall head over heels for this dessert, and here are four compelling reasons why our Decadent No-Bake Chocolate Dream will become your new go-to:
- No Oven Required: Say goodbye to hot kitchens! This recipe is a lifesaver, especially during warmer months or when your oven is already occupied. It’s truly a hands-off baking experience (without the baking part!).
- Lightning-Fast Prep: With only 15 minutes of active prep time, you can whip up this luxurious dessert in a flash. The chilling does most of the work, leaving you more time to enjoy life (and anticipate dessert!).
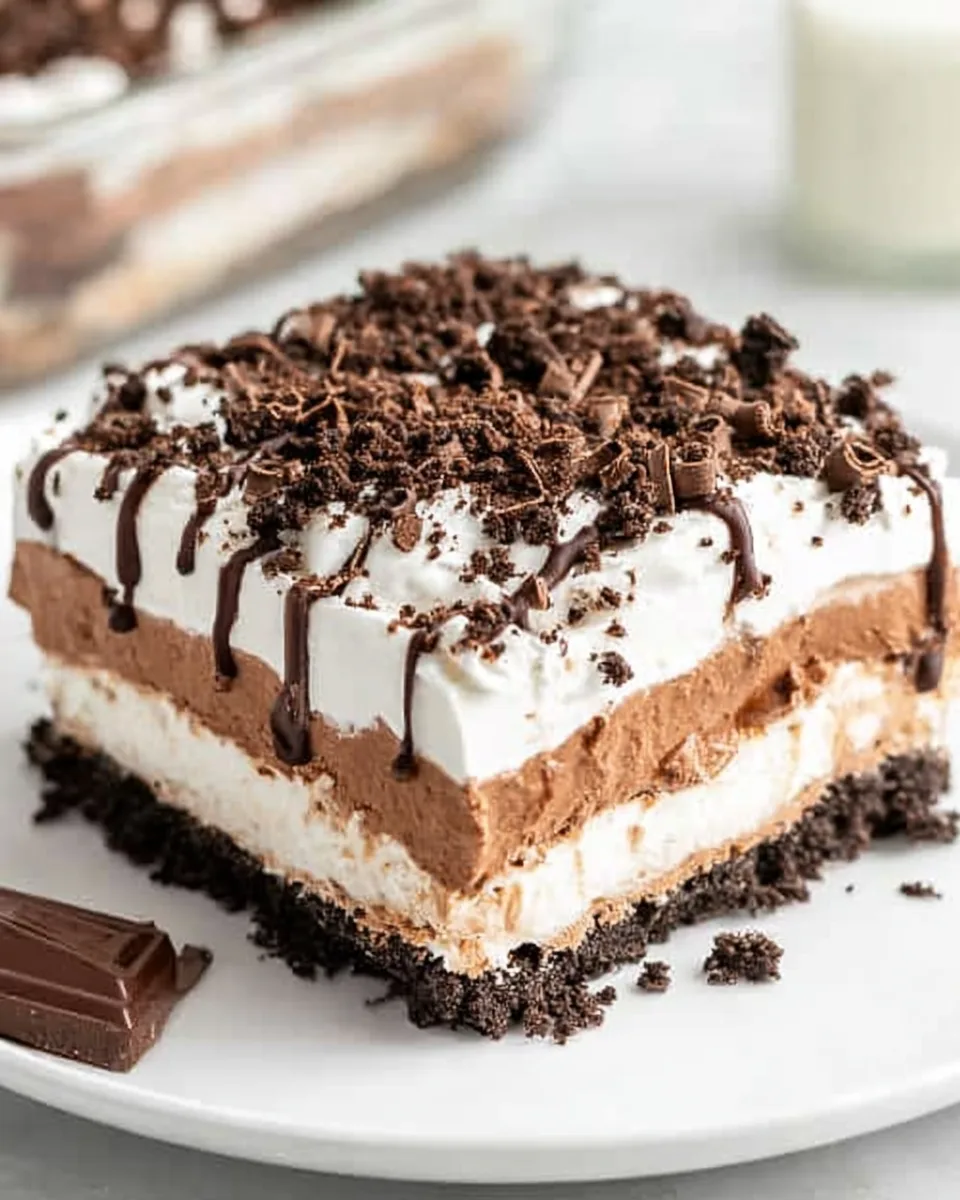
- Irresistibly Layered Flavor: From the crunchy Oreo crust to the tangy cream cheese, the double-chocolate pudding, and the airy whipped topping, each layer brings a unique texture and flavor that perfectly complements the others. It’s a symphony of chocolatey goodness!
- A Guaranteed Crowd-Pleaser: This dessert consistently earns rave reviews. Its rich flavor and stunning layers make it an impressive centerpiece for any gathering, and everyone will be begging for the recipe.
Ingredients for Your Decadent No-Bake Chocolate Dream
Gather your simple yet mighty ingredients to create this masterpiece. You likely have most of these on hand already!
- One 14.3-ounce package regular Oreo cookies: The foundation of chocolatey crunch!
- ½ cup melted unsalted butter or margarine: To bind that delicious crust.
- One 8-ounce block cream cheese, softened: For that creamy, tangy layer.
- 1 cup powdered sugar: Sweetness for the cream cheese.
- 3 cups cold milk (any type works!): The base for your dreamy pudding.
- One 5.1-ounce box instant chocolate pudding mix (not cook & serve): For intense chocolate flavor.
- One 5.1-ounce box instant vanilla pudding mix (not cook & serve): Adding depth and creamy texture.
- One 16-ounce container frozen whipped topping (like Cool Whip), thawed and divided: The light, airy finishing touch.
- Chocolate syrup for drizzling: For extra visual appeal and chocolate punch.
- Optional: Chocolate curls or your favorite chocolate candy for topping: Elevate your presentation!
Detailed Directions: Crafting Your Decadent No-Bake Chocolate Dream
Let’s turn these simple ingredients into an extraordinary dessert! Follow these easy steps to create your perfect Decadent No-Bake Chocolate Dream.
- Crush & Press Your Crust: Your culinary adventure begins! Take your entire package of Oreo cookies and turn them into fine crumbs. A food processor makes this super quick, but a sturdy bag and a rolling pin work just as well for a fun stress-reliever. Set aside about 1 cup of these magical crumbs – they’re destined for a spectacular topping later. Mix the remaining crumbs with your melted butter or margarine until well combined. Press this mixture firmly and evenly into the bottom of a 9×13 inch baking pan. Pop this into the refrigerator while you move on to the next layer to ensure it chills and firms up beautifully.
- Whip Up the Creamy Dream: In a clean mixing bowl, beat your softened cream cheese with the powdered sugar until it’s wonderfully smooth and fluffy. Now, for the secret touch: gently fold in 8 ounces (that’s half) of your thawed whipped topping until just combined. Carefully spread this luscious cream cheese mixture over your now-chilled Oreo crust. Return the pan to the refrigerator for another quick chill – patience is key for perfect layers!
- Unleash the Pudding Power: Grab a separate bowl and whisk together both packages of instant pudding mixes (yes, both chocolate AND vanilla!) with the cold milk. Whisk vigorously for about 2 minutes until the mixture thickens beautifully. This will be a rich, delightful layer. Spread this thickened pudding mixture evenly over your cream cheese layer. Back into the fridge it goes to set properly – give it enough time to firm up.
- The Grand Finale & Toppings: Once your pudding layer has fully set, it’s time for the final flourish! Gently spread the remaining 8 ounces of whipped topping over the top, creating a fluffy cloud. Now for the fun part: sprinkle those reserved Oreo crumbs generously over the whipped topping. Then, get artistic with a drizzle of chocolate syrup! If you’re feeling extra fancy (and we encourage it!), add some elegant chocolate curls or scatter your favorite chopped chocolate candy for that extra “wow” factor.
- Chill & Indulge: The hardest part is waiting! Refrigerate your magnificent Decadent No-Bake Chocolate Dream for at least 30 minutes. For optimal setting and flavor melding, a few hours or even overnight is ideal. This allows all the layers to become perfectly firm and flavors to harmonize. When ready, slice into generous portions and prepare for sheer delight!
Presenting & Serving Your Decadent No-Bake Chocolate Dream
While a simple slice of this Decadent No-Bake Chocolate Dream is already a showstopper, here are a few ways to elevate your presentation and serving experience:
- Classic Slice: The easiest way! Use a sharp, warm knife (run under hot water and wipe dry) for clean slices. Garnish each plate with an extra drizzle of chocolate syrup or a fresh berry for color contrast.
- Individual Parfaits: Instead of a 9×13 pan, layer the ingredients in clear individual glasses, mason jars, or small trifle dishes. This creates stunning mini desserts that are perfect for parties and portion control.
- Dessert Shots: For an elegant touch, layer small amounts in shot glasses for a sophisticated bite-sized treat, perfect for tasting menus or large gatherings.
- Fruit & Nut Pairings: While divine on its own, this dessert pairs beautifully with fresh raspberries, strawberries, or even a sprinkle of chopped toasted pecans or walnuts for added texture.
- Coffee & Cream: Serve alongside a steaming cup of coffee or a cold glass of milk for the ultimate indulgence. The slight bitterness of coffee will wonderfully complement the sweet chocolate.
Storage & Shelf Life of Your Decadent No-Bake Chocolate Dream
Ensuring your Decadent No-Bake Chocolate Dream stays fresh and delicious is key to enjoying it over several days. Here’s how to store it:
- Refrigeration is a Must: Due to the dairy components (cream cheese, milk, whipped topping), this dessert must be stored in the refrigerator.
- Airtight is Best: To prevent it from absorbing refrigerator odors and to keep it fresh, cover the baking pan tightly with plastic wrap or transfer individual slices to an airtight container.
- How Long Does It Last? When stored properly in the refrigerator, your Decadent No-Bake Chocolate Dream will remain fresh and delicious for 3 to 5 days. After this time, while still safe to eat, the textures might start to soften, particularly the cookie crust.
- Freezing? While you *could* technically freeze it, the texture of the cream cheese and pudding layers, especially the whipped topping, may become a bit grainy or watery upon thawing. For the best taste and texture, we recommend enjoying it fresh from the refrigerator.
FAQs About Your Decadent No-Bake Chocolate Dream
-
1. Can I use different cookies for the crust?
- Absolutely! While Oreos provide a classic chocolate base, you can experiment with graham crackers, chocolate chip cookies, or even shortbread. Adjust butter quantity if needed to get the right consistency.
-
2. Can I make this dessert dairy-free?
- Yes, with a few substitutions! Use dairy-free Oreos, plant-based butter, dairy-free cream cheese, almond or oat milk, and a dairy-free whipped topping (like coconut whip). Ensure your pudding mixes are also dairy-free (most instant mixes are).
-
3. How long does it really take to set?
- While it’s sliceable after 30 minutes in the fridge, for the firmest layers and best flavor, we recommend chilling for at least 2-4 hours, or ideally overnight. This allows everything to fully set and meld.
-
4. Can I prepare this Decadent No-Bake Chocolate Dream ahead of time?
- Yes, it’s an excellent make-ahead dessert! You can prepare it up to 24 hours in advance. Just cover it tightly with plastic wrap and keep it refrigerated until serving.
-
5. What if my cream cheese isn’t soft enough?
- For best results, take your cream cheese out of the refrigerator about 30-60 minutes before you start. If you’re short on time, you can microwave it on low power (e.g., 50% power) for 15-30 seconds, checking frequently, until softened.
-
6. Can I use Cook & Serve pudding mix?
- No, it’s crucial to use “instant” pudding mix. Cook & Serve pudding requires heating to thicken and won’t set correctly in this no-bake recipe.
-
7. How many servings does this recipe yield?
- This recipe is designed to yield 12 generous servings, making it perfect for sharing at gatherings or enjoying over a few days.
-
8. Can I add other flavors to the pudding layer?
- Certainly! Feel free to swap out one of the pudding flavors. A box of instant cheesecake, butterscotch, or even white chocolate pudding could add an interesting twist.
-
9. My pudding didn’t thicken. What went wrong?
- The most common reasons are using warm milk instead of cold, or using “Cook & Serve” instead of “Instant” pudding. Also, ensure you whisked it vigorously for at least 2 minutes as directed.
-
10. What’s the best way to get clean slices?
- For the cleanest slices, make sure the dessert is thoroughly chilled. Use a long, sharp knife. For each cut, dip the knife in hot water and wipe it clean before slicing to prevent dragging layers.
“`
Decadent No-Bake Chocolate Dream 🍫
Equipment
- 9x13-inch baking pan
- Mixing Bowl
- Whisk
- Food processor (optional)
Ingredients
- 1 package regular Oreo cookies 14.3-ounce
- 0.5 cup melted unsalted butter or margarine
- 1 block cream cheese 8-ounce, softened
- 1 cup powdered sugar
- 3 cups cold milk any type works!
- 1 box instant chocolate pudding mix 5.1-ounce, not cook & serve
- 1 box instant vanilla pudding mix 5.1-ounce, not cook & serve
- 1 container frozen whipped topping 16-ounce, thawed and divided
- chocolate syrup for drizzling
- chocolate curls or your favorite chocolate candy for topping, optional
Instructions
- 1. Prepare Your Crust: Take your Oreo cookies and crush them until they're fine crumbs. You can use a food processor for ease, or place them in a bag and crush with a rolling pin. Reserve about 1 cup of these crumbs for a lovely topping later. Mix the remaining crumbs with your melted butter or margarine. Press this mixture evenly into the bottom of a 9x13 inch baking pan. Pop it into the refrigerator to chill and firm up.
- 2. Create the Creamy Layer: In a mixing bowl, beat the softened cream cheese with the powdered sugar until smooth and fluffy. Gently fold in 8 ounces (half) of your thawed whipped topping. Carefully spread this luscious cream cheese mixture over your chilled Oreo crust. Return the pan to the refrigerator for another quick chill.
- 3. Whip Up the Pudding Layer: In a separate bowl, whisk together both packages of instant pudding mixes (vanilla and chocolate) with the cold milk for about 2 minutes, until thickened. Spread this rich pudding mixture evenly over the cream cheese layer. Back to the fridge it goes to set properly.
- 4. Add the Final Touch: Once the pudding layer is set, gently spread the remaining 8 ounces of whipped topping over the top. Now for the fun part! Sprinkle your reserved Oreo crumbs over the whipped topping, then drizzle with chocolate syrup. If you like, add chocolate curls or your favorite chopped chocolate candy for an extra flourish.
- 5. Chill & Enjoy: Refrigerate the dessert for at least 30 minutes, or even better, a few hours or overnight, to allow all the layers to set perfectly. Slice and serve this delightful treat!
Notes
Total Carbs: 70g
Net Carbs: 68g