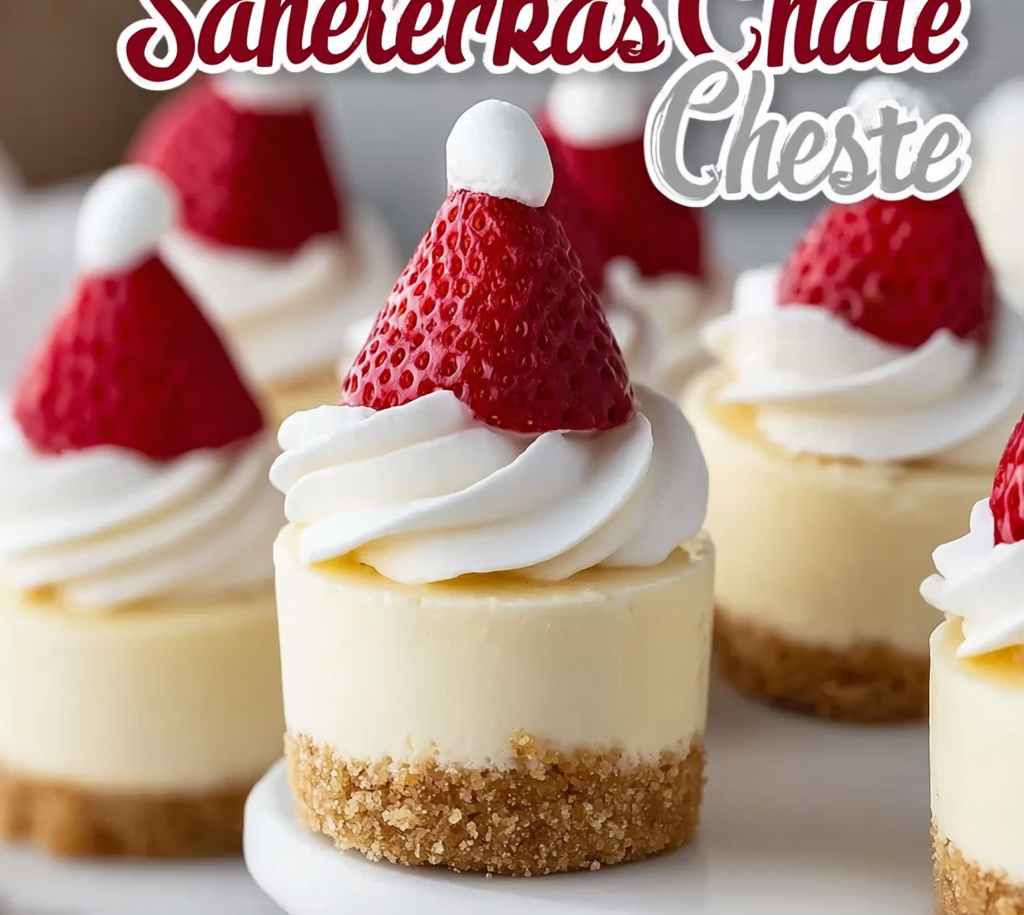
Get ready to sprinkle some serious holiday magic on your dessert table with the most adorable and irresistible treat of the season: Santa Hat Cheesecake Bites! Forget the stress of elaborate holiday baking; these little wonders are here to bring pure joy, cheer, and an explosion of creamy, fruity deliciousness in every single bite. Imagine a velvety smooth cheesecake base, a buttery graham cracker crust, all topped with a vibrant red strawberry and a fluffy cloud of whipped cream, perfectly mimicking Santa’s iconic hat. They’re not just desserts; they’re tiny, edible celebrations waiting to happen. So, grab your apron, crank up the carols, and let’s dive into making these festive masterpieces!
Why You’ll Love These Santa Hat Cheesecake Bites
- Effortlessly Festive & Oh-So-Cute: These aren’t just cheesecakes; they’re miniature works of art! Their vibrant red and white “Santa hat” design makes them an instant showstopper at any holiday gathering, guaranteed to elicit “oohs” and “aahs” from guests of all ages.
- Perfectly Portion-Controlled Indulgence: Craving something sweet without the guilt of a giant slice? These bites are your answer! Each little cheesecake is a delightful 220-calorie treat, making them ideal for satisfying your sweet tooth in a mindful way.
- Make-Ahead Magic: Holiday hosting just got easier! The cheesecake bases can be baked and chilled a day or two in advance, leaving you free to assemble the festive hats right before your event. Less last-minute stress, more holiday cheer!
- Crowd-Pleasing Flavors: The classic combination of tangy cream cheese, sweet graham cracker, fresh strawberries, and light whipped cream is universally loved. These bites offer a delightful balance of textures and flavors that will have everyone reaching for more.
Ingredients for Your Santa Hat Cheesecake Bites
🍰 FOR THE CRUST:
- 🍪 1 cup graham cracker crumbs (about 8 full sheets)
- 🥄 2 tablespoons granulated sugar
- 🧈 4 tablespoons unsalted butter, melted
🍓 FOR THE CHEESECAKE FILLING:
- 🧀 2 (8 oz) blocks full-fat cream cheese, softened at room temperature
- 🍚 1/2 cup granulated sugar
- ✨ 1 teaspoon vanilla extract
- 🥚 2 large eggs, at room temperature
- 🍦 1/4 cup sour cream
- 🌾 1 tablespoon all-purpose flour
- 🧂 Pinch of salt
🎄 FOR TOPPING:
- 🍓 12–14 fresh strawberries, hulled
- 🥛 1 cup heavy whipping cream, well-chilled
- 🥄 2 tablespoons powdered sugar
- 🌟 1/2 teaspoon vanilla extract
Detailed Directions: Crafting Your Festive Bites
- Preheat & Prep Your Pan: First things first, get your oven cozy by preheating it to a moderate 325°F (163°C). Next, grab your mini cheesecake pan or a trusty mini muffin tin. Line each cavity with adorable paper liners – they make serving a breeze! If you’re using a silicone mold, a light grease will do the trick.
- Crust Creation Time: In a small bowl, combine your graham cracker crumbs, granulated sugar, and the golden melted butter. Stir it all together until it magically transforms into a mixture that looks and feels like perfectly damp sand. Spoon about 1 tablespoon of this crumbly goodness into each prepared cavity. Now, with the back of a spoon or even a small, flat-bottomed glass, firmly press that crust down. Pop them into the preheated oven for just 5 minutes to set, then bring them out and let them chill out for a bit.
- Whip Up the Creamy Filling: In a generously sized mixing bowl, take your softened cream cheese and beat it until it’s absolutely silky smooth – no lumps allowed! Add the granulated sugar and mix until it’s fully happy and combined. Now, gently beat in your eggs, one at a time, being sure to scrape down the sides of the bowl after each addition to ensure everything is incorporated. Finally, add the vanilla extract, sour cream, flour, and that tiny pinch of salt. Mix just until everything is combined and uniform. Remember the golden rule of cheesecake: don’t overmix, or you might invite cracks!
- Fill, Bake & Cool: Divide your glorious cheesecake filling evenly among the crusts, filling each cavity almost to the very top. Slide them back into the oven for 15–18 minutes. You’re looking for centers that appear mostly set but still have a charming slight jiggle – that’s the secret to a creamy texture! Remove them and let them cool in their pan for a relaxed 10 minutes. Then, carefully transfer them to a wire rack to cool completely. This part is crucial: once cool, refrigerate them for at least 2 hours, or even better, overnight! Patience is a virtue when it comes to perfect cheesecake.
- Whisk Up the Whipped Cream Crown: Get your heavy whipping cream, powdered sugar, and vanilla extract ready. Make sure your bowl and whisk attachments are super-chilled for the best results! Beat the ingredients together until you achieve beautiful, stiff peaks. This is your fluffy cloud for Santa’s hat! Carefully transfer this delightful creation into a piping bag fitted with your favorite star or round tip.
- Assemble Your Santa Hats: The moment of truth! Once your mini cheesecakes are perfectly chilled and firm, pipe a generous, lovely swirl of whipped cream on top of each one. Gently place a hulled strawberry, pointed side up, onto the whipped cream – this is the main part of Santa’s hat. For that absolutely iconic Santa hat look, add a small, charming dot of whipped cream right on the very tip of each strawberry. Voila! You’ve created edible holiday magic!
Creative Ways to Present and Serve Your Santa Hat Cheesecake Bites
These Santa Hat Cheesecake Bites are already showstoppers on their own, but with a little extra flair, you can elevate their presentation from delightful to truly unforgettable!
- Tiered Dessert Wonderland: Arrange your bites on a multi-tiered cake stand or a decorative dessert tower. This creates a stunning focal point for any holiday buffet and makes them easy for guests to grab.
- Individual Festive Favors: Place each Santa Hat Cheesecake Bite in a small, clear cupcake box or a festive cellophane bag tied with a ribbon. They make charming take-home gifts or individual party favors.
- “Snowy” Serving Platter: Dust your serving platter lightly with extra powdered sugar to create a whimsical “snowy” effect before arranging the cheesecake bites. You can even add a few sprigs of fresh mint or rosemary for a touch of greenery.
- Hot Cocoa Companion: Serve these bites alongside mugs of steaming hot cocoa or a festive holiday punch. The cool, creamy cheesecake pairs wonderfully with warm drinks.
- Dessert Board Delight: Integrate them into a larger holiday dessert charcuterie board alongside other treats like gingerbread cookies, chocolate-dipped pretzels, and candied nuts for an abundant display.
Serve them chilled for the best experience, letting the creamy texture and fresh fruit flavors truly shine.
Storage and Shelf Life
To keep your delightful Santa Hat Cheesecake Bites fresh and delicious, proper storage is key!
- Refrigeration: The assembled cheesecake bites (with strawberries and whipped cream) should be stored in an airtight container in the refrigerator. They will last beautifully for 2-3 days. The whipped cream might lose a little of its stiffness over time, but the flavors will remain fantastic.
- Unassembled Storage: If you want to make them further in advance, you can store the baked and completely cooled cheesecake bases (without the toppings) in an airtight container in the refrigerator for up to 4-5 days. Whip and pipe the cream and add the strawberries just before serving for the freshest look.
- Freezing (Cheesecake Bases Only): You can actually freeze the baked cheesecake bases! Once completely cooled, wrap each individual cheesecake base tightly in plastic wrap, then place them in an airtight freezer-safe container or bag. They can be frozen for up to 1 month. Thaw them overnight in the refrigerator before adding the whipped cream and strawberries. We don’t recommend freezing them once assembled with the fresh strawberries and whipped cream, as the texture of both can be compromised upon thawing.
FAQs About Santa Hat Cheesecake Bites
- Can I use store-bought graham cracker crusts?
Absolutely! While homemade is easy, you can definitely use mini pre-made graham cracker crusts to save time. Just ensure they fit your pan size. - What kind of cream cheese is best?
Full-fat cream cheese is crucial for that classic, rich cheesecake texture and flavor. Low-fat varieties might result in a less creamy, more watery filling. - Can I make these gluten-free?
Yes! Simply substitute gluten-free graham crackers for the crust and ensure your other ingredients are certified gluten-free. - My cheesecake tops cracked! What went wrong?
Cracks usually occur from overmixing the batter (incorporating too much air) or drastic temperature changes during baking/cooling. Ensure all ingredients are room temperature and avoid opening the oven door too often. - Can I use frozen strawberries?
For the topping, fresh strawberries are highly recommended. Frozen strawberries tend to release too much moisture when thawed, making them unsuitable for decorating. - What if I don’t have a piping bag?
No problem! You can use a resealable plastic bag. Just snip a small corner off one end to create a makeshift piping bag. - Can I substitute the sour cream?
Full-fat plain Greek yogurt can be used as a substitute for sour cream, offering a similar tang and creaminess to the filling. - How far in advance can I assemble them?
For the freshest appearance, assemble the Santa Hat Cheesecake Bites with the whipped cream and strawberries no more than 2-3 hours before serving. The cheesecake bases can be made 1-2 days ahead. - Are there any alternative toppings for the “hat”?
While strawberries are iconic, you could experiment with raspberries or even a maraschino cherry for a different red fruit option, though the “hat” shape might vary slightly. - Why is chilling so important?
Chilling allows the cheesecake to fully set and firm up, preventing it from crumbling. It also deepens the flavors and ensures a perfect, creamy texture when served. Don’t skip this step!
Santa Hat Cheesecake Bites
Equipment
- Mini cheesecake pan
- Mini Muffin Tin
- Paper Liners
- Small Bowl
- Piping bag
- Star or round tip
- Large mixing bowl
- Wire Rack
- Chilled bowl
Ingredients
FOR THE CRUST
- 1 cup graham cracker crumbs about 8 full sheets
- 2 tablespoons granulated sugar
- 4 tablespoons unsalted butter melted
FOR THE CHEESECAKE FILLING
- 2 blocks full-fat cream cheese 8 oz each, softened at room temperature
- 1/2 cup granulated sugar
- 1 teaspoon vanilla extract
- 2 large eggs at room temperature
- 1/4 cup sour cream
- 1 tablespoon all-purpose flour
- salt Pinch of
FOR TOPPING
- 12 fresh strawberries hulled
- 1 cup heavy whipping cream well-chilled
- 2 tablespoons powdered sugar
- 1/2 teaspoon vanilla extract
Instructions
- Get Ready: Preheat your oven to 325°F (163°C). Line a mini cheesecake pan or a mini muffin tin with paper liners, or lightly grease the cavities if you’re using a silicone mold.
- Make the Crust: In a small bowl, combine the graham cracker crumbs, granulated sugar, and melted butter. Stir until the mixture looks and feels like wet sand. Spoon about 1 tablespoon of this mixture into each prepared cavity and press it down firmly with the back of a spoon or a small glass. Bake for just 5 minutes, then take them out and let them cool slightly.
- Prepare the Creamy Filling: In a large mixing bowl, beat the softened cream cheese until it’s wonderfully smooth. Add the granulated sugar and mix until everything is fully combined. Gently beat in the eggs one at a time, making sure to scrape down the bowl as needed. Finally, mix in the vanilla extract, sour cream, flour, and a tiny pinch of salt until just incorporated. Remember, don’t overmix!
- Fill & Bake: Evenly divide the cheesecake filling among the crusts, filling each cavity almost to the top. Bake for 15–18 minutes, or until the centers look mostly set but still have a slight jiggle. Remove from the oven and let them cool in the pan for 10 minutes. Then, transfer them to a wire rack to cool completely before refrigerating for at least 2 hours, or even overnight, for best results.
- Whip the Cream: In a chilled bowl, beat the cold heavy whipping cream with powdered sugar and vanilla extract until beautiful, stiff peaks form. Transfer this delightful whipped cream to a piping bag fitted with your favorite star or round tip.
- Assemble Santa Hats: Once your mini cheesecakes are perfectly chilled, pipe a lovely swirl of whipped cream on top of each one. Carefully place a hulled strawberry, pointed side up, onto the whipped cream. For that perfect Santa hat look, add a small dot of whipped cream right on the very tip of each strawberry!
Notes
- Calories: 220
- Total Carbs: 19g
- Net Carbs: 17g
- Fats: 16g
- Protein: 4g