Are you ready to embark on a dessert journey that will redefine your idea of indulgence? Forget everything you thought you knew about cheesecake, because you’re about to discover The BEST Chocolate Cheesecake! This isn’t just a recipe; it’s an experience. Imagine a velvety smooth chocolate filling, nestled on a perfectly crunchy Oreo crust, all crowned with a glistening, silky ganache. It’s rich, it’s decadent, and it’s surprisingly achievable, even for home bakers. Get ready to impress your taste buds and everyone you share it with!
Why You’ll Love This Recipe
Wondering what makes this particular chocolate cheesecake stand out from the crowd? Here are four compelling reasons why this will quickly become your go-to recipe:
- Unforgettable Flavor & Texture: This isn’t just chocolate; it’s a symphony of semi-sweet and bittersweet, delivering a deep, complex flavor. The texture is pure magic – incredibly creamy, melting in your mouth, perfectly contrasted by the crunchy Oreo crust. It’s truly The BEST Chocolate Cheesecake! you’ll ever taste.
- Effortless Elegance: While it looks like a masterpiece, the steps are straightforward. The easy Oreo crust comes together in minutes, and the water bath baking method, while sounding fancy, is your secret weapon for a crack-free, perfectly baked cheesecake every time.
- Crowd-Pleasing Perfection: Whether it’s a birthday, a holiday, or just a Tuesday night craving, this cheesecake is guaranteed to be a showstopper. It feeds a crowd generously and satisfies even the most discerning chocolate lovers. Be prepared for recipe requests!
- Versatile & Customizable: With simple garnishes like fresh berries or chocolate shavings, you can transform this dessert for any occasion. Plus, knowing how to make The BEST Chocolate Cheesecake! opens the door to experimenting with different toppings and flavor pairings.
Ingredients with Measurements
Gather your ingredients and get ready to create something truly spectacular. Precision is key for The BEST Chocolate Cheesecake!
For the Easy Oreo Crust:
- 18 Oreo cookies, finely crushed
- 4 tablespoons salted butter, melted
For the Rich Chocolate Cheesecake:
- 8 ounces semi-sweet chocolate, melted and slightly cooled
- 32 ounces (4 blocks) cream cheese, softened to room temperature
- 1 cup granulated sugar
- ¼ cup sour cream
- 2 tablespoons all-purpose flour (helps prevent cracks!)
- 1 teaspoon vanilla extract
- 4 large eggs, at room temperature
For the Silky Ganache Topping:
- 8 ounces bittersweet chocolate, finely chopped
- 1 cup heavy whipping cream
Optional Garnishes (for a fresh touch!):
- Fresh strawberries or raspberries
- Chocolate shavings
Detailed Step-by-Step Directions
Ready to bake The BEST Chocolate Cheesecake! Follow these steps carefully for a perfect result that will have everyone asking for more.
1. Prepare Your Pan and Oven:
Preheat your oven to 325°F (160°C). Grab a 9-inch springform pan and wrap it tightly with two layers of heavy-duty aluminum foil – think of it as a waterproof jacket for your cheesecake! Lightly spray the inside with nonstick cooking spray. For the water bath, place a folded kitchen towel in the bottom of a large roasting pan (ensure your springform pan fits inside with some space). Set this aside for now.
2. Make the Simple Oreo Crust:
Toss your Oreo cookies into a food processor and pulse until they become fine, uniform crumbs. Drizzle in the melted butter and pulse again until everything is well combined and feels like wet sand. Press this mixture firmly and evenly into the bottom of your prepared springform pan, extending about 1 inch up the sides. A flat-bottomed glass works wonders for pressing down firmly! Bake this crust for just 10 minutes, then take it out and let it cool completely while you get the filling ready.
3. Mix the Creamy Chocolate Filling:
Gently melt the semi-sweet chocolate in a microwave-safe bowl. Heat it in 30-second bursts at 50% power, stirring after each, until smooth. Let it cool a bit – you don’t want it hot when it meets the cream cheese. In a large mixing bowl (or using a stand mixer with the paddle attachment), beat the softened cream cheese and granulated sugar on low speed until it’s wonderfully smooth and thoroughly blended. Remember, low speed is your friend; overmixing incorporates too much air. Now, add the sour cream, all-purpose flour, and vanilla extract, mixing on low speed until they are just combined. Slowly fold in your cooled melted chocolate. Finally, add the eggs one at a time, mixing only until each egg is just blended into the batter. Pour this dreamy chocolate mixture over your cooled Oreo crust. Give the pan a few gentle taps on the counter to release any hidden air bubbles.
4. Bake and Chill for Perfection:
Carefully place your foil-wrapped springform pan (with the cheesecake) onto the folded towel in the roasting pan inside the oven. Now, carefully pour hot water into the roasting pan, around the cheesecake, aiming for about 1 to 2 inches of water depth (be extra careful to avoid splashing water into the cheesecake itself!). Bake for 60 to 70 minutes. You’ll know it’s done when the edges are set but the center still has a slight, gentle wobble (it should read 150°F/65°C with a thermometer). Turn off the oven, crack the door slightly, and let the cheesecake cool slowly in the oven for 1 hour. This gentle, slow cool-down is crucial for preventing cracks. Take it out, run a thin knife around the rim of the pan to loosen, and let it cool completely at room temperature on a wire rack for another hour. Once fully cooled, wrap it well in plastic wrap and chill it in the refrigerator for at least 4 hours, or even better, overnight. This makes it super firm, incredibly delicious, and truly The BEST Chocolate Cheesecake!
5. Add the Silky Ganache Topping:
Place the finely chopped bittersweet chocolate in a heat-proof bowl. Heat the heavy whipping cream in a small saucepan or microwave until it just starts to simmer (don’t let it boil). Pour the hot cream over the chopped chocolate and let it sit undisturbed for 5 minutes. Stir gently from the center outwards until the ganache is beautifully smooth and glossy. Let it cool for about 20 minutes – it should be pourable but not hot. Take your chilled cheesecake out of the fridge and carefully remove the springform pan rim. Pour the cooled ganache over the top, spreading it gently if needed to cover the surface. For a touch of freshness and color, garnish with fresh strawberries, raspberries, or chocolate shavings. Pop it back in the fridge for 20-30 minutes to let the ganache set. Slice, serve, and enjoy your amazing creation! You just made The BEST Chocolate Cheesecake!
Different Ways to Present and Serve Your Cheesecake
You’ve baked The BEST Chocolate Cheesecake! Now, let’s talk about making it look as spectacular as it tastes. Presentation can elevate the experience from delicious to unforgettable!
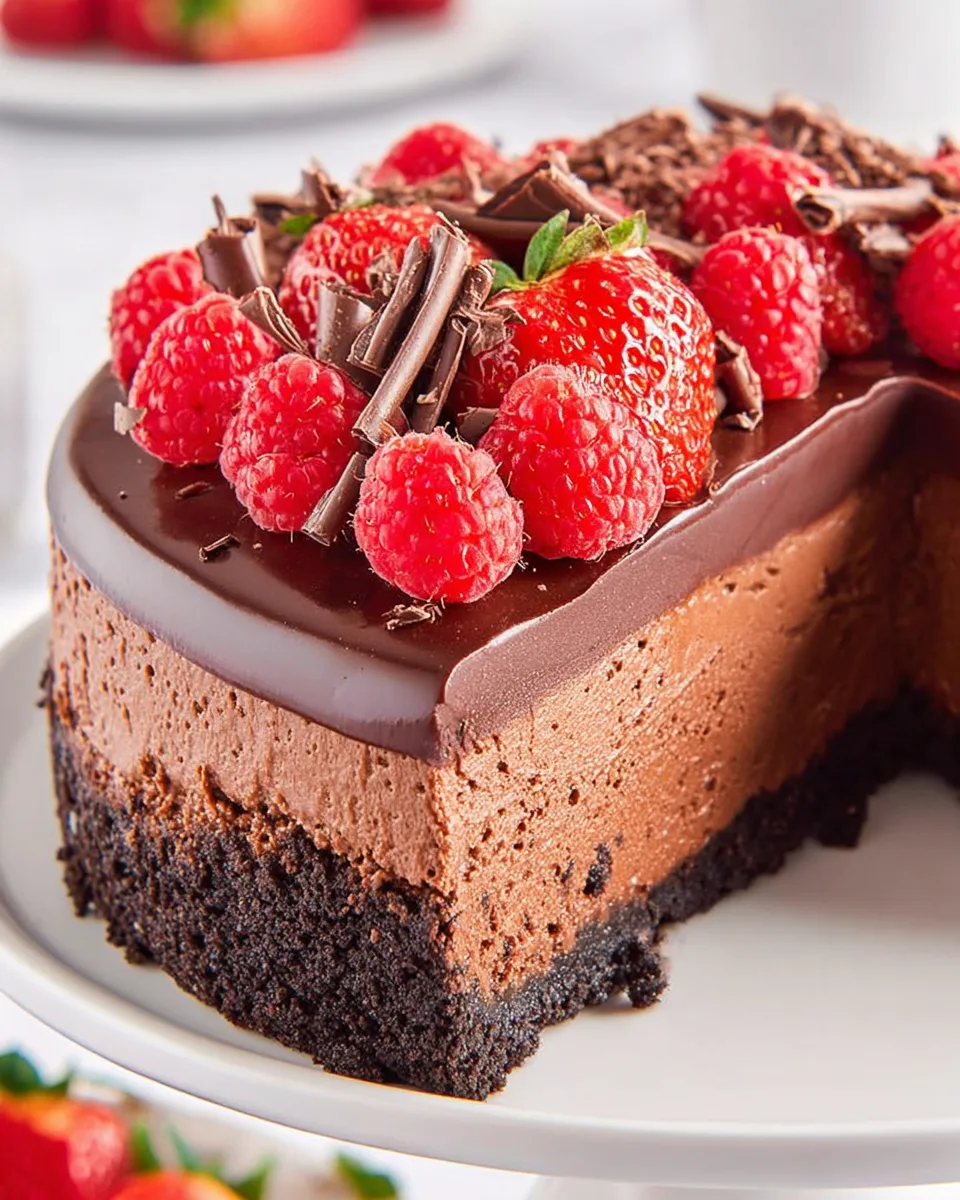
- Classic & Elegant: The recommended garnish of fresh strawberries, raspberries, or delicate chocolate shavings creates an instant classic. The vibrant red of berries beautifully contrasts with the dark chocolate, adding a pop of color and a fresh tang.
- Sauce It Up: Drizzle your slices with a homemade raspberry coulis, a warm caramel sauce, or even a hint of mint syrup for an extra layer of flavor and visual appeal.
- Textural Play: Consider sprinkling toasted chopped nuts (like pecans or almonds) around the base or on top of the ganache for added crunch. A sprinkle of sea salt flakes on the ganache can also enhance the chocolate flavor.
- Holiday Flair: For festive occasions, adapt your garnishes. Think candy canes and white chocolate curls for winter holidays, or edible flowers for spring celebrations.
- Miniature Marvels: For individual servings, you can bake this recipe in smaller springform pans or even muffin tins lined with paper cups (adjust baking time accordingly). These mini cheesecakes are adorable and perfect for parties.
- Dessert Platter Star: Serve a slice alongside a scoop of vanilla bean ice cream or a dollop of freshly whipped cream for the ultimate dessert platter.
However you choose to present it, this cheesecake is guaranteed to be a showstopper!
How to Store It and How Long Does It Last
Congratulations, you’ve mastered The BEST Chocolate Cheesecake! Now, how do you ensure its deliciousness lasts?
- Refrigeration is Key: Always store your chocolate cheesecake in the refrigerator. Due to its dairy content (cream cheese, sour cream, eggs), it’s important to keep it chilled to maintain freshness and food safety.
- Wrap It Tight: For optimal freshness and to prevent it from absorbing other odors in your fridge, wrap the cheesecake (or individual slices) tightly with plastic wrap. You can also place it in an airtight container.
- How Long It Lasts: When stored properly in the refrigerator, your chocolate cheesecake will stay fresh and delicious for 5-7 days. The texture and flavor are usually best within the first 3-4 days.
- Freezing for Later: Yes, you can freeze cheesecake! For best results, freeze the cheesecake without the ganache topping. Wrap the cooled, unsliced cheesecake (still on the springform base, if possible) tightly in several layers of plastic wrap, then a layer of aluminum foil. It can be frozen for up to 1-2 months. Thaw it slowly in the refrigerator overnight before adding the ganache and serving. If freezing slices, wrap each slice individually before placing them in an airtight container.
Enjoy every last bite of your amazing creation!
FAQs Section
Got questions about making The BEST Chocolate Cheesecake!? We’ve got answers!
- Why do I need a water bath for cheesecake? A water bath creates a moist, even heat environment in your oven, which helps the cheesecake bake slowly and gently. This prevents the cheesecake from cooking too quickly, cracking, or developing a lumpy texture.
- How do I prevent cracks in my cheesecake? The water bath, using room temperature ingredients, not overmixing the batter, and slowly cooling the cheesecake in the oven are all crucial steps to prevent cracks. Don’t worry if a tiny crack appears; the ganache will cover it beautifully!
- Can I use a different type of crust? Absolutely! While the Oreo crust is fantastic, you could use a graham cracker crust, a shortbread crust, or even a gluten-free cookie crust as an alternative.
- What if my ganache looks oily or separated? This sometimes happens if the cream is too hot or the chocolate isn’t stirred properly. Try adding a tablespoon of cool heavy cream and stirring vigorously until it comes back together. If it’s too thick, gently warm it slightly.
- Can I make this cheesecake ahead of time? Yes, and it’s highly recommended! Cheesecakes benefit greatly from chilling, which allows the flavors to meld and the texture to firm up. Making it a day in advance is ideal.
- My cheesecake center is still wobbly after 70 minutes. Is it done? A slight wobble in the center (about 1-2 inches in diameter) is perfectly normal and desired. The cheesecake will continue to set as it cools. If the entire cheesecake jiggles like liquid, it needs more time. The internal temperature should be around 150°F (65°C).
- Can I use milk chocolate instead of semi-sweet and bittersweet? You can, but it will result in a much sweeter and less intense chocolate flavor. For The BEST Chocolate Cheesecake! experience, we recommend sticking to the specified chocolates for depth.
- I don’t have a springform pan. What can I use? While a springform pan is ideal for easy removal, you could use a regular 9-inch round cake pan. Line the bottom and sides with parchment paper, leaving an overhang to lift the cheesecake out. Be extra careful when doing the water bath!
- How do I get clean slices? For the neatest slices, use a long, thin knife that has been run under hot water and wiped clean between each cut. This prevents the ganache and cheesecake from sticking.
- My cream cheese isn’t soft enough. Can I still use it? It’s best to wait until your cream cheese is truly at room temperature. Cold cream cheese will result in a lumpy batter and a less smooth, potentially overmixed cheesecake. Speed up softening by cutting it into cubes.
The BEST Chocolate Cheesecake!
Equipment
- 9-inch Springform Pan
- Heavy-duty aluminum foil
- Food Processor
- Large roasting pan
- Kitchen towel
- Large mixing bowl
- Stand Mixer (optional)
- Microwave-safe Bowl
- Small Saucepan
- Wire Rack
- Knife
Ingredients
For the Easy Oreo Crust
- 18 Oreo cookies finely crushed
- 4 tablespoons salted butter melted
For the Rich Chocolate Cheesecake
- 8 ounces semi-sweet chocolate melted and slightly cooled
- 32 ounces cream cheese (4 blocks), softened to room temperature
- 1 cup granulated sugar
- 1/4 cup sour cream
- 2 tablespoons all-purpose flour (helps prevent cracks!)
- 1 teaspoon vanilla extract
- 4 large eggs at room temperature
For the Silky Ganache Topping
- 8 ounces bittersweet chocolate finely chopped
- 1 cup heavy whipping cream
Optional Garnishes (for a fresh touch!)
- Fresh strawberries or raspberries
- Chocolate shavings
Instructions
1. Prepare Your Pan and Oven:
Preheat your oven to 325°F (160°C). Grab a 9-inch springform pan and wrap it tightly with two layers of heavy-duty aluminum foil to keep any water out. Lightly spray the inside with nonstick cooking spray. For the water bath, place a folded kitchen towel in the bottom of a large roasting pan (make sure your springform pan fits inside with some space). Set this aside for now.2. Make the Simple Oreo Crust:
Toss your Oreo cookies into a food processor and pulse until they become fine crumbs. Drizzle in the melted butter and pulse again until everything is well combined. Press this mixture firmly and evenly into the bottom of your prepared springform pan, extending about 1 inch up the sides. A flat-bottomed glass works great for pressing! Bake this crust for just 10 minutes, then take it out and let it cool completely while you get the filling ready.3. Mix the Creamy Chocolate Filling:
Gently melt the semi-sweet chocolate in a microwave-safe bowl. Heat it in 30-second bursts at 50% power, stirring after each, until smooth. Let it cool a bit. In a large mixing bowl (or using a stand mixer), beat the softened cream cheese and granulated sugar on low speed until it’s wonderfully smooth and thoroughly blended. Be careful not to overmix! Now, add the sour cream, all-purpose flour, and vanilla extract, mixing on low speed until they are just combined. Slowly fold in your cooled melted chocolate. Finally, add the eggs one at a time, mixing only until each egg is just blended into the batter. Pour this dreamy chocolate mixture over your cooled Oreo crust. Give the pan a few gentle taps on the counter to release any hidden air bubbles.4. Bake and Chill for Perfection:
Carefully place your springform pan (with the cheesecake) onto the folded towel in the roasting pan inside the oven. Now, carefully pour hot water into the roasting pan, around the cheesecake, aiming for about 1 to 2 inches of water depth (avoid splashing water into the cheesecake itself!). Bake for 60 to 70 minutes. You’ll know it’s done when the edges are set but the center still has a slight, gentle wobble (it should read 150°F/65°C with a thermometer). Turn off the oven, crack the door slightly, and let the cheesecake cool slowly in the oven for 1 hour. This slow cool-down helps prevent cracks. Take it out, run a knife around the rim of the pan to loosen, and let it cool completely at room temperature on a wire rack for another hour. Once fully cooled, wrap it well in plastic wrap and chill it in the refrigerator for at least 4 hours, or even better, overnight. This makes it super firm and delicious!5. Add the Silky Ganache Topping:
Place the finely chopped bittersweet chocolate in a heat-proof bowl. Heat the heavy whipping cream in a small saucepan or microwave until it just starts to simmer (don’t let it boil). Pour the hot cream over the chopped chocolate and let it sit undisturbed for 5 minutes. Stir gently until the ganache is beautifully smooth and glossy. Let it cool for about 20 minutes. Take your chilled cheesecake out of the fridge and carefully remove the springform pan rim. Pour the cooled ganache over the top, spreading it gently if needed. For a touch of freshness and color, garnish with fresh strawberries, raspberries, or chocolate shavings. Pop it back in the fridge for 20-30 minutes to let the ganache set. Slice, serve, and enjoy your amazing creation!
Notes
- Calories: 576
- Total Carbs: 41g
- Net Carbs: 38g
- Fats: 43g
- Protein: 8g