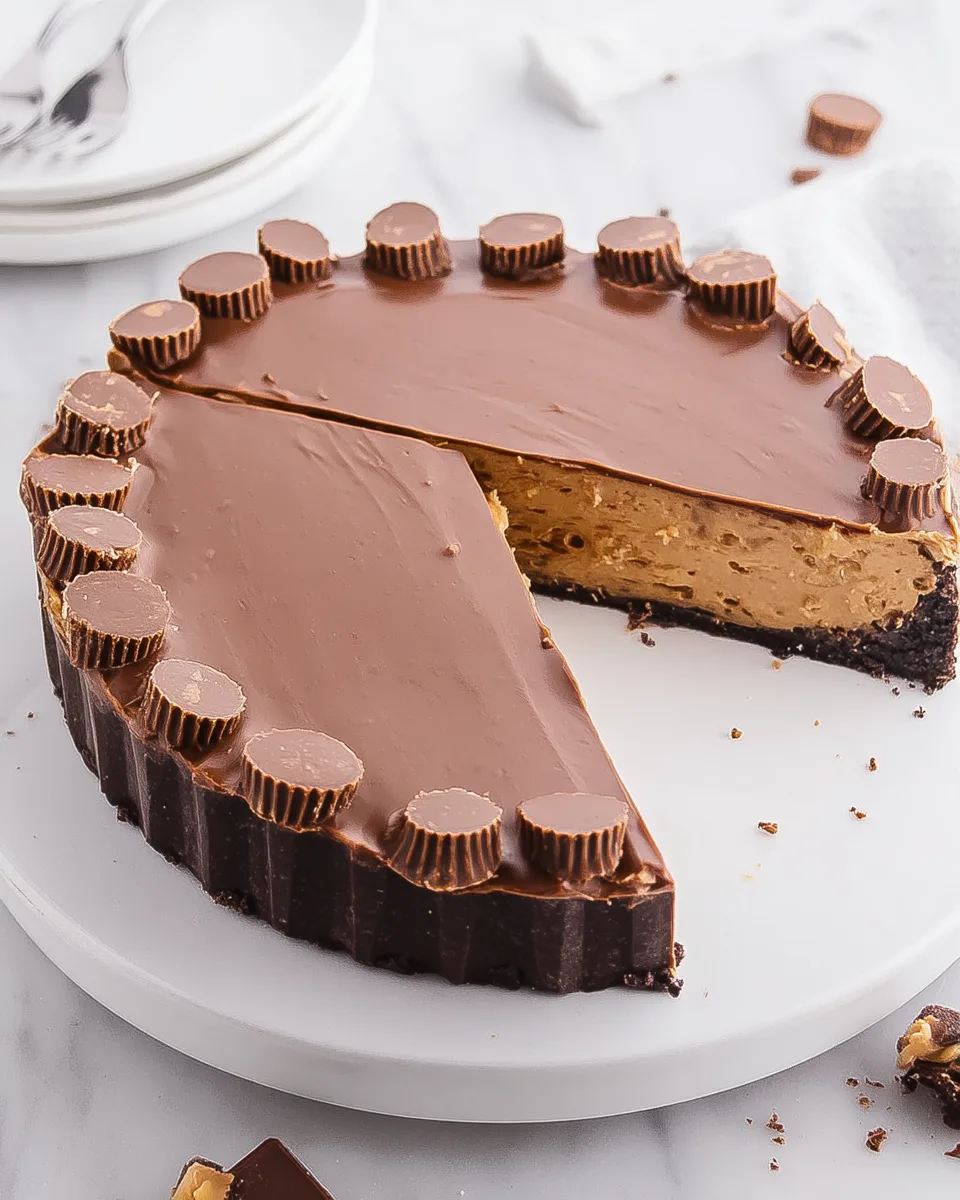
Unleash Your Inner Chocoholic: The Easiest Reese’s Peanut Butter Cup Pie Ever!
Ever dreamt of a giant Reese’s Peanut Butter Cup Pie, but in a ridiculously easy, no-bake form? Your wildest, most delicious dreams are about to become a reality! Get ready to dive headfirst into the glorious world of our Homemade Reese’s Peanut Butter Cup Pie. Forget the oven, forget the fuss – this isn’t just a dessert; it’s a creamy, dreamy, chocolate-peanut butter masterpiece that’s shockingly simple to whip up and outrageously good to eat. Perfect for any gathering, or just when that serious craving hits, this pie delivers all the iconic flavor you adore, supersized and ready to impress. Let’s make some magic!
Why You’ll Love This Reese’s Peanut Butter Cup Pie Recipe
- No Bake, All Flavor: Say goodbye to hot ovens! This Reese’s Peanut Butter Cup Pie comes together without ever touching a conventional oven, making it perfect for summer days or when you want a fuss-free dessert.
- Iconic Flavor Perfection: Every bite delivers that unmistakable, beloved combination of rich milk chocolate and salty-sweet peanut butter. It’s exactly like your favorite candy, but in a luxurious pie form!
- Impressive, Yet Effortless: Despite its gourmet appearance and decadent taste, this pie is incredibly simple to assemble. You’ll look like a culinary wizard with minimal effort – perfect for impressing guests or just treating yourself!
- A Guaranteed Crowd-Pleaser: From kids to adults, everyone adores the classic pairing of chocolate and peanut butter. This Reese’s Peanut Butter Cup Pie is a guaranteed hit at parties, potlucks, or family dinners.
Reese’s Peanut Butter Cup Pie Ingredients
- 🍫 2½ cups milk chocolate chips
- 🌻 1½ tablespoons vegetable oil
- 🍚 1⅓ cup powdered sugar
- 🍪 1 cup graham cracker crumbs
- 🥜 1¼ cup crunchy peanut butter
- 🧈 ½ cup salted butter
Detailed Directions: How to Make Your Reese’s Peanut Butter Cup Pie
- Pan Prep Perfection: Begin by lightly greasing a 9-inch tart pan. If you have one with a removable bottom, even better for serving! Line the very bottom with a perfectly cut circle of parchment paper. This helps with easy release.
- Melt the Chocolate Magic: In a microwave-safe bowl, combine your luscious milk chocolate chips with the vegetable oil. Microwave for 45-55 seconds. Stir well until the chocolate is gloriously melted and completely smooth. The oil helps keep it silky!
- Build the Chocolate Shell: Pour exactly half of that melted chocolate goodness into your prepared tart pan. Use a spoon or spatula to carefully spread it evenly over the bottom and up the sides, creating a beautiful chocolate shell. Pop this into the fridge to chill and firm up while you get started on the irresistible filling.
- Mix Your Dry Dream Team: In a large mixing bowl, whisk together the powdered sugar and graham cracker crumbs. This forms the delightful base for your peanut butter filling. Set it aside for a moment.
- Melt the Wet Wonders: Grab another microwave-safe bowl and combine the star players: crunchy peanut butter and salted butter. Microwave for about 45 seconds, then stir until the mixture is beautifully smooth and thoroughly combined.
- Combine for Creamy Bliss: Pour the warm peanut butter mixture directly over your dry ingredients (powdered sugar and graham cracker crumbs). Stir vigorously until everything is fully incorporated and the mixture starts to come together, forming a thick, luscious peanut butter dough.
- Assemble Your Masterpiece: Retrieve your chilled chocolate shell from the fridge. Evenly press the peanut butter mixture into the chocolate shell, ensuring it fills the base. If your remaining melted chocolate has thickened, give it a quick zap in the microwave for 15-20 seconds until it’s smooth again. Spread this final chocolate layer over the peanut butter, smoothing it right to the edges. Gently tap the pan on the counter a couple of times to ensure a perfectly level top.
- Chill to Perfection: The hardest part – waiting! Refrigerate your magnificent Reese’s Peanut Butter Cup Pie for at least 4 hours, or for truly optimal firmness and flavor, let it chill overnight.
- Serve & Savor: When it’s showtime, remove the pie from the fridge and let it sit at room temperature for about 20 minutes. This makes slicing a breeze. Carefully remove it from the tart pan (those removable bottoms are a lifesaver!), place it on a serving platter, slice with a warm, sharp knife, and prepare for a standing ovation!
Prep Time & Nutrition
Prep Time: 30 minutes
Cook Time: 0 minutes
Total Time: 4 hours 30 minutes (mostly chilling!)
Servings: 8
Calories: 747 kcal
Total Carbs: 76g
Net Carbs: 71g
Fats: 46g
Protein: 13g
Serving and Presenting Your Reese’s Peanut Butter Cup Pie
The beauty of this Reese’s Peanut Butter Cup Pie is that it’s stunning all on its own, but a few simple touches can elevate it even further! Here are some fun ways to serve and present your masterpiece:
- Classic & Chic: For a clean, elegant look, simply slice with a warm knife (run your knife under hot water and wipe dry between slices for the cleanest cuts) and serve on individual dessert plates. The distinct layers are beautiful enough!
- Whipped Cream Wonderland: A dollop of freshly whipped cream on top of each slice is always a hit. You can even pipe it on for a professional flourish.
- Extra Chocolate Drizzle: Melt a tablespoon or two of extra chocolate chips with a tiny bit of coconut oil and drizzle it decoratively over the top of the pie before slicing, or over individual slices.
- Peanut Butter Swirl: For a double dose of peanut butter, warm a small amount of extra peanut butter until drippy and swirl it over the top chocolate layer.
- Crumbled Candy Topping: Get truly meta by crushing a few actual Reese’s Peanut Butter Cups and sprinkling them generously over the top of the pie just before serving.
- Sprinkle Fun: A scattering of chocolate sprinkles or even seasonal sprinkles can add a festive touch!
- Ice Cream Sidekick: Serve a slice with a scoop of vanilla bean or even coffee ice cream for an indulgent treat.
How to Store Your Reese’s Peanut Butter Cup Pie
This Reese’s Peanut Butter Cup Pie is best enjoyed chilled, and thankfully, it stores wonderfully! Here’s how to keep it fresh and delicious:
- Refrigeration is Key: Always store your pie in the refrigerator. Due to the butter and peanut butter content, it needs to be kept cold to maintain its firm texture.
- Airtight is Best: To prevent it from absorbing any fridge odors and to keep it from drying out, place the pie in an airtight container. If you don’t have a pie-specific container, cover it tightly with plastic wrap or aluminum foil.
- How Long Does It Last? When stored correctly in the refrigerator, your Reese’s Peanut Butter Cup Pie will stay fresh and delicious for 3 to 5 days.
- Freezing for Later: For longer storage, you can freeze individual slices or the whole pie (well-wrapped in plastic wrap then foil) for up to 1 month. Thaw in the refrigerator overnight before serving.
FAQs About Your Reese’s Peanut Butter Cup Pie
1. Can I use smooth peanut butter instead of crunchy?
Absolutely! If you prefer a smoother texture, smooth peanut butter works perfectly. Crunchy just adds a little extra textural interest to this Reese’s Peanut Butter Cup Pie.
2. Do I have to use a tart pan?
A 9-inch tart pan with a removable bottom is ideal for easy slicing and presentation, but you can also use a regular 9-inch pie plate. Just note that removing the pie for serving might be trickier.
3. Can I make this pie ahead of time?
Yes, this pie is perfect for making ahead! In fact, chilling it overnight often results in the best texture. Just keep it covered in the refrigerator until serving.
4. Is this recipe gluten-free?
As written, no, because of the graham cracker crumbs. However, you can make it gluten-free by using gluten-free graham cracker crumbs or a gluten-free cookie crumb alternative.
5. Why does the recipe call for vegetable oil with the chocolate?
The vegetable oil helps to thin the melted chocolate slightly, making it smoother and easier to spread evenly for your chocolate shell and top layer. It also gives the chocolate a lovely sheen.
6. Can I use dark chocolate chips?
Certainly! If you prefer a less sweet, more intense chocolate flavor, dark chocolate chips would be a fantastic substitute for the milk chocolate in this Reese’s Peanut Butter Cup Pie.
7. How long does the pie need to chill?
The pie needs a minimum of 4 hours to firm up properly, but for the best results and easiest slicing, we recommend chilling it overnight.
8. Can I freeze this pie?
Yes! This pie freezes well. Wrap individual slices or the whole pie tightly in plastic wrap, then a layer of aluminum foil. It can be frozen for up to one month. Thaw in the refrigerator overnight before serving.
9. What if my chocolate hardens while I’m assembling?
Don’t worry! If your remaining melted chocolate thickens or hardens before you can spread the top layer, simply microwave it again for 15-20 seconds, stirring until smooth.
10. What are some good topping ideas for this pie?
Beyond the pie itself, consider adding a dollop of whipped cream, a drizzle of extra melted chocolate or peanut butter, or even a sprinkle of chopped Reese’s Peanut Butter Cups for ultimate indulgence!
Reese's Peanut Butter Cup Pie 🥧
Equipment
- 9-inch tart pan (with removable bottom)
- Microwave-safe Bowl
- Spoon
- Spatula
- Large Bowl
Ingredients
- 2.5 cups milk chocolate chips
- 1.5 tablespoons vegetable oil
- 1.33 cup powdered sugar
- 1 cup graham cracker crumbs
- 1.25 cup crunchy peanut butter
- 0.5 cup salted butter
Instructions
- Prepare Your Pan: Lightly grease a 9-inch tart pan (preferably one with a removable bottom) and line the bottom with a circle of parchment paper.
- Melt Chocolate for Shell: In a microwave-safe bowl, combine the chocolate chips and vegetable oil. Microwave for 45-55 seconds, then stir until the chocolate is completely melted and smooth.
- Create the Chocolate Shell: Pour half of the melted chocolate into your prepared tart pan. Use a spoon or spatula to spread it evenly over the bottom and up the sides. Place the pan in the fridge to chill while you make the filling.
- Mix Dry Filling Ingredients: In a large bowl, whisk together the powdered sugar and graham cracker crumbs. Set aside.
- Melt Wet Filling Ingredients: In another microwave-safe bowl, combine the crunchy peanut butter and salted butter. Microwave for 45 seconds, then stir until smooth and well combined.
- Combine Filling: Pour the warm peanut butter mixture over the dry ingredients (powdered sugar and graham cracker crumbs). Stir well until the mixture is fully incorporated and starts to come together.
- Assemble the Pie: Take your chilled chocolate shell from the fridge. Evenly press the peanut butter mixture into the chocolate shell. If your remaining chocolate has thickened, briefly microwave it for 15-20 seconds until smooth again. Spread this chocolate over the peanut butter layer, smoothing it to the edges. Gently tap the pan on the counter to ensure the top layer is level.
- Chill to Set: Refrigerate the pie for at least 4 hours, or ideally overnight, until it's firm and perfectly set.
- Serve and Enjoy: When ready to serve, remove the pie from the fridge and let it sit at room temperature for about 20 minutes. This makes it easier to slice cleanly. Carefully remove it from the tart pan, place it on a serving platter, slice with a warm, sharp knife, and dig in!
Notes
Calories: 747 kcal
Total Carbs: 76g
Net Carbs: 71g
Fats: 46g
Protein: 13g This delightful no-bake pie is a perfect treat for peanut butter and chocolate lovers!