Ever find yourself in a delicious dilemma? You’re craving something sweet, something chocolatey, but also something that actually fuels your body? And, let’s be honest, you don’t have hours to spend in the kitchen. What if we told you there’s a magical solution that combines all these desires into one incredible, no-bake treat? Get ready to meet your new obsession: these **Easy Chocolate Protein Bars**!
Forget the expensive, store-bought versions filled with mysterious ingredients. We’re talking about homemade goodness that’s packed with flavor, protein, and all the satisfying textures you could ask for. Best of all? No oven required! Just a few simple ingredients, a bowl, and a little chill time stand between you and a batch of the most delightful protein-packed snacks you’ll ever make. Perfect for busy mornings, post-workout fuel, or simply when that chocolate craving hits hard, these bars are a game-changer. Let’s dive into the fun!
Why You’ll Love This Recipe
There are countless reasons why these **Easy Chocolate Protein Bars** are about to become a staple in your kitchen, but here are four compelling ones that make them an absolute must-try:
-
Effortless & No-Bake Brilliance
Hate turning on the oven? Love quick fixes? This recipe is your dream come true! It requires zero baking, making it perfect for novice chefs, hot summer days, or anyone who values their time. Simply mix, press, chill, and voilà – you’re done!
-
Nutrient-Packed Goodness
These aren’t just delicious; they’re genuinely good for you! Loaded with protein from both the powder and peanut butter, satisfying fiber from oats, and healthy fats, these bars keep you full and energized without the sugar crash of typical sweets. It’s smart snacking at its finest.
-
Irresistible Sweet & Salty Flavor
Who can resist the classic combination of chocolate and peanut butter? Add in a hint of natural honey for sweetness and that critical sprinkle of flaky sea salt, and you’ve got a flavor profile that’s utterly addictive. It hits all the right notes for a truly satisfying treat.
-
Perfect for Meal Prep & On-the-Go
Whip up a batch of these **Easy Chocolate Protein Bars** on a Sunday, and you’ll have delicious, healthy snacks ready for the entire week! They’re individually portioned, making them ideal for grab-and-go breakfasts, post-gym fuel, or a quick pick-me-up during a busy day. Healthy eating has never been so convenient!
Ingredients with Measurements
Gather your simple ingredients, and let the magic begin!
- 1 cup creamy “no-stir” peanut butter
- 1/3 cup natural honey
- 1/3 cup rolled oats (old-fashioned oats)
- 2/3 cup chocolate protein powder
- 1 tablespoon unsweetened cocoa powder
- 2/3 cup semi-sweet chocolate chips
- Flaked sea salt, for topping (optional, but highly recommended!)
Detailed Step-by-Step Directions How to Make the Recipe
Get ready for the easiest recipe you’ve ever made. Follow these simple steps to create your batch of delicious **Easy Chocolate Protein Bars**:
- Mix Your Wholesome Base: Grab a large mixing bowl – the bigger, the better, to give you room to really get in there! Add your creamy peanut butter, the sticky natural honey, the wholesome rolled oats, your chosen chocolate protein powder, and the rich cocoa powder. Now, channel your inner baker and use a sturdy rubber spatula (or even your clean hands if you’re feeling adventurous!) to mix everything together. Keep going until all the ingredients are thoroughly combined and you have a thick, uniform “dough” that pulls away from the sides of the bowl. No dry spots allowed!
- Press & Prepare: Time to get this show on the road! Line an 8×8 inch baking dish with parchment paper or wax paper. Make sure there’s enough overhang on the sides – this is your secret weapon for lifting the entire slab out later with zero fuss. Spoon your glorious protein bar mixture into the prepared pan. Now, with the back of your spatula, or even better, your clean hands (a little pressure goes a long way!), press the mixture down firmly and evenly. You want a compact, smooth base that’s ready for its chocolatey crown.
- Melt & Top with Chocolate: Place your semi-sweet chocolate chips in a microwave-safe bowl. Heat them in 30-second intervals, stirring well after each, until they are beautifully smooth and glossy. Alternatively, you can use a double boiler on the stovetop. Once melted, carefully pour and spread this luscious melted chocolate layer evenly over the top of your pressed protein bar base. Work quickly but gently to cover every inch.
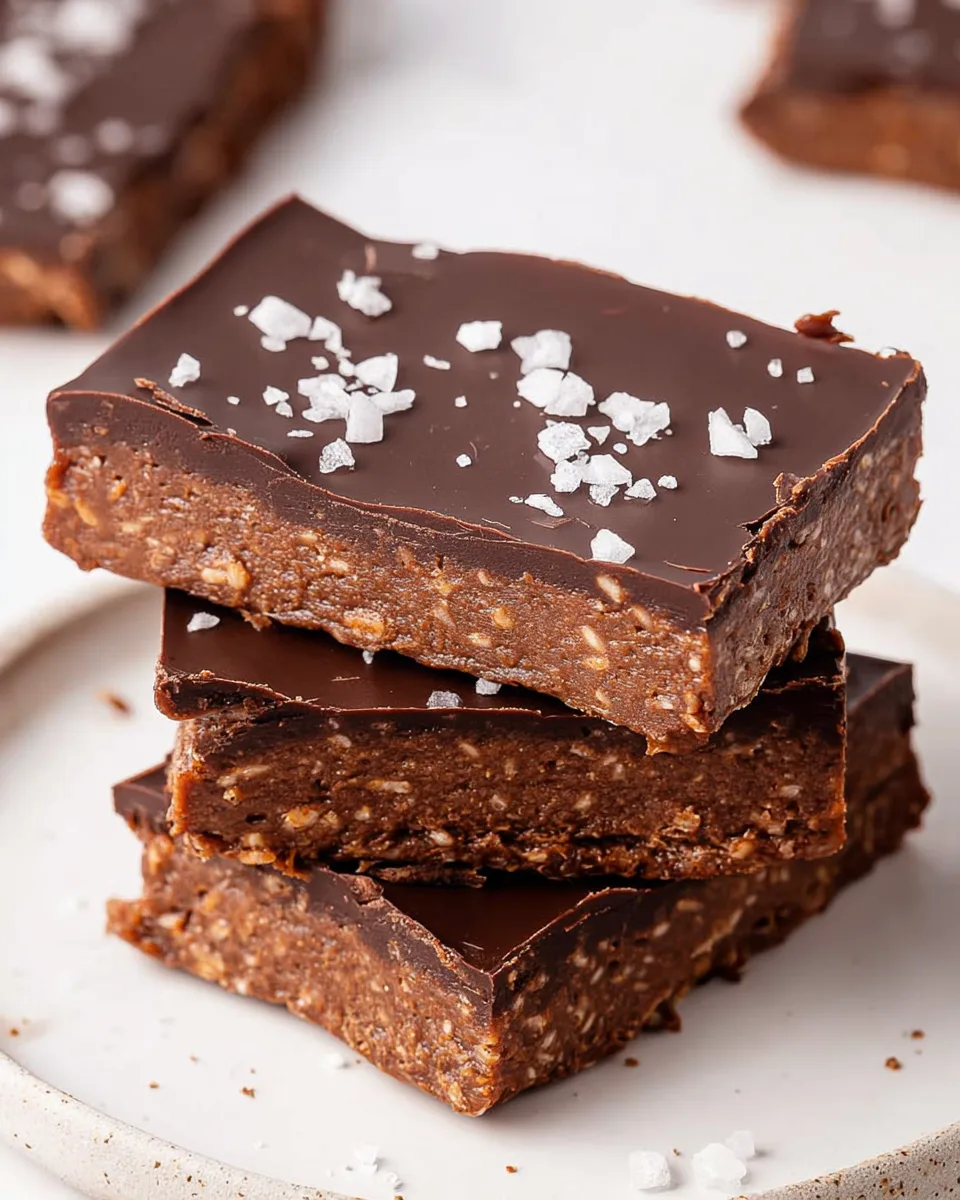
- Add a Salty Sparkle: This is where the magic happens! Immediately after spreading the chocolate, and before it has a chance to set, grab your flaked sea salt. Sprinkle it generously over the melted chocolate. Don’t be shy! This optional step is non-negotiable for true flavor enthusiasts; it adds an incredible sweet and salty contrast that truly elevates these bars from great to gourmet.
- Chill & Slice: Pop your pan into the refrigerator. Let it chill there for 1 to 2 hours, or until that chocolate topping is completely firm and set. Patience is a virtue here! Once thoroughly chilled, use the parchment paper overhang to lift the entire slab of **Easy Chocolate Protein Bars** out of the pan. Place it on a cutting board, grab a sharp knife, and slice into 12 perfect, energy-packed servings. Now, go ahead – take a bite and enjoy your masterpiece!
Detailed Different Ways You Can Present the Recipe and How to Serve It
While slicing these into classic bars is fantastic, there are so many fun ways to serve and present your homemade **Easy Chocolate Protein Bars**!
- Classic Grab-and-Go: The most straightforward way! Cut them into traditional rectangular bars, wrap individually in plastic wrap or parchment paper, and stash them in your bag for an instant energy boost whenever you need it.
- Mini Bites: For portion control or a lighter snack, cut the slab into smaller, bite-sized squares. These are perfect for kids’ lunchboxes or when you just want a little something sweet without committing to a full bar.
- Crumble Topping: Get creative! Crumble a bar over a bowl of Greek yogurt, oatmeal, or even a smoothie bowl for added texture, chocolatey flavor, and a protein punch.
- Fancy Dessert Plate: To elevate them for a casual dessert, warm a bar slightly in the microwave for 10-15 seconds (just enough to soften the chocolate). Serve with a dollop of whipped cream, a few fresh berries, or a drizzle of extra melted chocolate.
- Garnished Goodness: Before the chocolate sets, beyond the sea salt, consider sprinkling other toppings! Chopped nuts (almonds, peanuts, pecans), shredded coconut, or even a few dried cranberries can add extra flavor and visual appeal.
- Thoughtful Gift: Package a few bars in a pretty box or bag with a ribbon. They make a wonderful homemade gift for health-conscious friends, busy colleagues, or anyone who appreciates a delicious, handmade treat.
Serve them post-workout for muscle recovery, as a satisfying afternoon snack to beat the 3 PM slump, a quick and wholesome breakfast on a hectic morning, or even as a guilt-free dessert alternative. The versatility of these **Easy Chocolate Protein Bars** is truly endless!
How You Can Store It and How Long Does It Last
Proper storage is key to keeping your **Easy Chocolate Protein Bars** fresh, delicious, and ready to enjoy whenever a craving strikes!
Once your bars are sliced, store them in an airtight container. This is crucial for preventing them from drying out and absorbing any fridge odors. Place the container in the refrigerator, where your bars will happily last for up to a week. The cold temperature helps keep the chocolate topping firm and the base nicely set, maintaining their perfect texture.
For longer-lasting goodness, these protein bars are excellent for freezing! Simply wrap individual bars tightly in plastic wrap, then place them in a freezer-safe bag or container. They can be stored in the freezer for up to 2-3 months. When you’re ready to enjoy a frozen bar, simply take it out of the freezer and let it thaw at room temperature for about 15-30 minutes, or pop it in the fridge overnight. This makes them an ultimate meal prep hero, ensuring you always have a healthy snack at your fingertips!
FAQs
Got questions about these delightful **Easy Chocolate Protein Bars**? We’ve got answers!
- Can I use a different nut butter?
Yes! While creamy peanut butter provides a classic flavor, you can absolutely experiment with other “no-stir” creamy nut butters like almond butter or cashew butter. Just ensure they are smooth and not too oily for the best texture. - Can I use a different sweetener?
Honey adds a unique flavor and helps bind the bars. You can try maple syrup for a vegan alternative, but the texture might be slightly softer. Adjust to taste. - Is there a substitute for rolled oats?
Old-fashioned rolled oats provide the best texture. Quick oats can be used, but they might make the bars a bit chewier and less firm. Steel-cut oats are not recommended as they won’t soften sufficiently without cooking. - Can I make these vegan?
Yes! Substitute the honey with maple syrup or agave nectar, and ensure your chocolate protein powder and chocolate chips are dairy-free (most dark chocolate chips are). - What if my mixture is too dry/wet?
Protein powders can vary greatly in absorbency. If the mixture is too dry and crumbly, add a tiny bit more peanut butter or honey (1 teaspoon at a time) until it comes together. If it’s too wet and sticky, add a little more protein powder or oats until it reaches a thick dough-like consistency. - Can I skip the sea salt?
You can, but we highly recommend against it! The flaked sea salt adds a crucial sweet and salty contrast that truly elevates the flavor of these **Easy Chocolate Protein Bars**. - How do I store them if it’s hot?
Always store these bars in the refrigerator, especially in warm climates, to keep the chocolate topping firm and prevent the bars from becoming too soft. - Can I add other mix-ins to the base?
Absolutely! Once the base mixture is combined, feel free to fold in chopped nuts (like almonds or walnuts), seeds (chia, flax, hemp), or even a handful of dried fruit like cranberries or raisins for extra texture and flavor. - Are these suitable for pre/post-workout?
Yes, definitely! With a good balance of protein, carbs (from oats and honey), and healthy fats (from peanut butter), they make an excellent pre-workout fuel for sustained energy or a great post-workout snack for muscle recovery. - Can I halve or double the recipe?
Yes, this recipe is very adaptable! You can easily halve all the ingredients to make a smaller batch (6 bars) or double them to make a larger batch (24 bars) for extra meal prep or sharing.
Easy Chocolate Protein Bars
Equipment
- Large mixing bowl
- Rubber Spatula
- 8x8-inch baking dish
Ingredients
- 1 cup creamy "no-stir" peanut butter
- 1/3 cup natural honey
- 1/3 cup rolled oats old-fashioned oats
- 2/3 cup chocolate protein powder
- 1 tablespoon unsweetened cocoa powder
- 2/3 cup semi-sweet chocolate chips
- Flaked sea salt for topping (optional, but highly recommended!)
Instructions
- In a large mixing bowl, combine the creamy peanut butter, natural honey, wholesome rolled oats, your favorite chocolate protein powder, and the rich cocoa powder. Use a sturdy rubber spatula to mix everything thoroughly until it forms a thick, uniform "dough."
- Line an 8x8 inch baking dish with parchment paper or wax paper – this simple step makes lifting them out a breeze! Evenly spread your protein bar mixture into the prepared pan. Press it down firmly with your hands or the spatula to create a compact, smooth base.
- Gently melt your semi-sweet chocolate chips until they are wonderfully smooth and glossy. Carefully spread this melted chocolate layer evenly over the top of your pressed protein bar base.
- Immediately, before the chocolate sets, sprinkle a touch of flaky sea salt over the top. This optional step adds an incredible sweet and salty contrast that truly elevates the flavor!
- Pop your pan into the refrigerator for 1 to 2 hours, or until the chocolate topping is completely firm and set. Once chilled, lift the entire slab out using the parchment paper, slice into 12 perfect, energy-packed servings, and enjoy! Store any leftover bars in an airtight container in the fridge for up to a week, or freeze them for longer-lasting healthy snacks.
Notes
Calories: 248 kcal
Total Carbs: 20g
Net Carbs: 18g
Fats: 15g
Protein: 11g