The holidays are here, and so is the craving for something sweet, festive, and utterly delicious! But who wants to spend hours slaving away in the kitchen when there’s so much holiday magic to enjoy? If you’re nodding your head, then get ready to unwrap the secret to stress-free seasonal sweetness: Easy Christmas Fudge! This isn’t just a recipe; it’s your ticket to becoming a holiday hero, whipping up a decadent treat that tastes like it took all day but comes together in mere minutes. Forget complicated candy thermometers and endless stirring – we’re talking about a no-bake wonder that’s perfect for gifting, sharing, or simply treating yourself. Let’s dive into a world where homemade holiday fudge is not just possible, but incredibly simple and fun!
Why You’ll Love This Easy Christmas Fudge Recipe
Prepare to fall head over heels for this incredible Easy Christmas Fudge. Here are four irresistible reasons why it’s about to become your new holiday go-to:
- Effortlessly Simple: Say goodbye to complex candy-making! This recipe requires minimal ingredients and just a few simple steps, making it perfect for even the most novice bakers. No tricky techniques, just pure joy.
- No-Bake Wonder: Your oven can take a well-deserved break! This fudge comes together beautifully in the microwave, freeing up oven space for other holiday roasts or cookies, and keeping your kitchen cool.
- Lightning Fast Prep: With only 10 minutes of prep and 5 minutes of “cook” time, you can whip up a batch of this festive treat almost instantly. The hardest part is waiting for it to chill!
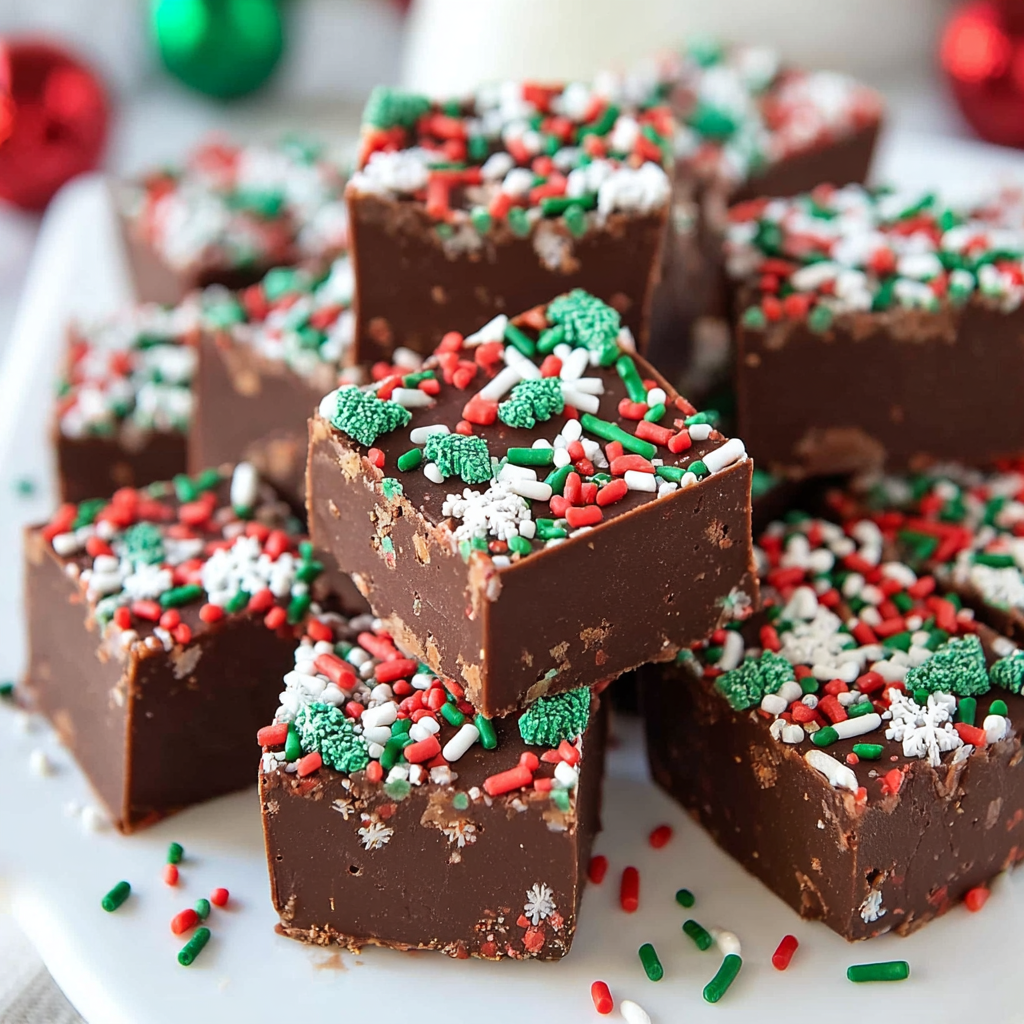
- Festively Delicious: Rich, creamy, and packed with chocolatey goodness, this fudge is elevated by a hint of vanilla and a burst of colorful Christmas sprinkles, making it visually stunning and undeniably festive. It’s the ultimate bite of holiday cheer!
Ingredients for Your Easy Christmas Fudge
Gathering your ingredients for this delightful Easy Christmas Fudge is as straightforward as it gets. You likely have most of these on hand already! Here’s what you’ll need to create this holiday magic:
- 🥛 1 (14-ounce) can sweetened condensed milk
- 🍫 3 cups semi-sweet chocolate chips
- 🧈 ¼ cup butter (salted or unsalted)
- 🌿 1 teaspoon pure vanilla extract
- ✨ 2-3 tablespoons Christmas sprinkles
Step-by-Step Directions: Making Your Easy Christmas Fudge
Get ready for a super simple, super satisfying baking experience! Making this Easy Christmas Fudge is incredibly fun and fast. Follow these detailed steps to create your perfect batch:
- Prep Your Pan Like a Pro: First things first, grab an 8×8 inch baking pan. Line it with either parchment paper or aluminum foil, making sure to leave an overhang on the sides – this will be your handy “lift” later! Give the lining a light spray with non-stick cooking spray. This crucial step ensures your beautiful fudge will lift out easily and cleanup will be an absolute breeze.
- Melt It Up in Minutes: In a generously sized microwave-safe bowl, combine your semi-sweet chocolate chips, the entire can of sweetened condensed milk, and the ¼ cup of butter. Pop it into the microwave. Now, here’s the trick: microwave in short 30-second bursts. After each burst, remove the bowl and stir the mixture thoroughly with a spatula or spoon. Repeat this process until everything is completely smooth, gloriously melted, and perfectly combined. Be patient and don’t rush; gentle melting prevents scorching the chocolate.
- Stir in Sweet Vanilla: Once your chocolate mixture is smooth and luscious, it’s time for the secret flavor enhancer! Add the 1 teaspoon of pure vanilla extract. Stir it in until it’s perfectly combined. The vanilla won’t just add its own delicious aroma; it will also deepen and enhance the rich chocolate flavors, making your fudge even more irresistible.
- Pour, Spread, and Sparkle: Quickly pour the warm, creamy fudge mixture into your prepared 8×8 inch pan. Using your spatula, gently spread the fudge evenly across the pan, ensuring a consistent thickness. Now for the festive touch! Immediately, before the fudge begins to set, generously sprinkle your festive Christmas sprinkles all over the top. Don’t be shy – the more sprinkles, the merrier!
- Chill Out and Cut: Carefully transfer your pan of sprinkle-topped fudge to the refrigerator. Let it chill there for at least 2 hours, or until it’s completely firm and set. Once firm, use the parchment paper or foil overhangs to gently lift the entire slab of fudge out of the pan. Peel away the paper/foil, place the fudge on a cutting board, and cut it into bite-sized pieces. A warm knife can help create cleaner cuts. Now, all that’s left to do is enjoy your delicious, homemade Easy Christmas Fudge!
Creative Ways to Present and Serve Your Easy Christmas Fudge
Your beautiful batch of Easy Christmas Fudge deserves a presentation as festive as it tastes! Here are some delightful ways to serve and present your holiday treat:
- Classic Platter: Arrange a variety of cut fudge pieces on a festive holiday platter. Mix in other small treats like peppermints, shortbread cookies, or mini candy canes for an extra pop of color and texture.
- Charming Gift Boxes: Cut your fudge into neat squares and place them in small, cellophane-lined gift boxes or decorative tins. Tie with a festive ribbon and add a personalized tag for a heartwarming homemade gift that everyone will adore.
- Miniature Masterpieces: Instead of standard squares, use small cookie cutters (think stars, trees, or gingerbread men) to create fun, festive shapes. This is especially charming for kids’ parties or a whimsical touch.
- Edible Glitter & Toppings: Before the fudge sets, beyond the sprinkles, consider dusting with edible glitter for extra sparkle, or gently pressing in mini chocolate chips, crushed candy canes, or chopped nuts for added texture and flavor.
- Dessert Boards: Incorporate your fudge into a holiday dessert charcuterie board alongside fresh berries, cheeses, crackers, and other sweet treats for an impressive display at any gathering.
- With Warm Beverages: Serve individual pieces of fudge alongside mugs of hot cocoa, coffee, or a glass of cold milk. The richness of the fudge pairs perfectly with a comforting drink.
Storing Your Easy Christmas Fudge: Freshness Tips
Want to keep your delightful Easy Christmas Fudge tasting fresh and delicious for as long as possible? Proper storage is key! Here’s how to ensure your holiday treat lasts:
- At Room Temperature (Short Term): While fudge is generally stable, it’s best to store this particular recipe in the refrigerator due to the condensed milk and butter, especially in warmer environments. If serving at a party, it can sit out for a few hours.
- In the Refrigerator (Recommended): For optimal freshness and to maintain its firm texture, store your fudge in an airtight container in the refrigerator. If stacking pieces, place parchment paper between layers to prevent sticking. Stored this way, your Easy Christmas Fudge will stay wonderfully fresh for 1 to 2 weeks.
- Freezing for Longer Enjoyment: Yes, you can freeze fudge! This is a fantastic option if you’re making a big batch ahead of time. Wrap individual pieces or small blocks of fudge tightly in plastic wrap, then place them in an airtight, freezer-safe container or freezer bag. Frozen fudge will maintain its quality for up to 3 months. To thaw, simply transfer it to the refrigerator overnight or let it come to room temperature for a couple of hours before serving.
Always make sure the fudge is fully chilled and set before storing to prevent condensation buildup, which can affect its texture.
FAQs About Your Easy Christmas Fudge
- Can I use different types of chocolate chips?
Absolutely! While semi-sweet is traditional, you can experiment with milk chocolate, dark chocolate, or even white chocolate chips for a different flavor profile. Adjust sweetness levels to your preference. - What if I don’t have a microwave? Can I still make this fudge?
Yes! You can use a double boiler on the stovetop. Place a heat-safe bowl over a saucepan of simmering water (ensure the bowl doesn’t touch the water). Add chocolate, condensed milk, and butter to the bowl and stir until smooth and melted. - My fudge didn’t set. What went wrong?
This usually happens if the mixture wasn’t heated enough or if there wasn’t enough chocolate. Try gently reheating the mixture in 15-second bursts, adding another ¼ cup of chocolate chips, and stirring until fully melted before chilling again. - Can I add nuts or dried fruit to my Easy Christmas Fudge?
Definitely! Fold in about ½ to 1 cup of chopped nuts (pecans, walnuts), dried cranberries, or mini marshmallows after stirring in the vanilla, just before pouring into the pan. - Is this Easy Christmas Fudge recipe gluten-free?
Yes, based on the ingredients listed, this recipe is naturally gluten-free. Always check labels on specific brands if you have severe sensitivities. - How can I make clean cuts when slicing the fudge?
For perfectly clean cuts, use a sharp knife that has been heated under hot water and wiped dry. Wipe the blade clean between each cut for the best results. - Can I double the recipe?
Yes, you can easily double the recipe. Just be sure to use a larger pan (like a 9×13 inch baking pan) and increase microwave time slightly, stirring frequently. - Why is my fudge grainy?
Grainy fudge is less common with this condensed milk method, but it can occur if the mixture is overheated or if the sugar in the condensed milk recrystallizes. Ensure gentle heating and thorough stirring. - How far in advance can I make this Easy Christmas Fudge?
You can easily make this fudge 1-2 weeks in advance if stored properly in the refrigerator, or up to 3 months if frozen, making it perfect for holiday prep! - What kind of sprinkles are best for Christmas fudge?
Any festive Christmas-themed sprinkles work great! Look for red, green, and white jimmies, nonpareils, or fun holiday shapes like stars or trees. Make sure to add them immediately after pouring the fudge so they adhere well.
Easy Christmas Fudge 🎁
Equipment
- 8×8 inch baking pan
- parchment paper or aluminum foil
- Microwave-safe Bowl
- Spatula
Ingredients
- 1 can sweetened condensed milk (14-ounce)
- 3 cups semi-sweet chocolate chips
- 0.25 cup butter (salted or unsalted)
- 1 tsp pure vanilla extract
- 2-3 tbsp Christmas sprinkles
Instructions
- Prep Your Pan: Get an 8×8 inch baking pan ready by lining it with parchment paper or aluminum foil, then give it a light spray with non-stick cooking spray. This makes cleanup a breeze!
- Melt It Up: In a microwave-safe bowl, combine the chocolate chips, sweetened condensed milk, and butter. Microwave in short 30-second bursts, stirring in between, until everything is smooth and beautifully melted.
- Stir in Vanilla: Once melted, stir in the pure vanilla extract until it’s perfectly combined, enhancing all those delicious flavors.
- Pour and Decorate: Pour the creamy fudge mixture into your prepared pan. Use a spatula to spread it evenly. Immediately sprinkle your festive Christmas sprinkles on top for that extra holiday cheer!
- Chill and Cut: Pop the pan into the refrigerator for about 2 hours to let the fudge set firm. Once firm, gently lift it out of the pan using the parchment paper, remove the paper, and cut it into bite-sized pieces. Enjoy!
Notes
Nutrition Information:
Calories: 134kcalTotal Carbs: 14g
Net Carbs: 13g
Fats: 8g
Protein: 2g