Ever found yourself staring into the pantry, craving something spectacularly decadent but dreading a complicated baking project? Imagine a cake that’s so rich, so moist, and so incredibly flavorful, it tastes like it came straight from a gourmet bakery – but is surprisingly simple to whip up in your own kitchen. We’re talking about the star of today’s show: the **Easy Dreamy Oreo Cake**!
This isn’t just any chocolate cake; it’s a celebration of all things chocolate and cookies, topped with a cloud-like frosting that’s studded with crunchy Oreo bits. Get ready to impress your friends, delight your family, or simply treat yourself to a slice of pure bliss. Forget fuss and embrace the fun, because making this cake is as delightful as eating it!
Why You’ll Love This Recipe
- Seriously Easy! Don’t let the impressive looks fool you. This recipe is designed for bakers of all skill levels. From a straightforward batter to a simple, airy frosting, we’ve stripped away the complexity so you can enjoy the process and the delicious results without any stress.
- Unforgettable Flavor & Texture. Prepare for a flavor explosion! The cake itself is incredibly moist and deeply chocolatey, perfectly balanced by a light, creamy marshmallow-Oreo frosting. Each bite offers a delightful contrast of soft cake and crunchy cookie pieces – it’s a texture dream come true.
- Perfect for Any Occasion. Whether it’s a birthday, a holiday gathering, a potluck, or just a Tuesday evening craving, the **Easy Dreamy Oreo Cake** is a guaranteed crowd-plepleaser. Its classic appeal and irresistible taste make it suitable for any event, big or small.
- Customizable Fun. This recipe is a fantastic canvas for your creativity! Want more Oreos? Go for it! Prefer a “naked” cake look? Easy peasy. Add sprinkles, a chocolate drizzle, or even turn it into cupcakes. This cake is as adaptable as it is delicious, allowing you to personalize it to your heart’s content.
Ingredients with Measurements
For the Cake:
- 🌾 3 cups (372g) all-purpose flour
- 🍚 2 cups (400g) granulated sugar
- 🍫 ½ cup (40g) unsweetened dark cocoa powder (like Hershey’s Special Dark)
- ✨ 2 teaspoons baking soda
- 🧂 1 teaspoon salt
- 💧 1 ½ cups (355ml) hot water
- ☕ ½ cup (118ml) hot coffee (or simply use more hot water for coffee-free)
- 🌻 ¾ cup (177ml) vegetable oil
- 🧪 2 tablespoons (30ml) white vinegar
- 🍦 1 teaspoon vanilla extract
For the Frosting:
- 🧈 ½ cup (113g) unsalted butter, softened
- 🥥 ½ cup (95g) vegetable shortening (or use all butter for a less “Oreo-like” taste)
- ☁️ 1 (7 ounce) jar marshmallow cream or fluff
- ⚪ 3 cups (339g) powdered sugar
- 🧂 ½ to 1 teaspoon salt (adjust to your preference, see notes for salted butter)
- 🍦 1 teaspoon vanilla extract
- 🥛 1-2 tablespoons (15-30ml) heavy whipping cream
- 🍪 10 Oreos, crushed (plus more for topping if desired)
Detailed Step-by-Step Directions
Crafting the Cake:
- Preheat & Prep: Get your oven ready by preheating it to 350°F (175°C). Lightly grease and flour two 8-inch or 9-inch round cake pans. For super easy cake release, line the bottoms with parchment paper.
- Mix Dry Goodness: In a spacious bowl, whisk together the flour, granulated sugar, cocoa powder, baking soda, and salt. Set this mixture aside for now.
- Whisk Wet Wonders: Grab a large measuring cup or another bowl and whisk together the hot water, hot coffee (or extra hot water if skipping coffee), vegetable oil, white vinegar, and vanilla extract until smoothly combined.
- Combine & Create: Gently pour the wet ingredients into the dry mixture. Stir or whisk until you have a smooth batter. Don’t worry if it seems a little thin; that’s just right!
- Bake to Perfection: Divide the batter evenly between your prepared cake pans. Bake for approximately 34-38 minutes. You’ll know it’s done when a toothpick inserted about 3 inches from the edge comes out clean.
- Cool Down: Let your beautiful cake layers cool completely in their pans before attempting to remove them or add frosting. This ensures they hold their shape beautifully!
Whipping Up the Frosting:
- Creamy Base: In a large bowl, use a hand mixer to beat the softened butter and vegetable shortening until wonderfully smooth and creamy.
- Marshmallow Magic: Add the marshmallow fluff and beat again until the mixture is perfectly smooth and airy.
- Sweeten & Flavor: Gradually mix in the powdered sugar. Then, add ½ teaspoon of salt, vanilla extract, and one tablespoon of heavy whipping cream.
- Smooth Finish: Continue mixing on medium speed until your frosting is light and fluffy. If it feels too thick, add a little more cream, a teaspoon at a time, until it reaches your desired smooth consistency. Give it a taste and add a tiny pinch more salt if you find it too sweet.
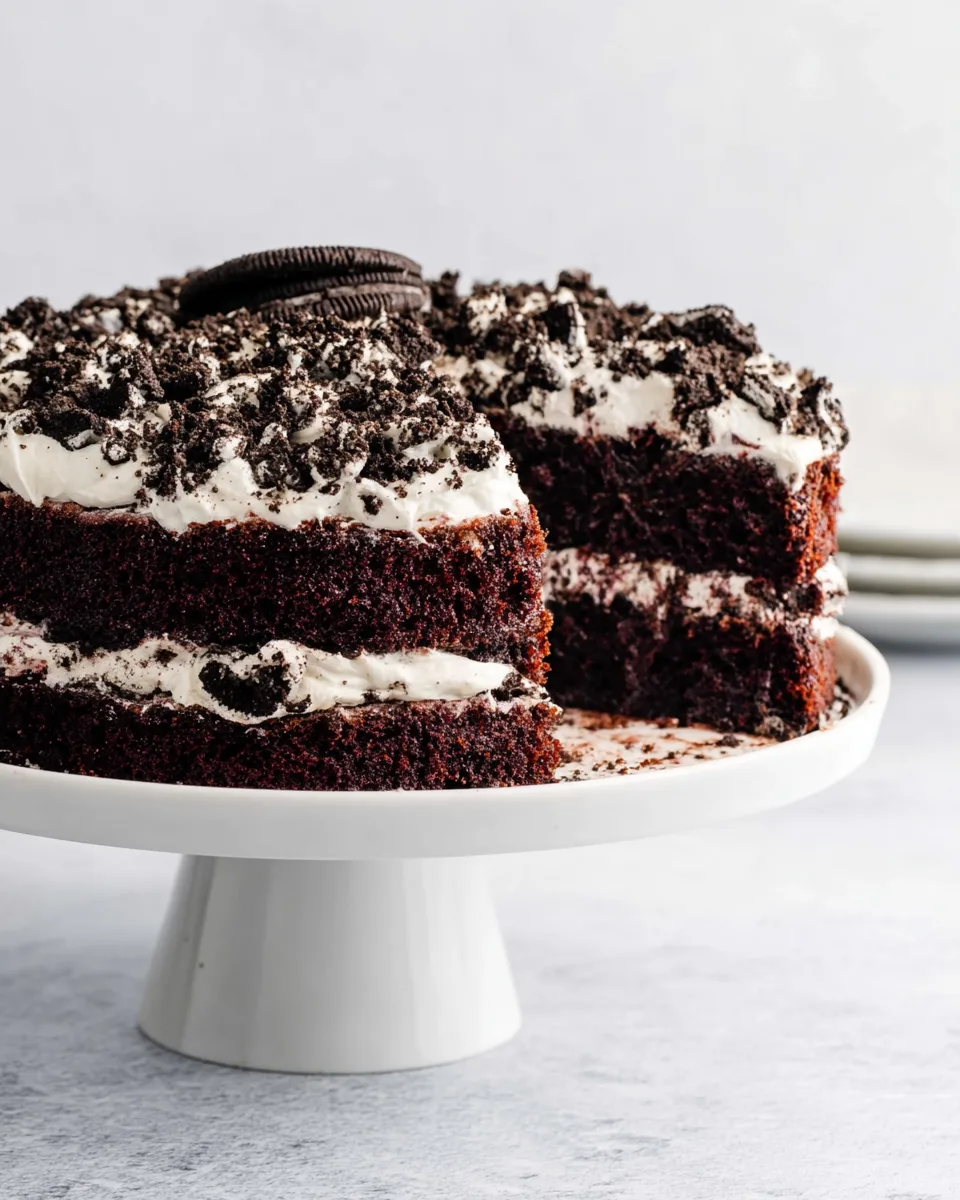
Assembling Your Masterpiece:
- Level Up (Optional): Once the cakes are completely cool, gently take them out of their pans. If your cake layers have a dome, you can use a serrated knife to carefully level them for a perfectly flat stack.
- First Layer Fun: Place one cake layer on your serving plate. Spread half of your delightful frosting evenly over the top, reaching to the edges.
- Oreo Crunch: Sprinkle half of your crushed Oreos generously over the frosting layer.
- Stack & Repeat: Carefully place the second cake layer on top. Repeat the frosting and crushed Oreo steps.
- Final Touches: For a chic “naked” cake look, you’re all set! If you prefer to cover the sides and top completely, remember to save enough frosting. Feel free to crush extra Oreos and sprinkle them over the top and sides for the ultimate Oreo experience.
- Enjoy: Serve your incredible Oreo cake at room temperature.
Presentation & Serving Suggestions
The **Easy Dreamy Oreo Cake** is a showstopper, and there are many fun ways to present it to truly wow your guests!
- The “Naked” Cake Charm: For a modern, rustic look, simply frost the tops of your cake layers, creating generous layers of creamy Oreo goodness, and leave the sides uncovered. The exposed chocolate cake adds an artisanal touch.
- Fully Frosted Classic: If you love a traditional, polished look, save a little extra frosting to generously cover the entire cake – top and sides. Use an offset spatula or a cake scraper for a smooth finish, then scatter extra crushed Oreos for that iconic black-and-white contrast.
- Oreo Overload Extravaganza: Why stop at just crushed Oreos? Decorate the top with whole mini Oreos or strategically placed halves. You can even press crushed Oreos into the sides of a fully frosted cake for a magnificent crunch in every bite.
- Drizzle & Delight: A simple chocolate ganache or a white chocolate drizzle can elevate the visual appeal. Drip it artfully over the top edge so it cascades down the sides for an extra touch of elegance.
When it comes to serving, this cake is best enjoyed at room temperature, allowing the flavors to truly shine and the frosting to remain perfectly creamy. Pair it with a scoop of premium vanilla bean ice cream for an extra indulgence, or a tall glass of cold milk to complete the classic Oreo experience. It also makes a fantastic companion to a hot cup of coffee or tea, especially with that rich, dark cocoa flavor.
Storage & Longevity
You’ve made this incredible **Easy Dreamy Oreo Cake**, and chances are, there might be a slice or two left over (though we wouldn’t bet on it!). Proper storage will keep your cake fresh and delicious.
- Refrigeration: Store any leftover cake loosely covered in the refrigerator. An airtight cake dome or a large container works best to prevent the cake from drying out or absorbing other food odors. It will stay fresh and moist for 3-5 days.
- Room Temperature: If your environment is cool and not too humid, a frosted cake can sit at room temperature for up to 1 day. However, due to the butter and marshmallow cream in the frosting, refrigeration is generally recommended for longer storage.
- Freezing Cake Layers: If you want to bake ahead, the unfrosted cake layers can be wrapped tightly in plastic wrap, then again in aluminum foil, and frozen for up to 1 month. Thaw in the refrigerator overnight before frosting.
- Freezing Frosted Cake: You can also freeze a fully frosted cake! Place it uncovered in the freezer for about an hour until the frosting is firm. Then, wrap it tightly in plastic wrap and aluminum foil. It will last for up to 2-3 weeks. Thaw in the refrigerator overnight, then bring to room temperature before serving.
FAQs
- Can I make this cake gluten-free?
While this recipe uses all-purpose flour, you can often substitute a 1:1 gluten-free baking flour blend (one that contains xanthan gum) for the flour. Results may vary slightly in texture.
- Can I use regular cocoa powder instead of dark?
Yes, you can! Using regular unsweetened cocoa powder will result in a lighter colored cake with a milder chocolate flavor. Dark cocoa powder gives a richer, deeper chocolate taste and color, similar to an Oreo cookie.
- What if I don’t have hot coffee?
No problem! The coffee enhances the chocolate flavor without making the cake taste like coffee. If you don’t have it, simply use an additional ½ cup (118ml) of hot water instead.
- Why use vinegar in the cake batter?
The vinegar, combined with baking soda, creates a chemical reaction that helps the cake rise and contributes to its light and fluffy texture. It also helps to tenderize the cake without adding any noticeable vinegary taste.
- Can I make the frosting ahead of time?
Absolutely! You can make the frosting up to 2-3 days in advance. Store it in an airtight container in the refrigerator. Before using, let it come to room temperature and then re-whip it with a hand mixer for a few minutes to restore its light and fluffy consistency.
- What’s the best way to crush Oreos?
For fine crumbs, use a food processor. For chunkier pieces (which add great texture!), place Oreos in a zip-top bag, seal it, and crush them with a rolling pin or the bottom of a heavy pan.
- My cake layers stuck to the pan, what went wrong?
This usually happens if the pans weren’t adequately greased and floured, or if you tried to remove the cakes before they were completely cool. Lining the bottoms with parchment paper is highly recommended for easy release.
- Can I make this as a sheet cake or cupcakes?
Yes, you can! For a 9×13 inch sheet cake, bake for approximately 35-45 minutes. For cupcakes, line a muffin tin and fill liners about two-thirds full; bake for 20-25 minutes, or until a toothpick comes out clean.
- Why is my frosting too thick/thin?
If your frosting is too thick, gradually add more heavy whipping cream (a teaspoon at a time) until it reaches your desired consistency. If it’s too thin, add a tablespoon or two more powdered sugar until it stiffens up.
- How do I get clean slices of cake?
For neat slices, chill the frosted cake in the refrigerator for at least 30 minutes. Use a sharp, thin knife, wiping the blade clean with a damp cloth after each slice.
Easy Dreamy Oreo Cake
Equipment
- Round Cake Pans
- Hand Mixer
- Large Bowls
- Parchment Paper
- Serrated Knife
Ingredients
For the Cake
- 3 cups all-purpose flour 372g
- 2 cups granulated sugar 400g
- 1/2 cup unsweetened dark cocoa powder 40g
- 2 teaspoons baking soda
- 1 teaspoon salt
- 1 1/2 cups hot water 355ml
- 1/2 cup hot coffee 118ml or extra water
- 3/4 cup vegetable oil 177ml
- 2 tablespoons white vinegar 30ml
- 1 teaspoon vanilla extract
For the Frosting
- 1/2 cup unsalted butter 113g, softened
- 1/2 cup vegetable shortening 95g
- 1 jar marshmallow fluff 7 oz
- 3 cups powdered sugar 339g
- 1/2 to 1 teaspoon salt to taste
- 1 teaspoon vanilla extract
- 1-2 tablespoons heavy whipping cream 15–30ml
- 10 Oreos crushed
Instructions
- Preheat oven to 350°F (175°C). Grease and line two 8–9 inch cake pans.
- Whisk flour, sugar, cocoa powder, baking soda, and salt in a large bowl.
- Mix hot water, coffee, oil, vinegar, and vanilla in another bowl.
- Combine wet and dry ingredients until smooth.
- Divide batter and bake for 34–38 minutes. Cool completely.
- Beat butter and shortening until creamy.
- Add marshmallow fluff and mix until smooth.
- Add powdered sugar, salt, vanilla, and cream. Beat until fluffy.
- Frost first cake layer, add Oreos, stack second layer and repeat.
- Decorate with extra crushed Oreos and serve.