Craving a warm, fluffy donut but don’t want the fuss (or mess!) of deep frying? Imagine biting into a perfectly golden, tender donut, made right in your own kitchen, with minimal effort. Stop dreaming and start baking, because your search for the ultimate simple sweet treat ends here! Get ready to whip up a batch of the most delightful Easy Homemade Baked Bisquick Donuts that are so ridiculously simple, you’ll wonder why you ever bought them from a store.
This recipe transforms humble Bisquick into a bakery-worthy delight in mere minutes. It’s an absolute game-changer for busy mornings, spontaneous dessert cravings, or just because you deserve a little sprinkle of joy. Say goodbye to greasy hands and hello to a healthier, happier donut experience!
Why You’ll Love These Easy Homemade Baked Bisquick Donuts
These aren’t just any donuts; they’re your new go-to for a reason! Here are four fabulous reasons why you’ll fall head over heels for this recipe:
- Super Simple & Quick: Forget complicated steps and long proofs. With Bisquick as your secret weapon, you can have a batch of fresh, warm donuts ready in about 20 minutes from start to finish. Perfect for when that donut craving strikes hard and fast!
- Baked, Not Fried: Ditch the deep fryer and its accompanying oil splatters and extra calories! Baking these donuts makes them wonderfully lighter, healthier, and much easier to clean up. You get all the flavor without any of the frying guilt.
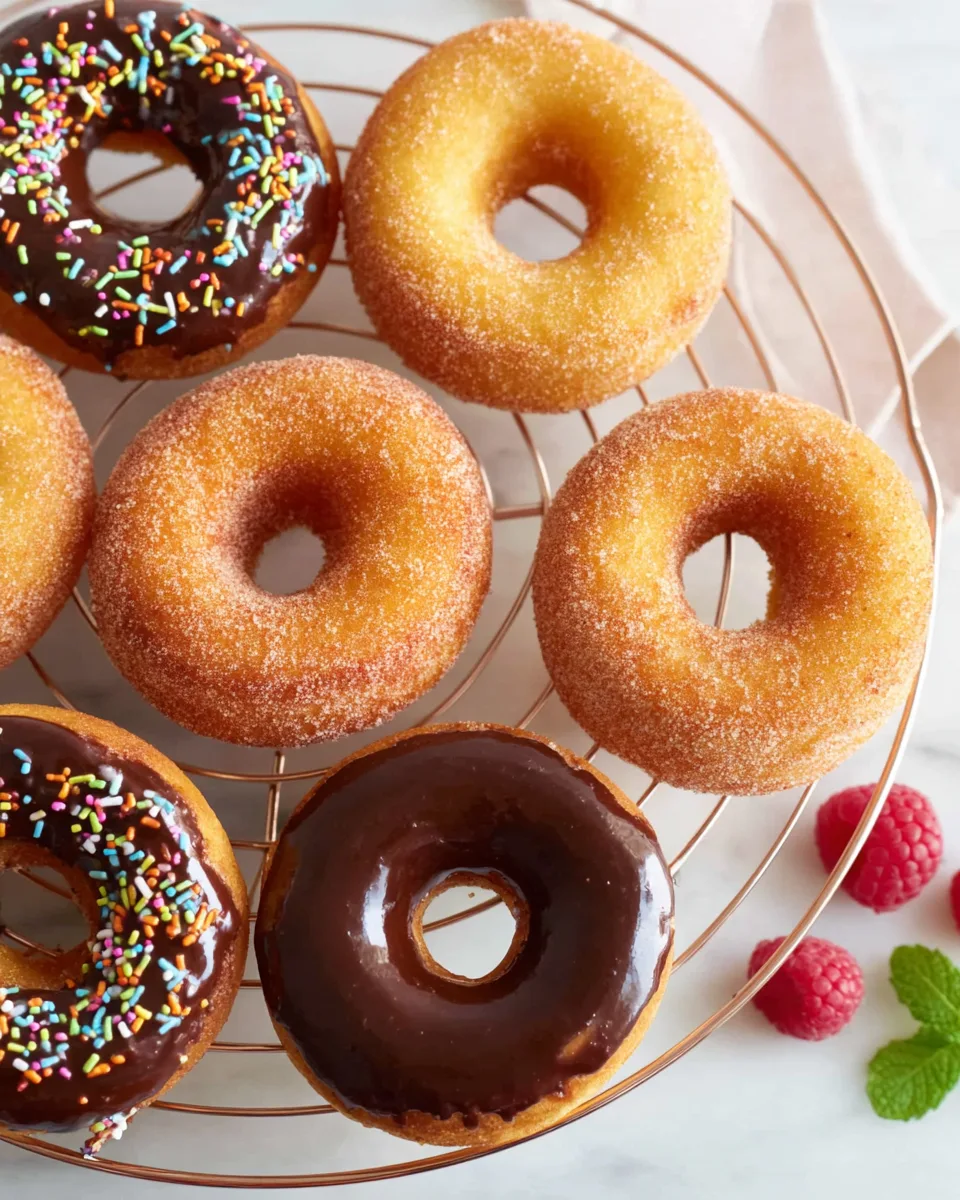
- Perfectly Tender Texture Every Time: Thanks to the magic of Bisquick and a few simple additions, these donuts bake up incredibly moist, fluffy, and tender on the inside, with a lovely golden exterior. They truly melt in your mouth!
- Endlessly Customizable Fun: While our cinnamon sugar and chocolate glaze are absolute winners, these donuts are a blank canvas for your creativity! From simple powdered sugar to elaborate glazes and sprinkles, you can make them uniquely yours for any occasion or mood.
Ingredients for Your Easy Homemade Baked Bisquick Donuts
Gather your simple ingredients, and let’s get baking! You likely have most of these pantry staples on hand already.
Donut Batter:
- 🍩 2 cups Bisquick baking mix
- 🍚 1/3 cup granulated sugar
- 🍦 1/3 cup sour cream
- 🥛 2/3 cup milk
- 🥚 1 large egg
- 🍶 2 tablespoons vegetable oil
- 🌿 2 teaspoons vanilla extract
For Optional Cinnamon Sugar Topping:
- 🧈 1/2 cup melted butter
- 🍚 1/2 cup granulated sugar
- 🌶️ 2 teaspoons ground cinnamon
For Optional Chocolate Glaze Topping:
- 🍫 1/2 cup semisweet chocolate chips
- 🧈 1 1/2 tablespoons butter
- 🥛 1/4 cup milk
- 🍥 3/4 cup sifted powdered sugar
- 🎉 1-2 tablespoons sprinkles (optional)
Detailed Step-by-Step Directions: How to Make Them
Ready to create some donut magic? Follow these simple steps, and you’ll be enjoying your fresh Easy Homemade Baked Bisquick Donuts in no time!
- Get Ready for Donut Glory: First things first, preheat your oven to a delightful 400°F (200°C). Grab your trusty 12-well donut pan and give each well a quick, light spray with nonstick cooking spray. This tiny step ensures your donuts pop out perfectly! Set the pan aside for its starring role.
- Whip Up That Heavenly Batter: In a spacious mixing bowl (or let your stand mixer do the heavy lifting with a paddle attachment), toss in the Bisquick baking mix, granulated sugar, tangy sour cream, fresh milk, our essential egg, a splash of vegetable oil, and that lovely vanilla extract. Start mixing on low speed until everything just begins to mingle. Don’t forget to scrape down the sides of the bowl to catch any stray bits! Now, crank it up to medium speed and mix until your batter transforms into a smooth, lump-free dream. Remember the golden rule: don’t overmix; we want tender donuts, not tough ones!
- Fill ‘Em Up Just Right: This is where your donuts get their shape! Gently spoon your wonderful batter into each prepared donut pan well. Aim to fill each well about two-thirds full. This magical amount allows the donuts to rise beautifully and ensures you get that classic donut shape with a perfect hole in the middle.
- Bake to Golden Perfection: Carefully slide your filled donut pan into your preheated oven. Let them bake for approximately 9 to 12 minutes. Keep an eye on them! You’ll know they’re perfectly baked when a toothpick inserted into the center of a donut emerges clean, and the donuts spring back ever-so-lightly when you give them a gentle touch.
- Cool Down with Patience: Once they’re golden and glorious, take the pan out of the oven. Let your beautiful donuts cool down right there in the pan for about 5 minutes. This little rest helps them firm up. After their short cool-down, carefully flip them out onto a wire rack to cool completely. If you’re planning on adding toppings, make sure the smoothest, prettiest side is facing up – it’s their best angle!
- Optional Toppings for Extra Fun (Highly Recommended!):
- Cinnamon Sugar Delight: As soon as the donuts are still wonderfully warm, dip the smooth top surface of each donut into your bowl of melted butter. Let any excess drip off, then immediately plunge it into a separate shallow dish where you’ve mixed the sugar and cinnamon. Roll it around until evenly coated! Place them back on the wire rack to set.
- Silky Chocolate Glaze: Once your donuts are completely cooled, combine the chocolate chips, butter, and milk in a small, microwave-safe bowl. Microwave for 30 seconds, stir it up really well, then microwave for another 15 seconds if it needs a little more coaxing until everything is smoothly melted and shiny. Whisk in the sifted powdered sugar until your glaze is utterly silky and smooth. Dip the top of each cooled donut into the rich chocolate glaze, then return them to the wire rack (chocolate side up, of course!). If you’re feeling fancy, sprinkle with your favorite sprinkles while the glaze is still wet. Let the donuts sit for about 15 minutes to allow that gorgeous glaze to set to a lovely satiny finish.
- Enjoy Your Masterpiece! Serve your wonderful Easy Homemade Baked Bisquick Donuts warm or at room temperature. Prepare for compliments!
Presenting and Serving Your Easy Homemade Baked Bisquick Donuts
These Easy Homemade Baked Bisquick Donuts are delicious on their own, but half the fun is in how you present and serve them! Here are some ideas to elevate your donut game:
Creative Topping Ideas Beyond the Basics:
- Classic Powdered Sugar: A simple dusting of sifted powdered sugar adds an elegant touch and classic sweetness. Dust heavily for a snow-kissed look!
- Maple Glaze: Whisk together powdered sugar with a splash of milk and a teaspoon or two of maple extract (or real maple syrup for a more subtle flavor) for a cozy, autumnal twist.
- Lemon Glaze: For a bright, zesty donut, combine powdered sugar with fresh lemon juice and a tiny bit of lemon zest.
- Nutty Crunch: After glazing (with chocolate or maple), sprinkle with chopped peanuts, walnuts, or pecans for added texture and flavor.
- Coconut Dream: Toast some shredded coconut and sprinkle it over a simple vanilla or chocolate glaze.
- Fruity Fun: Top with a spoonful of berry compote or a few fresh berries for a vibrant, fresh burst.
- Drizzle Delights: Drizzle melted white chocolate or caramel sauce over the donuts for an extra layer of decadence.
Serving Suggestions for Any Occasion:
- Breakfast or Brunch Treat: Pair them with your morning coffee, tea, or a glass of milk. They’re fantastic alongside scrambled eggs and bacon for a balanced (and fun!) brunch spread.
- Dessert Delight: Serve them warm with a scoop of vanilla ice cream, or arrange them on a platter for an easy and impressive dessert.
- Afternoon Pick-Me-Up: A perfect little sweet bite to accompany your afternoon coffee break.
- Party Perfect: Arrange a variety of topped donuts on a tiered stand for a delightful and customizable party treat that guests of all ages will adore.
- Gift of Yum: Package a few beautifully topped donuts in a pretty box or bag for a thoughtful homemade gift.
Storage and Shelf Life
Got leftovers? (We doubt it, but just in case!) Here’s how to keep your Easy Homemade Baked Bisquick Donuts fresh and delicious:
- Room Temperature: Any leftover donuts can be stored in an airtight container at room temperature for up to 3 days. This helps maintain their soft texture and prevents them from drying out.
- Refrigeration: While you *can* refrigerate them, it can sometimes alter the texture and make them a little denser. If you have a cream cheese or perishable glaze, refrigeration is recommended, but for our recipe’s toppings, room temperature is usually best.
- Freezing: Yes, you can freeze these donuts! It’s best to freeze them *un-topped*. Once cooled completely, place them in a single layer on a baking sheet and freeze until solid (about 1-2 hours). Then, transfer them to a freezer-safe bag or container, separating layers with parchment paper. They’ll last for up to 2-3 months. Thaw at room temperature and then add your desired toppings.
FAQs About Easy Homemade Baked Bisquick Donuts
A: While a donut pan is ideal for the classic shape, you can use a muffin tin! Fill muffin cups about half full for donut-muffin hybrids. They won’t have the hole, but they’ll taste just as delicious!
A: Plain Greek yogurt is an excellent substitute for sour cream! It adds the same moisture and tanginess. You can also use buttermilk.
A: Yes! Simply use a gluten-free Bisquick mix (or a similar gluten-free all-purpose baking mix blend) following the same measurements and instructions.
A: Overmixing the batter is the most common culprit for dense donuts. Mix only until the ingredients are just combined and smooth. Overbaking can also lead to dry donuts, so keep an eye on the cooking time and test with a toothpick!
A: Absolutely! Small additions like mini chocolate chips, sprinkles, or finely chopped nuts can be gently folded into the batter before filling the pan.
A: Ensure your powdered sugar is sifted to prevent lumps. Also, make sure your melted chocolate and butter mixture is completely smooth before whisking in the sugar. If it’s too thick, add a tiny bit more milk (1/2 teaspoon at a time) until it reaches your desired consistency.
A: For optimal freshness, warm them in the microwave for 10-15 seconds or in a toaster oven at a low temperature (around 200°F/95°C) for a few minutes until just warm.
A: Definitely! Instead of vanilla, try almond extract for a delicate flavor, or a touch of orange or lemon extract for a citrusy twist.
A: The trick is to dip the donuts into the melted butter and then the cinnamon sugar while they are still warm. The warmth helps the butter adhere, which in turn makes the sugar stick better.
A: Generally, yes. Baked donuts contain significantly less fat and calories than their deep-fried counterparts. Plus, you control the ingredients, making them a fresher, often healthier choice.
Easy Homemade Baked Bisquick Donuts 🍩
Equipment
- Donut pan (12-well)
- Large mixing bowl
- Wire Rack
- Stand Mixer (optional)
- Microwave-safe bowl (optional)
- Shallow dish (optional)
Ingredients
Donut Batter
- 2 cups Bisquick baking mix
- 1/3 cup granulated sugar
- 1/3 cup sour cream
- 2/3 cup milk
- 1 large egg
- 2 tablespoons vegetable oil
- 2 teaspoons vanilla extract
Optional Cinnamon Sugar Topping
- 1/2 cup melted butter
- 1/2 cup granulated sugar
- 2 teaspoons ground cinnamon
Optional Chocolate Glaze Topping
- 1/2 cup semisweet chocolate chips
- 1 1/2 tablespoons butter
- 1/4 cup milk
- 3/4 cup sifted powdered sugar
- 1-2 tablespoons sprinkles optional
Instructions
- Get Ready: Start by preheating your oven to a cozy 400°F (200°C). Grab a 12-well donut pan and give each well a light spray with nonstick cooking spray. Set it aside for now.
- Whip Up the Batter: In a big mixing bowl (or using your stand mixer with a paddle attachment), combine the Bisquick baking mix, granulated sugar, sour cream, milk, egg, vegetable oil, and vanilla extract. Mix everything on low speed until it just starts to come together, then scrape down the sides of the bowl. Increase to medium speed and mix until your batter is smooth and lump-free. Be careful not to overmix!
- Fill 'Em Up: Gently spoon the batter into each prepared donut pan well, filling each one about two-thirds full. This helps create that perfect donut shape with a nice clear hole in the middle.
- Bake to Golden Perfection: Pop the donut pan into your preheated oven and bake for about 9 to 12 minutes. You'll know they're ready when a toothpick inserted into the center of a donut comes out clean and the donuts spring back lightly when you touch them.
- Cool Down: Take the pan out of the oven and let the donuts cool right there in the pan for about 5 minutes. After that, carefully flip them out onto a wire rack to cool completely. If you're adding toppings, make sure the smoothest side is facing up!
- Optional Toppings for Extra Fun:
- Cinnamon Sugar Delight: While the donuts are still warm, dip the smooth top surface of each donut into the melted butter, then immediately into a separate shallow dish where you've mixed the sugar and cinnamon. Place them back on the wire rack.
- Silky Chocolate Glaze: Once the donuts are completely cooled, put the chocolate chips, butter, and milk into a small microwave-safe bowl. Microwave for 30 seconds, stir well, then microwave for another 15 seconds if needed, until everything is smoothly melted. Whisk in the sifted powdered sugar until your glaze is silky and smooth. Dip the top of each donut into the chocolate glaze, then return them to the wire rack (chocolate side up). If you like, sprinkle with sprinkles while the glaze is still wet. Let the donuts sit for about 15 minutes to allow the glaze to set to a lovely satiny finish.
- Enjoy! Serve your wonderful homemade baked donuts warm or at room temperature.