Why You’ll Love These Easy No-Bake Cannoli Bars
Get ready to fall head over heels for your new favorite dessert! These Easy No-Bake Cannoli Bars are a game-changer for anyone craving that iconic Italian treat without all the fuss. Here’s why they’re about to become a staple in your kitchen:
* **Effortlessly Easy:** Seriously, “easy” is in the name for a reason! Skip the hot oil, fragile shells, and pastry bags. This recipe simplifies cannoli perfection into a straightforward, no-bake bar that anyone can master.
* **No Oven Required:** That’s right, keep your kitchen cool and your energy bills low! Perfect for summer entertaining, holiday potlucks, or anytime you want a delicious dessert without firing up the oven. Just mix, press, and chill.
* **Classic Cannoli Flavor, Deconstructed:** All the creamy, sweet, ricotta-infused goodness with hints of vanilla, cinnamon, and lemon zest that you adore in a traditional cannoli, but in a convenient, sliceable bar format. The Biscoff crust adds an irresistible, unexpected twist!
* **Perfect for Make-Ahead:** These bars are practically begging to be made in advance! They need a good chill time, which means you can prepare them the day before your event, freeing up your precious time and ensuring a perfectly set, ready-to-serve dessert when you need it.
Say Ciao to Baking Stress: Meet Your New Favorite Easy No-Bake Cannoli Bars!
Picture this: the sun is shining, the aroma of a delicious meal lingers in the air, and all you want is a sweet, satisfying dessert to cap it all off. But the thought of turning on the oven, kneading dough, or wrestling with a tricky recipe? *Fuhgeddaboudit!* We get it. That’s why we’re absolutely thrilled to introduce you to a dessert revolution that brings the beloved flavors of Italy right to your countertop, without a single moment of baking stress. Get ready to embrace the joy of our **Easy No-Bake Cannoli Bars**! Forget the deep-fried shells and the intricate piping; this recipe takes all the creamy, dreamy essence of a classic cannoli and transforms it into a super simple, utterly irresistible bar. With a buttery Biscoff crust and a luscious, ricotta-infused filling studded with chocolate and pistachios, it’s an Italian-inspired masterpiece that requires nothing more than mixing, chilling, and a whole lot of anticipation. Prepare to impress everyone (including yourself!) with minimal effort and maximum deliciousness. Let’s get started!
Gather Your Goodies: Ingredients for Easy No-Bake Cannoli Bars
To create these delightful bars, you’ll need just a few simple ingredients, easily found at your local grocery store. Get everything ready, and you’ll be on your way to a spectacular, stress-free dessert!
* 🧈 5 tablespoons unsalted butter, melted and slightly cooled
* 🍪 2 cups Biscoff cookie crumbs (about 200g)
* 🥛 1 cup ricotta cheese (part-skim or whole milk works well)
* 🧀 16 ounces full-fat cream cheese, softened at room temperature
* 🍚 1⅓ cup powdered sugar
* 🍃 ¼ teaspoon cinnamon (optional, for a hint of warmth)
* 🍋 ½ teaspoon lemon zest (optional, or orange zest for a classic touch)
* ✨ 2 teaspoons vanilla extract
* 🍫 ½ cup mini chocolate chips (plus extra for topping)
* 🌰 ⅓ cup chopped pistachios (shelled, plus extra for topping)
Whip It Up: Step-by-Step Directions for Easy No-Bake Cannoli Bars
Ready to create some magic? Follow these simple steps to assemble your incredible No-Bake Cannoli Bars. It’s easier than saying “buon appetito!”
1. **Crust Creation Station:** First things first, grab an 8-inch square pan and line it with parchment paper. Make sure to leave some overhang on two sides – this is your secret weapon for easy lifting later! Toss your Biscoff cookies into a food processor and pulse until they’re finely crumbled. Drizzle in that melted, slightly cooled butter and pulse again until all the crumbs are beautifully moistened. Now, press this buttery mixture firmly and evenly into the bottom of your prepared pan. Pop the pan into the freezer for at least 30 minutes. This chill time is crucial for a firm, delicious crust while you tackle the filling!
2. **Creamy Filling Fun:** While your crust is getting its cool on, grab a large mixing bowl. Add the room-temperature cream cheese, ricotta cheese, and powdered sugar. Now, unleash your electric mixer! Beat these ingredients together until the mixture is gloriously smooth and completely combined. Make sure there are absolutely no lumps – we’re going for silky perfection here.
3. **Flavor Boost & Mix-ins:** Time to dial up the flavor! Stir in the vanilla extract. If you’re feeling adventurous (and we highly recommend it!), add the optional cinnamon and lemon zest for that extra layer of delightful, authentic cannoli taste. Finally, with a gentle hand, fold in the mini chocolate chips and chopped pistachios using a spatula. Mix just until they’re evenly distributed throughout that luscious, creamy filling. Don’t overmix!
4. **Assemble & Chill Out:** Retrieve your perfectly chilled cookie crust from the freezer. Carefully spread your rich, creamy filling evenly over the crust. An offset spatula works wonders here for smoothing the top to perfection. Cover the pan tightly with plastic wrap and slide it into the refrigerator. These bars need to chill for a minimum of 4 hours, but ideally, let them hang out overnight. This passive chilling time is absolutely essential – it ensures your bars set perfectly firm for super easy, clean slicing!
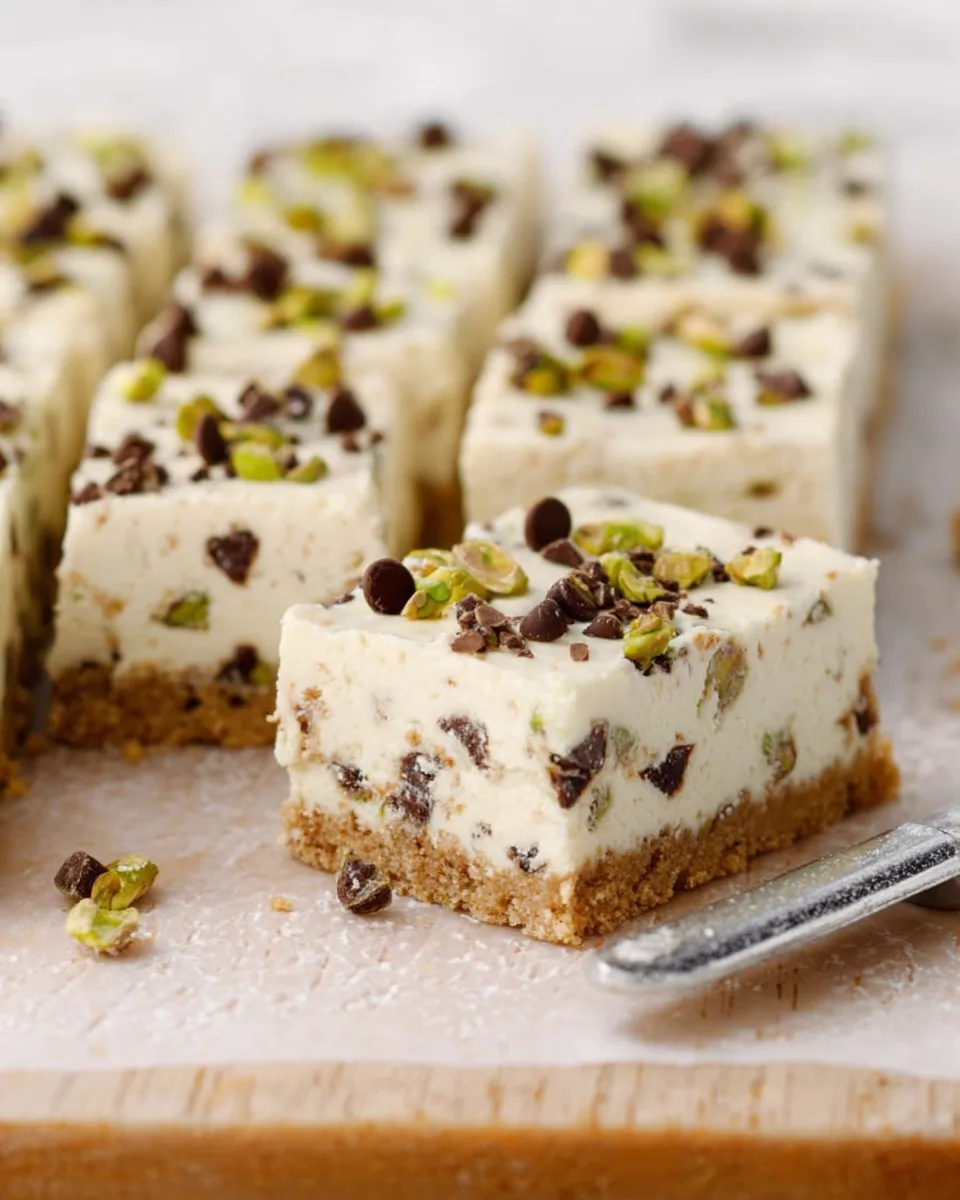
5. **Slice & Savor:** The moment of truth! Once thoroughly chilled, use the parchment paper overhang to gently lift the entire slab of bars out of the pan and onto a cutting board. For neat, clean slices that look like they came straight from an Italian bakery, here’s a pro tip: use a long, sharp knife, run it under hot water, and wipe it dry *between each cut*. Garnish your beautiful bars with extra mini chocolate chips or chopped pistachios if your heart desires. These easy, no-bake bars truly are a simpler, healthier-ish way to enjoy the classic taste of cannoli!
Serve It Up in Style: Presentation & Serving Suggestions
These Easy No-Bake Cannoli Bars are already a showstopper, but with a little extra flair, you can elevate them from delicious to absolutely dazzling!
* **Classic Square:** The easiest way to serve is directly from the pan, cut into neat squares. Lift the whole slab out using the parchment paper, place it on a clean cutting board, and slice into 12 even bars.
* **Diamond Cut:** For a more elegant look, cut the slab diagonally to create diamond shapes. This adds a touch of sophistication to your dessert platter.
* **Mini Bites:** Want to make them party-friendly? Slice the bars into smaller, bite-sized squares or rectangles. Perfect for a dessert buffet where guests can grab a quick, delicious nibble.
* **Garnish Galore:** Don’t underestimate the power of a good garnish!
* **Extra Chips & Nuts:** A sprinkle of extra mini chocolate chips and chopped pistachios on top of each bar is a must.
* **Dusting of Powdered Sugar:** A light dusting of powdered sugar (through a fine-mesh sieve) gives a beautiful, delicate finish.
* **Chocolate Drizzle:** Melt a little extra chocolate (dark or milk) and drizzle it artfully over the top of the bars just before serving.
* **Citrus Zest:** A final, fresh sprinkle of lemon or orange zest can add a vibrant pop of color and aroma.
* **Serving Platter:** Arrange your cut bars on a beautiful platter or tiered stand. Add a few fresh mint leaves or small edible flowers for a pop of color.
* **Individual Portions:** For a more formal presentation, serve individual bars on small dessert plates, perhaps with a side of fresh berries or a dollop of whipped cream.
No matter how you serve them, these bars are guaranteed to be a hit – the taste speaks for itself!
Keep ‘Em Fresh: Storage Tips for Your Easy No-Bake Cannoli Bars
Got leftovers? Lucky you! These Easy No-Bake Cannoli Bars are fantastic for making ahead and storing, ensuring you can enjoy a sweet treat whenever the craving strikes.
* **Refrigeration is Key:** Due to the cream cheese and ricotta filling, these bars must be stored in the refrigerator.
* **Airtight Container:** To keep them fresh and prevent them from absorbing any fridge odors, transfer the sliced (or unsliced, if you prefer) bars into an airtight container. If stacking layers, place a piece of parchment paper between them to prevent sticking.
* **How Long Do They Last?** When properly stored in the refrigerator, these cannoli bars will stay fresh and delicious for up to 3-4 days. The crust might soften slightly over time, but the flavor will remain wonderful.
* **Can You Freeze Them?** Yes, you can! For longer storage, slice the bars and arrange them in a single layer on a parchment-lined baking sheet. Freeze until solid (about 2-3 hours), then transfer the frozen bars to a freezer-safe, airtight container or heavy-duty freezer bag. They can be stored in the freezer for up to 1-2 months.
* **Thawing Frozen Bars:** When you’re ready to enjoy a frozen bar, simply transfer it from the freezer to the refrigerator and let it thaw for a few hours, or until it reaches a desired consistency. You can also eat them slightly frozen for a firmer, almost ice cream-like treat!
FAQs About Easy No-Bake Cannoli Bars
Got questions? We’ve got answers to help you master these delightful Easy No-Bake Cannoli Bars!
-
Can I use a different type of cookie for the crust?
Absolutely! While Biscoff provides a unique, spiced flavor, you can certainly substitute it. Graham crackers, vanilla wafers, or even chocolate cookies would work beautifully. Just ensure you have 2 cups of fine crumbs. -
I don’t have a food processor. How can I make the cookie crumbs?
No problem! Place the cookies in a large zip-top bag, seal it, and crush them with a rolling pin or the bottom of a heavy pan until they form fine crumbs. It’s a great stress reliever! -
Is full-fat cream cheese and ricotta necessary, or can I use lower-fat options?
For the best flavor and texture, full-fat options are recommended as they provide a richer, creamier consistency. However, part-skim ricotta and Neufchâtel (light) cream cheese can be used if you prefer, though the filling might be slightly less decadent. -
Can I skip the lemon zest or cinnamon?
Yes, both are optional additions. They enhance the classic cannoli flavor, but the bars will still be delicious without them. Feel free to adjust to your personal preference! -
What if my cream cheese isn’t soft enough?
Room temperature cream cheese is crucial for a smooth, lump-free filling. If you forget to take it out, you can unwrap it and microwave it on a low setting (e.g., defrost) in 10-15 second intervals, flipping it each time, until softened. Be careful not to melt it! -
How long do the bars *really* need to chill?
A minimum of 4 hours is necessary for the bars to set enough for clean slicing. For the absolute best, firmest texture and easiest cutting, chilling overnight (8+ hours) is highly recommended. Patience truly pays off here! -
Can I add other mix-ins to the filling?
Get creative! Beyond chocolate chips and pistachios, you could try candied orange peel, chopped dried cranberries, or a different type of nut like walnuts or almonds. Just keep the total amount of mix-ins similar. -
My bars are sticky when I try to cut them. What went wrong?
This usually means they haven’t chilled long enough. Also, using a hot, clean knife (run under hot water and wiped dry) for each slice helps immensely in getting clean cuts. -
Are these bars truly “healthier” than traditional cannoli?
“Healthier-ish” is a good term! They are generally lower in fat and calories than deep-fried cannoli shells and fillings, which typically contain lard and more sugar. Plus, no frying involved. They are still a dessert, but a lighter take on a classic. -
What if I don’t have an 8-inch square pan?
You can use a slightly larger square pan (e.g., 9×9 inch) or a small rectangular pan, but be aware that the bars will be thinner. The chilling time might be slightly less if thinner, but the overall recipe works well.Easy No-Bake Cannoli Bars 🇮🇹
These easy, no-bake bars offer a simpler way to enjoy the classic cannoli taste without the baking! They're perfect for making ahead and serving at any gathering.Equipment
- 8-inch Square Pan
- Parchment Paper
- Food Processor
- Electric Mixer
- Spatula
- Long, Sharp Knife
Ingredients
Crust
- 5 tablespoons unsalted butter melted and slightly cooled
- 2 cups Biscoff cookie crumbs (about 200g)
Creamy Filling
- 1 cup ricotta cheese (part-skim or whole milk works well)
- 16 ounces full-fat cream cheese softened at room temperature
- 1 1/3 cup powdered sugar
- 1/4 teaspoon cinnamon (optional, for a hint of warmth)
- 1/2 teaspoon lemon zest (optional, or orange zest for a classic touch)
- 2 teaspoons vanilla extract
- 1/2 cup mini chocolate chips (plus extra for topping)
- 1/3 cup chopped pistachios (shelled, plus extra for topping)
Instructions
- Prepare the Crust: Line an 8-inch square pan with parchment paper, ensuring an overhang on two sides for easy lifting. In a food processor, pulse the Biscoff cookies until they form fine crumbs. Pour in the melted butter and pulse again until the crumbs are well moistened. Press this buttery mixture firmly and evenly into the bottom of your prepared pan. Place the pan in the freezer for at least 30 minutes to chill while you get the filling ready.
- Whip the Creamy Filling: In a large mixing bowl, combine the room-temperature cream cheese, ricotta cheese, and powdered sugar. Using an electric mixer, beat these ingredients together until the mixture is beautifully smooth and completely combined, ensuring there are no lumps.
- Add Flavor and Mix-ins: Stir in the vanilla extract, and if you choose, the optional cinnamon and lemon zest for an added layer of delightful flavor. Gently fold in the mini chocolate chips and chopped pistachios with a spatula until they are just evenly distributed throughout the creamy filling.
- Assemble and Chill: Carefully spread the rich, creamy filling over your chilled cookie crust, smoothing the top with an offset spatula. Cover the pan tightly with plastic wrap and refrigerate for a minimum of 4 hours, or ideally overnight, to allow the bars to set perfectly firm. This passive chilling time is essential for easy slicing!
- Slice and Enjoy: Once thoroughly chilled, use the parchment paper overhang to gently lift the entire slab of bars out of the pan and onto a cutting board. For neat, clean slices, use a long, sharp knife, running it under hot water and wiping it dry between each cut. Garnish with extra mini chocolate chips or chopped pistachios if desired.
Notes
These easy, no-bake bars are a healthier and simpler way to enjoy the classic cannoli taste! Nutrition Information per serving:
Calories: 457 kcal
Total Carbs: 35g
Net Carbs: 34g
Fats: 34g
Protein: 5g