Get ready to weave a little magic in your kitchen! Are you tired of treats that just… sit there? It’s time to bake something that not only tastes incredible but also brings a huge smile to everyone’s face. Picture this: deliciously chewy cookies, studded with crunchy Maltesers, and adorned with playful chocolate legs and bright white eyes. We’re talking about the ultimate fun-to-make, fun-to-eat delight: **Spider Cookies**! Whether it’s for a spooky Halloween bash, a themed birthday party, or just a Tuesday that needs a little extra sparkle, these cute creepy-crawlies are here to steal the show. Forget the shivers, these spiders only bring sweet indulgence and a whole lot of giggles. Let’s dive into a recipe that’s as charming as it is easy!
Why You’ll Love This Recipe
These aren’t just any cookies; they’re an experience! Here are four fantastic reasons why our **Spider Cookies** will become your new go-to treat:
- Irresistibly Delicious: Imagine a perfectly chewy cookie base, rich with butter and a balanced sweetness, complemented by the malty crunch of Maltesers. It’s a texture and flavor party in every bite!
- Super Easy to Make: With straightforward instructions and common pantry ingredients, this recipe is perfect for bakers of all skill levels. Even kitchen novices can whip up a batch of these charming cookies with confidence.
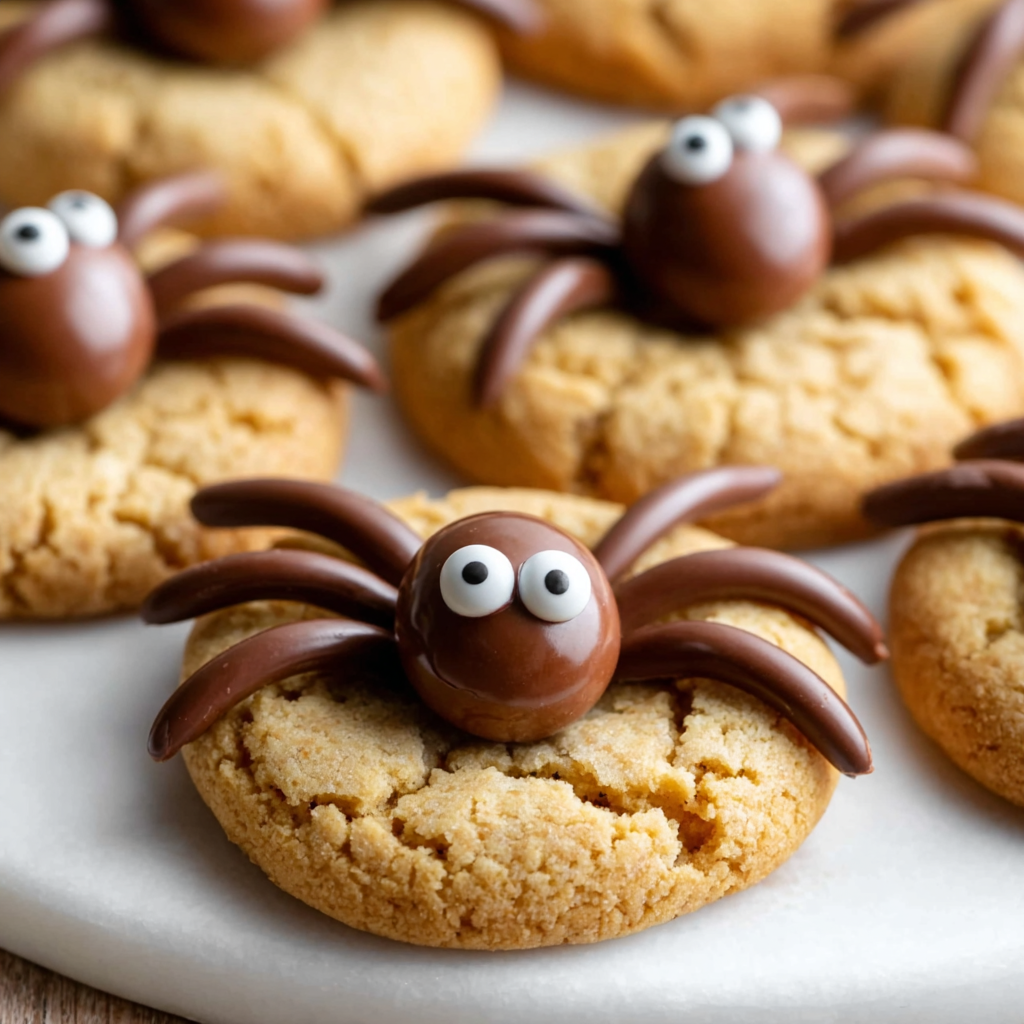
- Visually Stunning & Fun: These cookies are tiny edible works of art! The adorable spider design makes them a hit, especially with kids. They’re guaranteed to be the star of any dessert table and spark conversations.
- Perfect for Any Occasion: While they scream Halloween, **Spider Cookies** are versatile enough for school bake sales, themed parties, or just a delightful afternoon baking project. They bring joy year-round!
Ingredients with Measurements
Gather your web-spinning essentials! Here’s everything you’ll need to create your delicious **Spider Cookies**:
- 150g butter, melted
- ½ cup (100g) brown sugar
- ½ cup (110g) white sugar
- 1 large egg
- 1 tsp vanilla extract
- 2 cups (300g) plain flour
- ¼ tsp salt
- 1 tsp baking soda
- 2 Tbsp cornflour
- 140g Maltesers
- 100g dark chocolate, melted (for legs)
- White icing tube (for eyes)
Detailed Step-by-Step Directions How to Make the Recipe
Let’s get baking! Follow these simple steps to bring your delightful **Spider Cookies** to life:
- Prepare the Wet Ingredients: In a large mixing bowl, combine the melted butter, brown sugar, white sugar, large egg, and vanilla extract. Whisk them together thoroughly until the mixture is smooth and well-incorporated.
- Combine Dry Ingredients: In a separate bowl, sift together the plain flour, salt, baking soda, and cornflour. Sifting helps to aerate the flour and prevent lumps, ensuring a smooth cookie dough.
- Fold into Wet Mixture: Gradually add the sifted dry ingredients into the wet mixture. Use a spatula or wooden spoon to gently fold them together until just combined. Be careful not to overmix, as this can lead to tough cookies.
- Form the Cookies: Take small portions of the dough and roll them into uniform balls. The size should be appropriate for a single-serving cookie. Place these dough balls onto a baking tray lined with parchment paper, ensuring there’s enough space between each for spreading.
- Bake to Golden Perfection: Preheat your oven to 170°C (340°F). Bake the cookies for 12–15 minutes, or until their edges are lightly golden brown and the centers are just set.
- Add the Spider Bodies: As soon as the cookies come out of the oven and while they are still warm and soft, gently press one Malteser onto the center of each cookie. The residual heat will help the Malteser adhere.
- Decorate the Legs and Eyes: Once the cookies have cooled slightly (but before the Maltesers set completely), melt your dark chocolate. You can use a piping bag with a small hole or a Ziploc bag with a corner snipped off to pipe four little “legs” on each side of the Malteser, making eight legs in total. Finally, use the white icing tube to dot two small “eyes” onto the Malteser body.
- Cool and Serve: Allow your charming **Spider Cookies** to cool completely on a wire rack. This helps them firm up and allows the chocolate legs and icing eyes to set properly before you unleash them on your eagerly awaiting guests!
Detailed Different Ways You Can Present the Recipe and How to Serve It
These **Spider Cookies** aren’t just treats; they’re a centerpiece! Here are creative ways to present and serve them:
- Spooky Platter: Arrange the cookies on a large platter. You can create a “spiderweb” effect on the platter using white icing or chocolate sauce before placing the cookies. Add some plastic spiders or cobwebs for extra flair.
- Individual Treat Bags: For parties or as take-home favors, place one or two **Spider Cookies** in clear cellophane bags, tied with a festive ribbon. This makes them perfect for school events, trick-or-treaters, or party guests.
- Dessert Bar Fun: Incorporate them into a larger dessert spread. They pair wonderfully with mini cupcakes, chocolate-dipped pretzels, or other themed treats. Label them “Creepy Crawly Cookies” for an extra touch of fun.
- Coffee & Milk Companion: Serve them alongside a tall glass of cold milk for kids or a warm cup of coffee or hot cocoa for adults. Their chewy texture and chocolatey goodness are a perfect match for beverages.
- Story Time Snack: Make these for a cozy afternoon of reading spooky stories with the family. The visual appeal will enhance the storytelling experience!
How You Can Store It and How Long Does It Last
Want to enjoy your delicious **Spider Cookies** for a bit longer? Here’s how to store them effectively:
- Airtight Container: The key to keeping cookies fresh is an airtight container. Place your cooled **Spider Cookies** in a container with a tight-fitting lid. This prevents them from drying out and keeps them chewy.
- Room Temperature: Store the container at room temperature, away from direct sunlight or heat sources. A pantry or countertop is ideal.
- Shelf Life: When stored properly, these cookies will remain fresh and delicious for about 3-5 days. The chewiness might lessen slightly over time, but they’ll still be delightful.
- Freezing (Optional): While best fresh, you can freeze baked **Spider Cookies** for longer storage. Place them in a single layer on a baking sheet to freeze solid, then transfer them to a freezer-safe bag or container. They can last up to 1-2 months. Thaw at room temperature before serving.
FAQs Section
Got questions about these amazing **Spider Cookies**? We’ve got answers!
- Can I use a different type of chocolate for the legs?
Yes, you can! Milk chocolate or semi-sweet chocolate chips can also be melted and used for the legs. Dark chocolate offers a nice contrast in flavor, but use what you prefer! - What if I don’t have cornflour?
Cornflour helps to create a chewier cookie. If you don’t have it, you can omit it, but the texture of your cookies might be slightly different – perhaps a bit more cake-like. - Can I make the cookie dough ahead of time?
Absolutely! You can prepare the dough, form it into balls, and then refrigerate it in an airtight container for up to 2-3 days before baking. You might need to add a minute or two to the baking time. - My cookies spread too much. What went wrong?
Several factors can cause spreading: your butter might have been too warm (melted but not hot), your oven temperature might be too low, or you might have overmixed the dough. Chilling the dough balls for 15-30 minutes before baking can also help prevent excessive spreading. - Can I use other candies instead of Maltesers?
While Maltesers give a great malty crunch, you can experiment! Reese’s Pieces, Rolos, or even large chocolate buttons could work, but ensure they are pressed onto the warm cookie for adhesion. - How do I get the chocolate legs to set quickly?
If you’re in a hurry, you can place the decorated cookies in the refrigerator for about 10-15 minutes. This will help the chocolate firm up faster. - Are these cookies suitable for gluten-free diets?
This recipe uses plain flour. To make them gluten-free, you would need to substitute with a gluten-free flour blend, often with added xanthan gum. Results can vary significantly, so it’s often best to find a recipe specifically developed for gluten-free baking. - What’s the best way to melt the dark chocolate for piping?
You can use a microwave (in 30-second intervals, stirring in between) or a double boiler method. Ensure the chocolate is smooth and not too hot, as very hot chocolate can be hard to pipe neatly. - Why are my cookies not chewy?
Overbaking is the most common culprit for dry or crispy cookies. Pull them out of the oven when the edges are golden, and the center still looks slightly soft; they will continue to set as they cool. The cornflour in the recipe also aids in chewiness. - Can kids help make these **Spider Cookies**?
Absolutely! This is a fantastic recipe for kids to help with. They can assist with measuring ingredients, rolling dough balls, pressing the Maltesers (once cooled enough), and especially piping the legs and eyes (with supervision). It’s a fun and engaging activity!
Spider Cookies
Ingredients
- 150 g butter melted
- 0.5 cup brown sugar (100g)
- 0.5 cup white sugar (110g)
- 1 large egg
- 1 tsp vanilla extract
- 2 cups plain flour (300g)
- 0.25 tsp salt
- 1 tsp baking soda
- 2 Tbsp cornflour
- 140 g Maltesers
- 100 g dark chocolate melted (for legs)
- white icing tube (for eyes)
Instructions
- Combine melted butter, brown sugar, white sugar, egg, and vanilla until smooth.
- Gradually add sifted flour, salt, baking soda, and cornflour; gently fold into wet mixture.
- Form dough into small balls and place them on a baking tray.
- Bake at 170°C (340°F) for 12–15 minutes until golden.
- While still warm, press Maltesers onto each cookie for spider bodies.
- Use melted chocolate to pipe legs and add icing eyes.
- Allow cookies to cool before serving.
Notes
- Calories: 140
- Total Carbs: 18g
- Net Carbs: 17g
- Fats: 7g
- Protein: 1.5g