Why You’ll Love These Tri-Color Spumoni Cookies
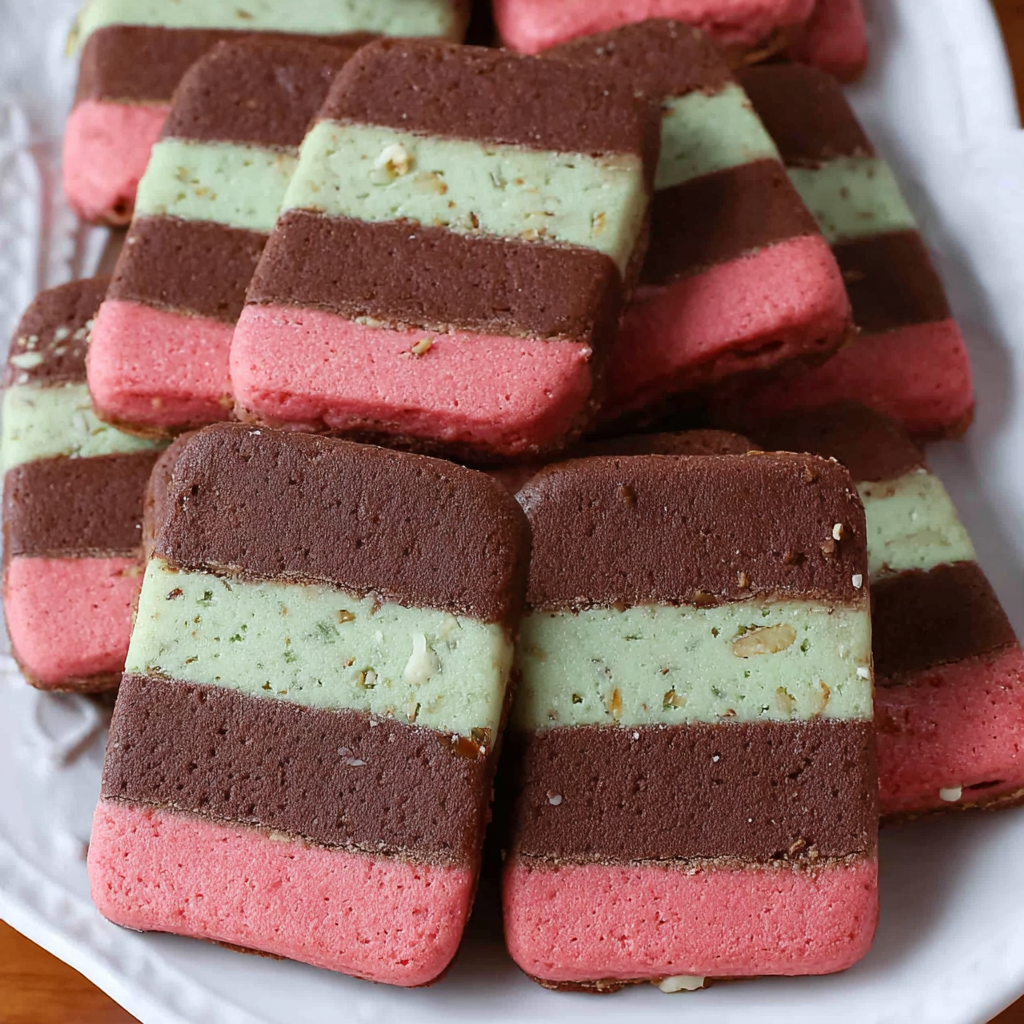
- A Feast for the Eyes: Forget bland cookies! These Tri-Color Spumoni Cookies are a vibrant masterpiece, with their distinct red, green, and chocolate layers. They’re guaranteed to be the star of any dessert platter and bring a smile to everyone’s face.
- Unforgettable Flavor Fusion: Each bite delivers a delightful blend of rich chocolate, earthy nuts, and a hint of rum, all brought together in a tender, buttery shortbread-style cookie. It’s a sophisticated flavor profile that stands out from your everyday cookie.
- Easier Than They Look: Don’t let their elegant appearance fool you! While they look impressive, the process of creating these beautiful layers is surprisingly simple and incredibly fun. It’s a fantastic recipe for both seasoned bakers and ambitious beginners.
- Perfect for Any Occasion: Whether you’re hosting a holiday party, looking for a unique homemade gift, or simply want to brighten a mundane Tuesday, these Tri-Color Spumoni Cookies fit the bill. They’re delicious, distinctive, and always a delightful surprise.
Get ready to whisk yourself away to a world of delightful colors and exquisite flavors with our show-stopping Tri-Color Spumoni Cookies! Imagine biting into a cookie that’s not just a treat for your taste buds, but also a vibrant spectacle for your eyes. Inspired by the classic Italian ice cream, these cookies bring all the charm and deliciousness of spumoni into a perfectly bakeable, slice-and-bake format. No fancy decorating skills needed – just a little mixing, layering, and chilling, and you’ll be on your way to creating bakery-worthy confections that are as fun to make as they are to devour. So, roll up your sleeves and let’s bring some joyful color and irresistible taste into your kitchen!
Ingredients for Tri-Color Spumoni Cookies
- 🧈 1 cup unsalted butter, softened
- 🍚 1 1/2 cups powdered sugar
- 🥚 1 large egg
- ✨ 1 teaspoon vanilla extract
- 🌾 2 1/2 cups all-purpose flour
- 🍫 2 ounces unsweetened chocolate, melted
- 🥜 1/2 cup chopped nuts (like pecans, walnuts, or pistachios)
- 🟢 A few drops of green food coloring
- 🥃 2 teaspoons rum extract (or cherry/peppermint extract for an alternative flavor)
- 🔴 A few drops of red food coloring
Detailed Step-by-Step Directions
- Prepare the Basic Dough: In a spacious mixing bowl, start by creaming together the softened unsalted butter and powdered sugar until the mixture is beautifully light and fluffy. Beat in the large egg and vanilla extract until well combined. Gradually, incorporate the all-purpose flour, mixing just until a smooth, cohesive dough forms. Be careful not to overmix! Once ready, divide this wonderfully versatile dough evenly into three separate bowls.
- Create the Flavored Layers:
- Chocolate Layer: To the first portion of dough, gently fold in the melted unsweetened chocolate until it’s perfectly integrated and boasts a rich, even brown hue. Set this aside.
- Green Layer: Into the second portion, stir in your chosen chopped nuts and a few drops of vibrant green food coloring. Mix thoroughly until the color is consistent throughout the dough. Set this aside.
- Red Layer: To the third portion, incorporate the rum extract (or your preferred alternative flavor) along with a few drops of striking red food coloring. Blend well until the color is evenly distributed and the flavor is fully mixed in. Set this dough aside as well.
- Shape and Chill the Layers: Lay out three separate sheets of waxed paper. On each sheet, press one of your colored dough portions into a neat 8 x 3-inch rectangle. Now for the fun part: carefully stack these colorful rectangles on top of each other. For that classic spumoni look, place the green layer directly in the middle. Gently but firmly press the layers together and smooth out the edges to form a tidy “cookie brick.” Wrap this colorful brick tightly in waxed paper and pop it into the refrigerator for at least 2 hours. This crucial chilling time allows the dough to firm up, making it wonderfully easy to slice later.
- Bake the Cookies: Preheat your oven to a precise 375°F (190°C). Once your dough brick is thoroughly chilled, remove it from the refrigerator. Using a very sharp knife, slice the dough into uniform 1/4-inch thick cookies, working from the end of the brick. Arrange these beautiful slices onto an ungreased baking sheet, ensuring a little space between each cookie for even baking. Bake for 9 to 11 minutes, or until the cookies are nicely set and no imprint remains when you lightly touch them. Allow them to cool slightly on the baking sheet before carefully transferring them to a wire rack to cool completely. Now, stand back and admire your beautiful, homemade Tri-Color Spumoni Cookies before enjoying every delightful bite!
Presentation and Serving Suggestions
These Tri-Color Spumoni Cookies are already a visual delight, but a little extra flair can make them truly unforgettable! For a stunning platter presentation, arrange them fanned out or stacked elegantly alongside other holiday treats or simple shortbreads. Their vibrant colors make them perfect for themed parties – think Christmas or Valentine’s Day! For gifting, layer them artfully in clear cello bags tied with a festive ribbon, or stack them in a decorative cookie tin. Imagine the joy of receiving these homemade beauties!
When it comes to serving, these cookies are incredibly versatile. They pair wonderfully with a warm cup of coffee or tea for a cozy afternoon snack. For a truly indulgent experience, serve them alongside a scoop of vanilla bean ice cream, allowing the cookie to add texture and a burst of flavor. You could also drizzle them with a bit of melted white chocolate after cooling for an extra touch of elegance, or sprinkle with edible glitter for a festive sparkle. Get creative and let these colorful cookies be the star of your dessert table!
Storage and Shelf Life
Keeping your delightful Tri-Color Spumoni Cookies fresh is simple, ensuring you can enjoy their vibrant flavors for days to come. Once completely cooled, store the baked cookies in an airtight container at room temperature. They will remain wonderfully fresh and delicious for about 3 to 5 days. If you wish to extend their freshness, you can store them in an airtight container in the refrigerator for up to a week.
For longer storage, both the raw dough and baked cookies can be frozen. To freeze the dough, wrap the “cookie brick” tightly in multiple layers of plastic wrap, then an additional layer of aluminum foil. It can be frozen for up to 1 month. Thaw the dough in the refrigerator overnight before slicing and baking as directed. For baked cookies, arrange them in a single layer on a baking sheet and freeze until solid, then transfer to a freezer-safe airtight container or bag. They will keep for 2 to 3 months. Thaw at room temperature for a quick treat!
FAQs About Tri-Color Spumoni Cookies
- What does “spumoni” mean in the context of these cookies?
“Spumoni” (Italian for “foam”) refers to a classic Italian ice cream, usually layered with different colors and flavors, often including fruit, nuts, and chocolate. These cookies capture that colorful, multi-flavored essence in a baked form. - Can I use different food colorings?
Absolutely! Feel free to get creative with your color choices to match different holidays or themes. Blue, yellow, or even purple would make a fun variation. - What if I don’t have rum extract?
No problem! Cherry extract, almond extract, peppermint extract, or even orange extract would make fantastic alternative flavors for the red layer. Choose your favorite! - Can I make these cookies gluten-free?
While not tested specifically for this recipe, you can usually substitute all-purpose flour with a 1:1 gluten-free baking blend that contains xanthan gum. Results may vary slightly in texture. - Why is chilling the dough so important?
Chilling the dough is crucial for two main reasons: it firms up the butter, which prevents the cookies from spreading too much during baking, and it makes the dough much easier to slice into neat, uniform pieces. - Can I prepare the dough ahead of time?
Yes! You can prepare the dough brick and keep it tightly wrapped in the refrigerator for up to 2-3 days before slicing and baking. You can also freeze the dough (as detailed in the storage section). - How do I prevent the layers from separating?
Make sure to press the layers firmly together when you form the cookie brick. Additionally, ensuring the dough is well-chilled before slicing helps maintain the integrity of the layers. - Can I add different types of nuts?
Definitely! The recipe suggests pecans, walnuts, or pistachios, but feel free to use almonds, cashews, or even macadamia nuts. Choose whatever you love! - My cookies are spreading too much, what went wrong?
Common culprits for spreading include dough that wasn’t chilled long enough, an oven that isn’t hot enough (so the butter melts too slowly), or measuring too much butter/not enough flour. Ensure your oven temperature is accurate and your dough is well-chilled. - Are these cookies suitable for gifting?
They are absolutely perfect for gifting! Their unique appearance and delightful taste make them a thoughtful and impressive homemade present for friends, family, or neighbors.
Tri-Color Spumoni Cookies 🌈
Equipment
- Large Bowl
- Waxed Paper
- Sharp Knife
- Baking Sheet
- Wire Rack
Ingredients
Basic Dough
- 1 cup unsalted butter softened
- 1 1/2 cups powdered sugar
- 1 large egg
- 1 teaspoon vanilla extract
- 2 1/2 cups all-purpose flour
Chocolate Layer
- 2 ounces unsweetened chocolate melted
Green Layer
- 1/2 cup chopped nuts (like pecans, walnuts, or pistachios)
- green food coloring A few drops
Red Layer
- 2 teaspoons rum extract (or cherry/peppermint extract for an alternative flavor)
- red food coloring A few drops
Instructions
- 1. Prepare the Basic Dough: In a large bowl, cream together the softened butter, powdered sugar, egg, and vanilla extract until light and fluffy. Gradually add the all-purpose flour, mixing until a smooth dough forms. Divide this dough evenly into three separate bowls.
- 2. Create the Flavored Layers:
- Chocolate Layer: To the first portion of dough, gently mix in the melted unsweetened chocolate until fully combined. Set aside.
- Green Layer: To the second portion, stir in the chopped nuts and a few drops of green food coloring. Mix until the color is even. Set aside.
- Red Layer: To the third portion, incorporate the rum extract (or your chosen alternative) and a few drops of red food coloring. Blend well. Set aside.
- 3. Shape and Chill the Layers: Lay out three sheets of waxed paper. On each sheet, press one colored dough portion into an 8 x 3-inch rectangle. Carefully stack the rectangles on top of each other, placing the green layer in the middle. Gently press the layers together and smooth the edges to form a neat “cookie brick.” Wrap the brick tightly in waxed paper and refrigerate for at least 2 hours to allow it to firm up, making it easy to slice.
- 4. Bake the Cookies: Preheat your oven to 375°F (190°C). Remove the chilled dough brick from the refrigerator. Using a sharp knife, slice the dough into 1/4-inch thick cookies from the end of the brick. Place the sliced cookies onto an ungreased baking sheet, leaving a little space between each. Bake for 9 to 11 minutes, or until the cookies are set and no imprint remains when lightly touched. Let them cool slightly on the baking sheet before transferring to a wire rack to cool completely. Enjoy your beautiful, homemade cookies!