
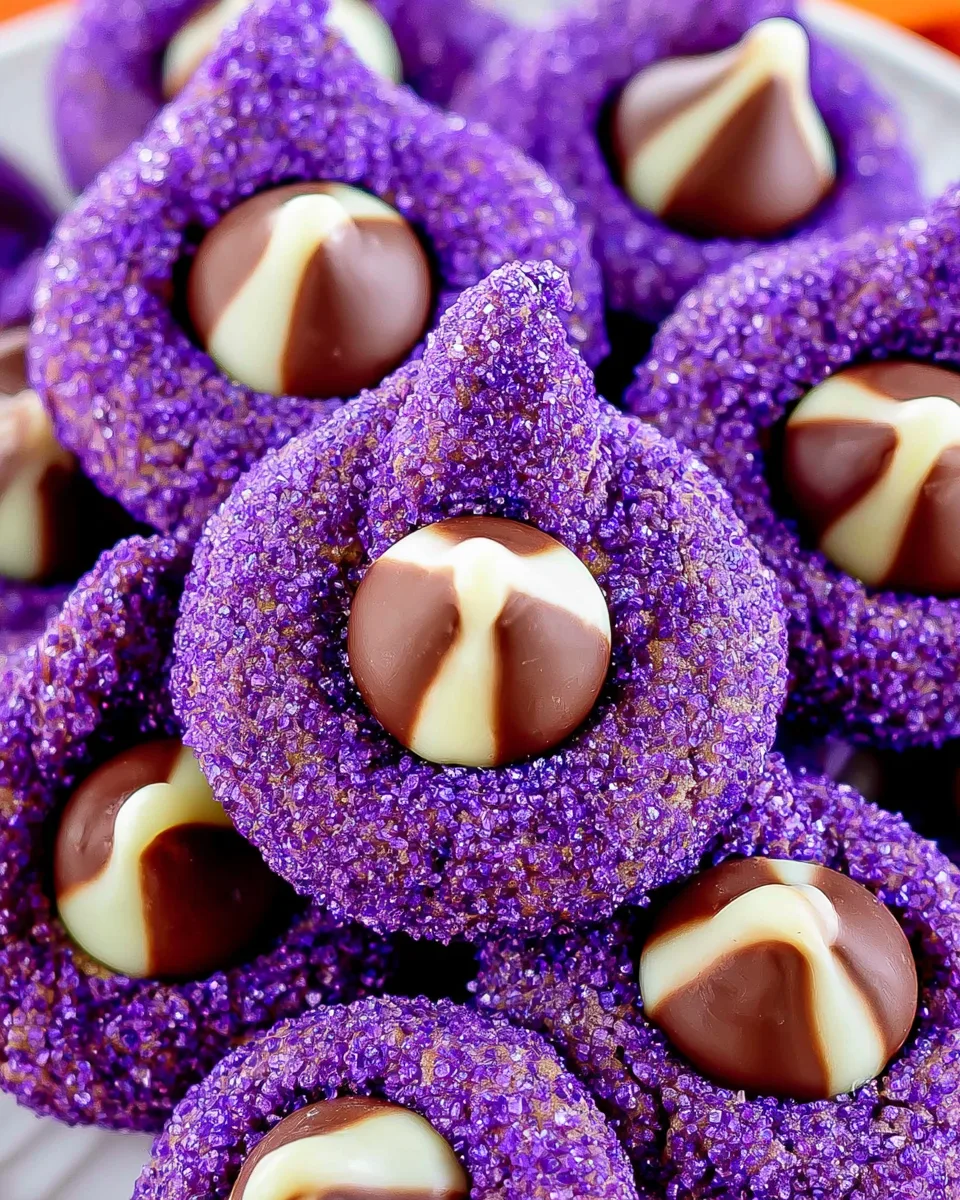
Summon the spirit of Halloween with a treat that’s as mischievously magical as a black cat’s wink! These Witch Hat Halloween Cookies are not just a dessert; they are a coven of tiny potions baked with peanut butter love and crowned with a sweet chocolate kiss. The moment you bite into the soft, purple-speckled dough and hit that creamy center, you’ll feel a spell of pure delight. They’re the perfect edible craft for a spooky party or a cozy night in, proving that magic doesn’t have to be complicated—just delicious.
Why You’ll Love This Recipe
- Effortless Magic: No fondant, no piping bags, and no special skills required. This recipe turns simple ingredients into adorable hats in just a few steps. It’s foolproof for beginner bakers and a fun project for kids.
- Perfect Peanut Butter & Chocolate Combo: The classic, salty-sweet duo shines here. A soft, sugar-coated peanut butter cookie base meets a rich chocolate kiss top, creating a flavor that’s nostalgic and deeply satisfying.
- Stunning Visuals, Minimal Effort: With purple gel coloring and sparkling sanding sugar, these cookies look like they belong in a Halloween bakery window. The bright color and shimmer make them pop on any dessert table without requiring any artistry.
- Make-Ahead Friendly: The dough can be chilled overnight, making them perfect for event prep. They also freeze beautifully, so you can have a batch ready for unexpected trick-or-treaters or last-minute party invites.
Ingredients with Measurements
- 🌾 1 ½ cups all-purpose flour
- 🥄 2 teaspoons cornstarch
- 🧂 ¼ teaspoon baking powder
- 🧂 ½ teaspoon baking soda
- 🧂 ¼ teaspoon salt
- 🧈 ½ cup unsalted butter, softened
- 🍚 1 cup granulated sugar
- 🥚 1 large egg, at room temperature
- 🍦 1 teaspoon vanilla extract
- 🥜 ¾ cup creamy peanut butter
- 🎨 Purple gel food coloring
- 🍫 30 Hershey’s Hugs or chocolate kisses, unwrapped
- ✨ Purple sanding sugar or Halloween sprinkles (for coating)
Detailed Step-by-Step Directions
- Prepare the Dry Base: In a medium bowl, whisk together the flour, cornstarch, baking powder, baking soda, and salt. This mix helps create the perfect soft and puffy cookie texture. Set it aside for later.
- Cream Butter & Sugar: In a large bowl, beat the softened butter and granulated sugar together until the mixture is light and creamy. This should take about 2 minutes. The air incorporated here gives the cookies lift.
- Add Wet Ingredients: Crack in the egg and add the vanilla extract, mixing until well combined. Then, add the creamy peanut butter, scraping down the sides of the bowl to ensure everything is evenly incorporated.
- Combine & Color: Gradually add your dry ingredients to the wet mixture, mixing on low speed just until combined. Now for the fun part: stir in the purple gel food coloring until the dough reaches your desired witchy shade. A deep violet or bright plum works best.
- Chill the Dough: Cover the dough tightly with plastic wrap and refrigerate for at least 2 hours (or overnight). This step is crucial—it prevents the cookies from spreading too much during baking.
- Preheat & Pre-coat: When ready to bake, preheat your oven to 350°F. Line two baking sheets with parchment paper or silicone mats. Place your sanding sugar or sprinkles in a small bowl.
- Shape & Roll: Scoop about 1 tablespoon of chilled dough and roll it into a smooth ball. Roll the ball in the sanding sugar or sprinkles until completely coated. This creates the sparkly “brim” of the hat.
- Bake to Perfection: Place the coated balls on the baking sheets about 2 inches apart. Bake for 8 to 10 minutes. You want the cookies to be puffed and have small cracks on the surface—do not let them brown.
- Add the Hat Top: Let the cookies cool on the baking sheet for 5 minutes. Gently press a Hershey’s Hug or Kiss into the center of each warm cookie. The residual heat will soften the chocolate, making it stick.
- Set & Serve: Place the entire baking sheet in the freezer for 10 minutes to fully set the chocolate. Once firm, transfer the cookies to a wire rack to cool completely before serving.
Different Ways to Present and Serve
To serve these Witch Hat Halloween Cookies with flair, arrange them on a black or dark purple cake stand to make the purple and silver colors pop. For a party, use a large platter and surround the cookies with edible “broomsticks” (pretzel sticks dipped in chocolate) and “witches’ fingers” (almond cookies).
You can also package them as gifts. Place them in a clear cellophane bag tied with a bright orange or green ribbon, or nestle them into a festive Halloween tin. For a themed dessert table, stack them on a tiered tray alongside pumpkin-shaped cookies and candy corn. They pair wonderfully with a tall glass of cold milk or a warm mug of spiced apple cider.
How to Store and How Long Does It Last
These cookies are best enjoyed within the first 2 days for optimal texture. To store them, place the cooled cookies in an airtight container at room temperature. They will stay fresh and maintain their soft centers for up to 5 days.
If you need to keep them longer, you can freeze the baked cookies. Place them in a single layer in a freezer-safe container or bag, separating layers with parchment paper. They will last for up to 3 months. To thaw, simply leave them at room temperature for about 15 minutes. You can also freeze the raw dough balls before baking for a quick treat later.
FAQs
- Can I use natural peanut butter? It’s not recommended. Natural peanut butter has a thinner consistency and can cause the cookies to spread too much. Use a standard creamy peanut butter like Skippy or Jif for the best structure.
- Do I have to use purple food coloring? No! While purple gives the “witch hat” vibe, you can use any color you like. Green for Frankenstein, orange for a pumpkin, or red for a devilish strawberry treat. Gel coloring is best as it doesn’t affect the dough’s texture.
- Can I use a different chocolate candy? Absolutely. Hershey’s Kisses are classic, but you can use Hugs, Rolo candies, or even a chocolate-covered caramel for a gooey center. For a nut-free option, use a caramel-filled chocolate.
- Why did my cookies spread too much? This usually happens if the dough wasn’t chilled long enough, or if the butter was too soft. Make sure to chill the dough for at least 2 hours. You can also freeze the scooped balls for 15 minutes before baking.
- How can I make these gluten-free? You can substitute the all-purpose flour with a 1:1 gluten-free baking flour blend. The texture might be slightly different, but they will still be delicious. Ensure your baking powder and baking soda are gluten-free as well.
- Can I freeze the cookie dough? Yes! Roll the dough into balls and place them on a baking sheet in the freezer. Once solid, transfer the frozen balls to a freezer bag. Bake from frozen, adding 2-3 extra minutes to the bake time.
- Is it okay if the cookies brown a little? For the best “witch hat” look, you want to avoid browning. The purple color is the star here. Keep a close eye on the oven and pull them out the moment they look puffy and have tiny cracks, just before they start to turn golden on the edges.
- Can I make these cookies larger? Yes. For larger cookies, use 2 tablespoons of dough per ball. You will need to increase the bake time to 11-13 minutes. You will also need to use larger chocolate candies to match the bigger size.
- Why do I have to use cornstarch? Cornstarch is the secret ingredient for soft, tender cookies. It inhibits gluten formation slightly, which keeps the texture delicate and crumbly rather than tough and chewy. It’s a common trick for bakery-style cookies.
- Can I use liquid food coloring instead of gel? You can, but you will need to use a lot more liquid coloring to achieve a deep purple. This will add extra moisture to the dough, which can cause spreading and change the texture. Gel is always the superior choice for baking.
Witch Hat Halloween Cookies
Equipment
- Mixing Bowls
- Baking Sheets
- Parchment Paper
- Electric Mixer
Ingredients
Dry Ingredients
- 1 1/2 cups all-purpose flour
- 2 tsp cornstarch
- 1/4 tsp baking powder
- 1/2 tsp baking soda
- 1/4 tsp salt
Wet Ingredients
- 1/2 cup unsalted butter softened
- 1 cup granulated sugar
- 1 large egg room temperature
- 1 tsp vanilla extract
- 3/4 cup creamy peanut butter
- purple gel food coloring
Assembly
- 30 Hershey's Hugs or chocolate kisses unwrapped
- purple sanding sugar or sprinkles
Instructions
- In a bowl, whisk together the flour, cornstarch, baking powder, baking soda, and salt. Set aside.
- In a large bowl, beat the softened butter and sugar together until creamy, about 2 minutes.
- Add the egg and vanilla extract, then mix until well combined.
- Add the peanut butter and mix again, scraping down the sides as needed.
- Gradually add the dry ingredients to the wet mixture, mixing on low just until combined.
- Stir in purple gel food coloring until the dough reaches your desired shade.
- Cover the dough and chill in the fridge for at least 2 hours (or overnight).
- Preheat your oven to 350°F and line two baking sheets with parchment paper or silicone mats.
- Place the sanding sugar or sprinkles in a small bowl.
- Scoop about 1 tablespoon of dough, roll into a ball, then roll in the sugar or sprinkles to coat.
- Place the coated balls on the baking sheets about 2 inches apart.
- Bake for 8 to 10 minutes, until the cookies are puffed and have small cracks (do not let them brown).
- Let the cookies cool on the baking sheet for 5 minutes, then gently press a Hug or Kiss into the center of each cookie.
- Place the entire baking sheet in the freezer for 10 minutes to set the chocolate.
- Transfer the cookies to a wire rack to cool completely.
Notes
Calories: 139 | Total Carbs: 16g | Net Carbs: 15g | Fats: 8g | Protein: 3g