Ever dreamt of a dessert that marries the rich bitterness of espresso with the luxurious indulgence of chocolate, all while keeping it completely sugar-free and keto-friendly? Stop dreaming and start tasting! Get ready to dive into the world of homemade Espresso Chocolate Mousse Cups, where every bite is a symphony of flavors designed to thrill your taste buds without compromising your health goals. These individual treats are not just delicious; they’re an experience waiting to happen, perfect for impressing guests or simply treating yourself to a moment of pure bliss.
Why You’ll Love These Espresso Chocolate Mousse Cups
Prepare to fall head over heels for these delightful desserts for more reasons than one. They’re a true game-changer for anyone seeking a sophisticated, yet simple, sweet treat!
- Keto-Friendly Magic: With only 5g net carbs per serving, these Espresso Chocolate Mousse Cups are a dream come true for anyone following a ketogenic or low-carb lifestyle. Indulge without the guilt or the sugar crash!
- Coffee Lover’s Dream: The subtle yet distinct kick of espresso powder elevates the chocolate to new heights, creating a flavor profile that coffee aficionados will absolutely adore. It’s the perfect blend of your favorite morning brew and a decadent dessert.
- Chocolate Obsession Satisfied: Using sugar-free semi-sweet chocolate chips and unsweetened cocoa powder ensures a deep, rich chocolate flavor that’s intensely satisfying. This isn’t just chocolate; it’s a cocoa celebration!
- Effortlessly Elegant: These mousse cups look like they came straight from a gourmet patisserie, but they’re surprisingly easy to make. They’re perfect for dinner parties, special occasions, or simply making an ordinary day feel a little more extraordinary.
Ingredients for Your Espresso Chocolate Mousse Cups
Gather your components for this delightful dessert. The magic happens with these simple, yet powerful, ingredients:
- 🍫 4 ounces sugar-free semi-sweet chocolate chips
- 🥥 1 teaspoon coconut oil
- 🥛 8 ounces cream cheese, softened
- 🍶 1 cup heavy cream
- 🍬 2/3 cup powdered monk fruit or allulose sweetener
- 🍫 1/4 cup unsweetened cocoa powder
- ☕ 2 teaspoons instant espresso powder
- 💧 2 teaspoons hot water
- 🍦 1 teaspoon vanilla extract
Step-by-Step Directions to Craft Your Espresso Chocolate Mousse Cups
Ready to get started? Follow these detailed instructions, and you’ll be enjoying your homemade Espresso Chocolate Mousse Cups in no time!
- Craft the Chocolate Cups: Begin by creating the elegant shells for your mousse. In a microwave-safe bowl, combine your sugar-free chocolate chips and coconut oil. Pop it in the microwave for 1 minute, then give it a good stir until it’s smooth. If you still see unmelted chips, microwave for another 20 seconds and stir again until the mixture is completely melted and has a beautiful glossy sheen.
- Shape the Cups: Carefully pour the melted chocolate evenly into 6 paper cupcake liners, making sure they are nestled snugly in a muffin pan. Using the back of a spoon or a small brush, gently spread the chocolate up the sides of each liner to form a cup shape. Think about creating a sturdy vessel for your mousse. Once shaped, place the muffin pan in the fridge for 1 to 2 hours, or until the chocolate is completely firm and crisp.
- Prepare the Espresso Shot: In a small, separate bowl, combine the instant espresso powder with the hot water. Stir until the powder is fully dissolved, creating a concentrated espresso liquid. Set this aside to cool slightly.
- Whip the Cream: Grab a chilled mixing bowl (popping it in the freezer for 10-15 minutes beforehand helps!) and pour in your heavy cream. Using an electric mixer, whip the cream until soft peaks form. You want it light and airy, but not stiff. Transfer this whipped cream to the fridge to keep it cool while you prepare the rest of the mousse.
- Cream Cheese Base: In another mixing bowl, take your softened cream cheese and use a hand mixer to beat it lightly until it’s wonderfully smooth and airy. This ensures a lump-free and luxurious mousse texture.
- Flavor the Mousse: Now for the flavor explosion! To the cream cheese mixture, add your powdered sweetener, unsweetened cocoa powder, the dissolved espresso liquid, and the vanilla extract. Mix everything together with your hand mixer until all the ingredients are well combined and the mixture is perfectly smooth and uniform.
- Fold in Whipped Cream: This step is crucial for maintaining the mousse’s light and fluffy texture. Gently fold the reserved whipped heavy cream into your chocolate-espresso cream cheese mixture. Use a spatula and fold in sections, being careful not to overmix. Just combine until no streaks of white cream remain. The goal is to keep as much air as possible in the mousse.
- Assemble and Chill: Carefully spoon or pipe your luscious mousse into the prepared chocolate cups. If piping, a pastry bag with a star tip will give them a professional flourish. Once filled, place your finished Espresso Chocolate Mousse Cups back into the fridge. Chill them for at least an hour, or until you’re ready to enjoy these delightful treats!
Serving and Presenting Your Espresso Chocolate Mousse Cups
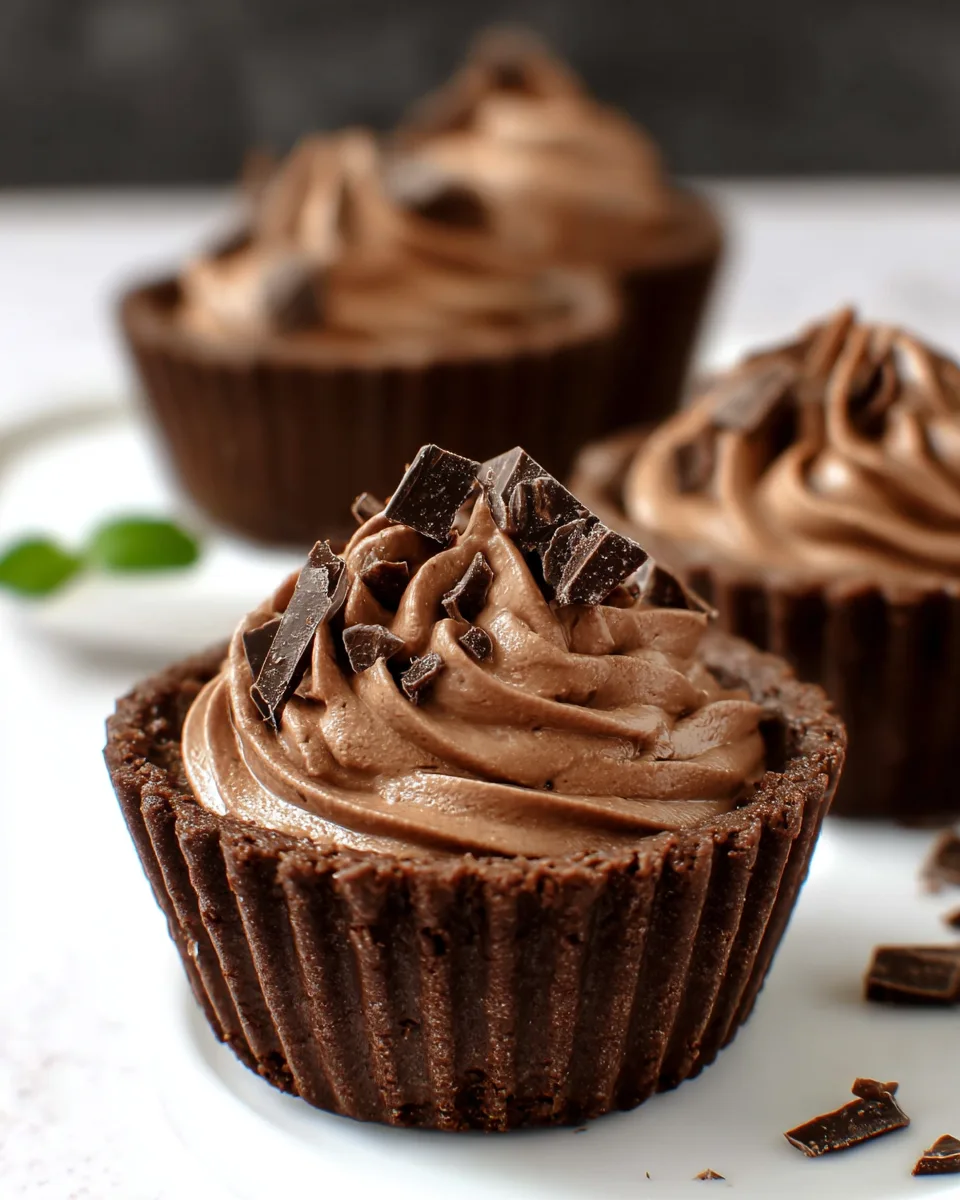
These Espresso Chocolate Mousse Cups are already a work of art, but with a few extra touches, you can elevate their presentation to truly impress! Think of them as individual masterpieces waiting for their final flourish.
Garnish Galore:
- Cocoa Dusting: A light dusting of unsweetened cocoa powder or instant espresso powder over the top adds a sophisticated touch and hints at the flavors within.
- Chocolate Shavings: Use a vegetable peeler to create delicate curls from a sugar-free chocolate bar. Sprinkle these on top for texture and visual appeal.
- Whipped Cream Swirl: For an extra layer of decadence, pipe a small dollop or swirl of sugar-free whipped cream on top of each mousse cup.
- Coffee Bean Accent: A single, whole roasted coffee bean placed elegantly on top of the whipped cream or directly on the mousse can be a beautiful and thematic garnish.
- Mint Leaf: A tiny, fresh mint leaf can add a pop of color and a subtle aromatic contrast.
Serving Suggestions:
- Serve them chilled, straight from the fridge. The contrast between the firm chocolate cup and the creamy mousse is divine.
- Arrange them on a beautiful platter for an elegant dessert display at your next gathering.
- Pair them with a hot cup of coffee or a sugar-free espresso for the ultimate coffee-chocolate experience.
- These make perfect individual portions, ensuring everyone gets their own little piece of heaven!
Storage and Shelf Life
Once you’ve crafted your incredible Espresso Chocolate Mousse Cups, you’ll want to make sure they stay fresh and delicious for as long as possible!
How to Store:
The key to keeping your mousse cups perfect is refrigeration. Place the finished cups in an airtight container. This prevents them from absorbing any unwanted odors from your fridge and keeps the chocolate shell from softening or getting condensation. Stack them carefully if necessary, using parchment paper between layers to prevent sticking.
How Long Do They Last?
When stored properly in the refrigerator, your Espresso Chocolate Mousse Cups will maintain their quality and deliciousness for up to 3-5 days. While they might be safe to eat for a little longer, the texture and freshness of the mousse are best within this timeframe. The chocolate cups will remain firm, and the mousse will retain its light, airy consistency.
We do not recommend freezing these mousse cups, as the delicate texture of the mousse and the crispness of the chocolate shell can be compromised during thawing.
FAQs About Espresso Chocolate Mousse Cups
- Can I make these Espresso Chocolate Mousse Cups dairy-free?
Yes, you can! Substitute the heavy cream with full-fat canned coconut cream (chilled overnight and scoop out the thick cream) and the cream cheese with a dairy-free cream cheese alternative. Ensure your chocolate chips are also dairy-free. - What if I don’t have coconut oil for the chocolate cups?
You can use a small amount of unsalted butter or even a neutral-flavored oil like avocado oil. The coconut oil helps with a smooth melt and makes the chocolate a bit easier to work with, but alternatives are possible. - Can I use regular sugar instead of monk fruit/allulose?
While you technically can, this recipe is designed to be keto-friendly and sugar-free. Swapping in regular powdered sugar would significantly increase the carb count and change the nutritional profile. - How do I ensure my chocolate cups don’t crack when removing the liners?
Ensure the chocolate is fully set and cold. Gently peel the paper liner away from the chocolate, rather than trying to pull the chocolate from the liner. Work slowly and carefully. - Can I make these Espresso Chocolate Mousse Cups ahead of time for a party?
Absolutely! These are a fantastic make-ahead dessert. You can prepare them 1-2 days in advance and store them in the fridge, allowing you more time to enjoy your event. - Are other sweeteners suitable besides monk fruit or allulose?
Erythritol or a blend containing stevia could also work, but powdered monk fruit or allulose are often preferred for their taste and texture, as they dissolve smoothly and have no aftertaste for many people. - Is instant espresso powder essential, or can I use regular instant coffee?
Espresso powder offers a much more concentrated coffee flavor, which is key for the “espresso” in these Espresso Chocolate Mousse Cups. Instant coffee might work, but you may need more to achieve a similar depth of flavor, and it might have a slightly different taste profile. - How do I prevent overmixing the mousse when folding in the whipped cream?
Use a gentle hand and a spatula. Fold from the bottom up, cutting through the center, and rotate the bowl. Stop as soon as no white streaks of cream are visible. Overmixing will deflate the whipped cream and make the mousse less airy. - Can I omit the espresso powder if I’m not a coffee fan?
Yes, you can! If you prefer a pure chocolate mousse cup, simply omit the instant espresso powder and hot water step. You’ll still have a wonderfully rich chocolate treat. - What’s the best way to melt chocolate if I don’t have a microwave?
You can melt the chocolate and coconut oil in a double boiler. Place a heat-proof bowl over a saucepan of simmering water, ensuring the bowl doesn’t touch the water. Stir gently until melted and smooth.
“`
Espresso Chocolate Mousse Cups
Equipment
- Microwave-safe Bowl
- Muffin Pan
- Mixing Bowls
- Hand Mixer
Ingredients
- 4 ounces sugar-free semi-sweet chocolate chips
- 1 teaspoon coconut oil
- 8 ounces cream cheese softened
- 1 cup heavy cream
- 2/3 cup powdered monk fruit or allulose sweetener
- 1/4 cup unsweetened cocoa powder
- 2 teaspoons instant espresso powder
- 2 teaspoons hot water
- 1 teaspoon vanilla extract
Instructions
- Craft the Chocolate Cups: In a microwave-safe bowl, combine the sugar-free chocolate chips and coconut oil. Microwave for 1 minute, then stir until smooth. If needed, heat for another 20 seconds and stir again until completely melted and glossy.
- Shape the Cups: Pour the melted chocolate evenly into 6 paper cupcake liners placed in a muffin pan. Gently spread the chocolate up the sides of each liner to form a cup. Place in the fridge for 1 to 2 hours, or until the chocolate is firm.
- Prepare the Espresso Shot: In a small bowl, dissolve the instant espresso powder in hot water and set aside.
- Whip the Cream: In a chilled mixing bowl, whip the heavy cream until soft peaks form. Set this aside in the fridge.
- Cream Cheese Base: In a separate mixing bowl, use a hand mixer to lightly beat the softened cream cheese until it's smooth and airy.
- Flavor the Mousse: Add the powdered sweetener, cocoa powder, dissolved espresso, and vanilla extract to the cream cheese. Mix until everything is well combined and smooth.
- Fold in Whipped Cream: Gently fold the whipped heavy cream into the chocolate mixture until just combined. Be careful not to overmix, to keep the mousse light and fluffy.
- Assemble and Chill: Spoon or pipe the mousse into your prepared chocolate cups. Chill them in the fridge until you're ready to enjoy these delightful treats!