The holidays are here, and so is the craving for something sweet, charming, and utterly effortless! Forget turning on the oven or spending hours in the kitchen. Imagine delightful little treats that come together faster than Santa can say “Ho ho ho,” bringing smiles to faces young and old. Get ready to sprinkle some magic and create the most enchanting, no-fuss dessert that will be the star of your festive spread. Prepare to fall head over heels for these adorable, easy-to-make, and incredibly delicious **Festive No-Bake Oreo Delights**!
Why You’ll Love This Recipe
These **Festive No-Bake Oreo Delights** aren’t just a treat; they’re a holiday lifesaver! Here are four fantastic reasons why you’ll want to whip up a batch (or five) right now:
- Effortlessly Easy & No-Bake: Ditch the oven and complex techniques! If you can melt chocolate and dip a cookie, you’re halfway to perfection. This recipe is designed for maximum festive fun with minimal fuss.
- Kid-Friendly & Fun: Looking for a holiday activity that involves delicious outcomes? Kids absolutely adore helping with these! From dipping to decorating, it’s a wonderful way to create edible art and precious memories together.
- Super Speedy & Time-Saving: With a prep time of just 10 minutes and a “cook” time of 5 (mostly melting!), you can have a batch of these beauties ready in under 15 minutes. Perfect for last-minute gatherings or when a sweet craving strikes!
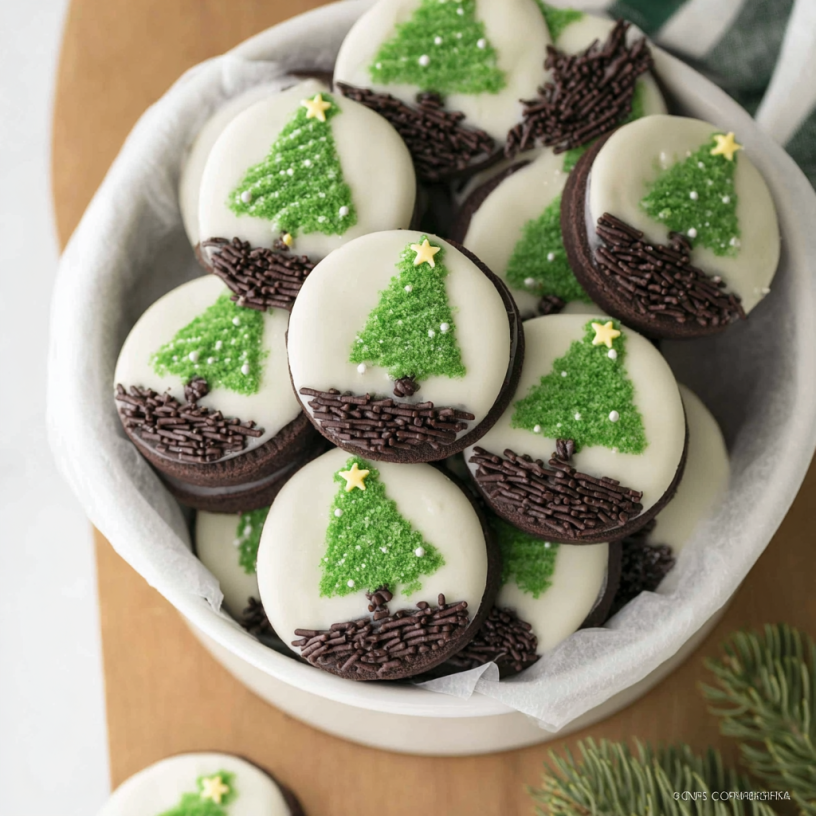
- Visually Stunning & Delicious: Not only are these little tree-decorated Oreos incredibly cute, but they also taste amazing! The classic Oreo crunch paired with smooth white and green chocolate is a match made in holiday heaven. They’ll instantly elevate your dessert table.
Ingredients for Your Festive No-Bake Oreo Delights
Gather your festive arsenal! Here’s everything you’ll need to create these charming **Festive No-Bake Oreo Delights**:
- 🍪 15 Oreo cookies (or your preferred sandwich cookies)
- ⚪ 6 ounces white melting chips (such as Ghirardelli wafers)
- 🟢 3 ounces green melting wafers (candy melts)
- ⭐ 15 small candy stars
- 🍫 1/4 cup chocolate sprinkles (jimmies), optional for tree trunks
Step-by-Step Directions to Create Holiday Magic
Get ready to transform simple cookies into enchanting **Festive No-Bake Oreo Delights**! Follow these easy steps:
- Prep Your Workspace: First things first, grab a baking sheet and line it with parchment paper. This makes for super easy cleanup and ensures your treats won’t stick. Set it aside, ready for action!
- Melt White Chocolate: In a microwave-safe bowl, place your white melting chips. Heat them in short, 30-second bursts, stirring diligently after each interval. Continue until the chocolate is perfectly smooth and fully melted – be patient, don’t overheat!
- Half-Dip Cookies: Carefully take each Oreo cookie and dip half of it into the luscious melted white chocolate. Let any excess chocolate gently drip back into the bowl. Once dipped, place these beauties onto your prepared parchment-lined baking sheet.
- Melt Green Chocolate: In a separate microwave-safe bowl, repeat the melting process with your green wafers. Use the same gentle 30-second bursts, stirring until you have a creamy, smooth green chocolate ready for piping.
- Pipe Green Trees: Transfer the melted green chocolate into a piping bag. If you don’t have one, a small zip-top bag with a tiny corner snipped off will work just as well for creating a fine opening.
- Decorate with Trees: Now for the artistic part! Using a steady hand and a fun back-and-forth motion, pipe a charming little green tree onto the white-dipped section of each cookie. Let your inner artist shine!
- Add Finishing Touches: Immediately after piping each tree, place a shiny candy star right on top. For that extra touch of authenticity, you can add a few chocolate sprinkles at the base of the tree to create a cute little tree trunk effect.
- Set and Enjoy: Allow your beautifully decorated cookies to set completely. This can happen at room temperature, or you can speed things up by chilling them briefly in the refrigerator until the chocolate is firm. Once set, your **Festive No-Bake Oreo Delights** are ready to be admired and devoured!
Presenting and Serving Your Festive No-Bake Oreo Delights
These **Festive No-Bake Oreo Delights** are almost too cute to eat, but we promise they’re even more delightful when shared! Here are some fun ways to present and serve your holiday masterpieces:
- The Edible Winter Wonderland Platter: Arrange your tree-decorated Oreos on a large festive platter, perhaps nestled among some actual pine sprigs (non-toxic, of course!) or surrounded by a dusting of powdered sugar “snow” for a stunning display.
- Charming Party Favors: Place a few cookies in small cellophane bags tied with a festive ribbon. They make perfect take-home treats for holiday parties or sweet gifts for neighbors and teachers.
- Miniature Forest Cupcake Toppers: For an extra festive touch, gently press one of these delightful Oreos into the frosting of a cupcake. Instant forest-themed cupcakes!
- Hot Chocolate Companions: Serve these alongside mugs of warm hot chocolate or coffee. The white and green chocolate pairs wonderfully with a warm beverage.
- Cookie Exchange Standouts: Bring them to your next cookie exchange! Their unique look and delicious taste are sure to make them a memorable contribution.
Storage and Shelf Life
Once you’ve created your batch of beautiful **Festive No-Bake Oreo Delights**, you’ll want to store them properly to maintain their freshness and charm. The good news is, they’re quite resilient!
Store your finished cookies in an airtight container at room temperature. They will stay fresh and delicious for up to 5-7 days. If your home is particularly warm, or if you prefer a firmer chocolate, you can store them in the refrigerator. Just be aware that refrigeration might cause the chocolate to “bloom” slightly (a white film can form, which is harmless but can alter the appearance), though it won’t affect the taste. If refrigerated, allow them to come to room temperature for a few minutes before serving for optimal flavor and texture. Avoid direct sunlight or extreme heat, as this can cause the chocolate to melt or soften.
FAQs About Festive No-Bake Oreo Delights
Q1: Can I use different types of sandwich cookies?
Absolutely! While Oreos are classic, feel free to experiment with other sandwich cookies like Nutter Butters for peanut butter trees or even chocolate sandwich cookies for a darker base. The possibilities are endless!
Q2: What if I don’t have a piping bag?
No problem! A small zip-top bag (like a snack or sandwich bag) with a tiny corner snipped off works perfectly as a makeshift piping bag. Just be sure the snip is small for better control over your tree shape.
Q3: Can I make these Festive No-Bake Oreo Delights ahead of time?
Yes, these are excellent for making ahead! You can prepare them up to 5-7 days in advance and store them in an airtight container at room temperature. This makes holiday entertaining a breeze.
Q4: My chocolate is too thick to dip/pipe. What should I do?
If your melting chocolate is too thick, you can add 1/2 to 1 teaspoon of vegetable shortening or coconut oil (not water or milk, which can seize chocolate) and stir until it reaches a smoother consistency. Reheat briefly if needed.
Q5: Can I use regular chocolate chips instead of melting wafers?
While possible, melting chips or candy melts are highly recommended as they melt more smoothly and set firmer, making them ideal for dipping and decorating. Regular chocolate chips may require tempering or adding shortening to achieve the right consistency.
Q6: Are these cookies gluten-free?
This recipe can easily be made gluten-free by simply using gluten-free sandwich cookies! Ensure your melting chocolates and candy stars are also certified gluten-free if this is a concern.
Q7: What other decorations can I use?
Get creative! Besides stars and sprinkles, you could use mini M&M’s, silver dragees, edible glitter, or even different colored melting wafers to make various “ornaments” on your trees.
Q8: How do I prevent the white chocolate from clumping or seizing?
To avoid seizing, ensure your bowl and utensils are completely dry before melting chocolate. Heat in short intervals and stir thoroughly; overheating is the main cause of clumping.
Q9: Are these suitable for shipping as gifts?
These are fairly sturdy once set, making them good candidates for gifting. Pack them in a sturdy container with layers separated by parchment paper to prevent shifting and breakage.
Q10: What if I don’t have enough time for the chocolate to set naturally?
To speed up the setting process, place your baking sheet with the decorated cookies into the refrigerator for 10-15 minutes, or until the chocolate is firm to the touch. Just don’t leave them in too long to avoid condensation.
“`
Festive No-Bake Oreo Delights
Equipment
- Baking Sheet
- Parchment Paper
- Microwave-safe Bowl
- Piping Bag (or zip-top bag)
Ingredients
- 15 Oreo cookies (or your preferred sandwich cookies)
- 6 ounces white melting chips (such as Ghirardelli wafers)
- 3 ounces green melting wafers (candy melts)
- 15 small candy stars
- 1/4 cup chocolate sprinkles (jimmies), optional for tree trunks
Instructions
- Prepare Your Workspace: Line a baking sheet with parchment paper for easy cleanup, then set it aside.
- Melt White Chocolate: In a microwave-safe bowl, gently melt the white melting chips. Heat them in 30-second bursts, stirring thoroughly after each interval, until the chocolate is smooth and fully melted.
- Half-Dip Cookies: Carefully dip half of each Oreo cookie into the melted white chocolate. Allow any excess chocolate to drip off, then place the dipped cookies onto your prepared baking sheet.
- Melt Green Chocolate: In a separate microwave-safe bowl, melt the green wafers using the same gentle 30-second interval method, stirring until they are creamy and smooth.
- Pipe Green Trees: Transfer the melted green chocolate into a piping bag or a small zip-top bag with a tiny corner snipped off to create a fine opening.
- Decorate with Trees: Using a steady back-and-forth motion, pipe a charming green tree onto the white-dipped section of each cookie.
- Add Finishing Touches: Immediately place a candy star on top of each green tree. If you'd like, add a few chocolate sprinkles at the base to create a tree trunk effect.
- Set and Enjoy: Allow the decorated cookies to set completely at room temperature, or chill them briefly in the refrigerator until the chocolate is firm. Store them in an airtight container for lasting freshness.
Notes
Cook Time: 5 minutes
Total Time: 15 minutes
Servings: 15 Nutrition Information (per serving):
Calories: 109 kcal
Total Carbs: 17 g
Net Carbs: 16.7 g
Fats: 5 g
Protein: 1 g