Get Ready to Dive Into Your Peanut Butter Dream Cheesecake!
Ever fantasized about a dessert so utterly delightful, so ridiculously easy, and so packed with your favorite flavors that it feels like, well, a dream? Stop dreaming and start making, because the Peanut Butter Dream Cheesecake is here to turn those dessert fantasies into a delicious reality! Imagine a luscious, creamy peanut butter filling, nestled atop a crunchy OREO crust, and crowned with a decadent chocolate ganache. All this, without ever having to turn on your oven. It’s a no-bake masterpiece that promises pure bliss with every single forkful. Get ready for the ultimate chocolate and peanut butter celebration!
Why You’ll Love This Peanut Butter Dream Cheesecake
- Effortlessly Delicious & No-Bake Wonder: Say goodbye to oven woes! This Peanut Butter Dream Cheesecake comes together with surprising ease, requiring zero baking. Perfect for summer days, busy schedules, or anyone who prefers to keep their kitchen cool.
- Irresistible Flavor Symphony: This isn’t just a dessert; it’s a concert of textures and tastes! The rich, salty-sweet peanut butter filling, the crisp chocolatey OREO crust, and the smooth, bitter-sweet chocolate ganache create an unparalleled flavor experience that will have everyone begging for the recipe.
- Impressive Yet Simple: You’ll be amazed at how gourmet this Peanut Butter Dream Cheesecake looks and tastes, given its straightforward instructions. It’s the perfect showstopper for parties, potlucks, or just a treat to impress your family (and yourself!).
- Real Ingredients, Real Satisfaction: We’re talking about wholesome, satisfying ingredients here – full-fat cream cheese, real peanut butter, and butter – ensuring a rich, authentic flavor and texture that store-bought versions simply can’t match. It’s a truly satisfying indulgence!
Ingredients for Your Peanut Butter Dream Cheesecake
- 🍪 45 OREO cookies (whole, with filling)
- 🧈 8 tablespoons salted butter, melted
- 🥛 ½ cup heavy whipping cream, very cold
- 🧀 24 ounces full-fat cream cheese, softened to room temperature
- 🍚 1 ½ cups powdered sugar
- 🥜 1 cup creamy peanut butter (avoid natural, for best texture)
- 🍦 ¾ cup full-fat sour cream or plain Greek yogurt, at room temperature
- 🌼 1 teaspoon vanilla extract
- 🍫 1 cup semi-sweet chocolate chips, coarsely chopped
- 🥛 ⅓ cup heavy whipping cream
- 🍬 Chopped Reese’s peanut butter cups (optional topping)
- 🌰 Chopped peanuts (optional topping)
- 🍯 Peanut butter drizzle (warm peanut butter slightly to thin, optional topping)
How to Craft Your Peanut Butter Dream Cheesecake: A Step-by-Step Guide
Step 1: Prepare Your Speedy OREO Crust.
- Let’s get cracking! Place all 45 whole OREO cookies (yes, with their creamy filling!) into a food processor. Pulse away until they transform into fine, uniform crumbs. No food processor? No problem! Pop them into a large zip-top bag and unleash your inner chef with a rolling pin until finely crushed.
- Now for the magic touch: Drizzle in the 8 tablespoons of gloriously melted salted butter. Continue pulsing or mixing, ensuring every crumb gets a buttery hug until it’s evenly moistened.
- Time to build the foundation! Firmly press this heavenly crumb mixture into the bottom and about 1 inch up the sides of a 9-inch springform pan. Once settled, cover your pan with plastic wrap and tuck it into the refrigerator to chill while you conjure up the filling.
Step 2: Create the Dreamy Peanut Butter Filling.
- In a large mixing bowl, grab your very cold heavy whipping cream and beat it until majestic, stiff peaks form (usually just 2 to 3 minutes of enthusiastic beating!). Set this cloud of cream aside.
- In a separate, equally large bowl, introduce your softened full-fat cream cheese to your mixer. Beat it for 2 to 3 minutes on medium-high speed until it’s wonderfully light and fluffy, scraping down the sides of the bowl to catch every last bit.
- Gradually, as if sprinkling fairy dust, beat in the 1 ½ cups of powdered sugar until your cream cheese mixture is utterly smooth and lump-free – perfection!
- Now for the star of the show! Add the 1 cup of creamy peanut butter (remember, avoid natural for that best texture!), the ¾ cup of room-temperature sour cream (or Greek yogurt if you’re feeling a bit lighter), and the 1 teaspoon of vanilla extract. Keep beating on medium speed until everything is impeccably smooth and lovingly combined.
- Time for the grand finale of the filling! Gently fold your reserved whipped cream into the peanut butter mixture. Be delicate! Continue folding until it’s fully incorporated and not a single streak remains, resulting in a uniform, airy, and irresistible filling.
- Carefully pour this luscious filling over your chilled OREO crust in the springform pan. Spread it out evenly with an offset spatula, making it look as good as it tastes.
- Cover the pan once more with plastic wrap and send it to the refrigerator for its beauty sleep – at least 4 hours, or until the cheesecake is wonderfully firm and set. Patience is a virtue, especially when it comes to cheesecake dreams!
Step 3: Make the Decadent Chocolate Ganache Topping.
- Place your coarsely chopped semi-sweet chocolate chips into a heatproof bowl. They’re ready for their warm bath!
- In a microwave-safe container, heat the ⅓ cup of heavy whipping cream. Do this in 30-second intervals until it just begins to shimmer and simmer – don’t let it boil!
- Pour the piping hot cream over the chocolate chips, making sure every chocolate piece is submerged. Let it sit undisturbed for a peaceful 2 to 3 minutes, allowing the warmth to work its melting magic.
- Now, gently whisk the mixture. Watch as the chocolate transforms into a completely melted, smooth, and glossy ganache. Oh, the beauty!
- Allow the ganache to cool for 5 to 10 minutes until it’s slightly warm but still easily spreadable. This is a crucial step! Pouring hot ganache onto your chilled cheesecake is a no-no; it will melt your hard work.
- Once cooled to perfection, pour the ganache over your firm, chilled Peanut Butter Dream Cheesecake. Spread it evenly with an offset spatula, creating a smooth, inviting chocolate blanket.
- Back to the fridge it goes! Refrigerate for another 30 minutes to allow the ganache to set beautifully and become perfectly sliceable.
Step 4: Slice and Savor!
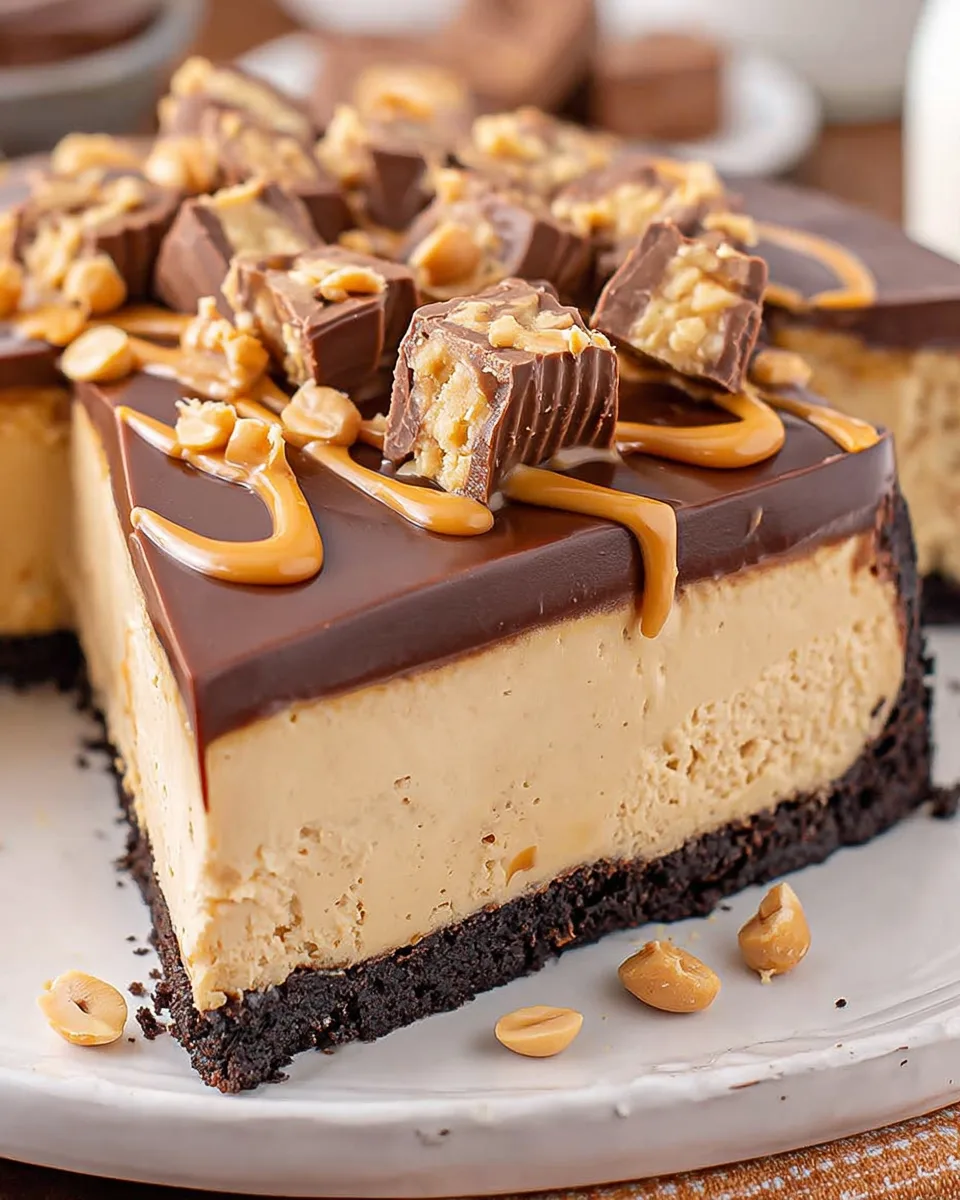
- Get ready for the grand reveal! For an extra special touch, unleash your creativity with garnishes. Sprinkle with chopped Reese’s peanut butter cups for more peanut butter bliss, a scattering of chopped peanuts for crunch, or a swirl of warm peanut butter drizzle for an extra layer of decadence.
- Before serving, run a thin knife along the inside edge of the springform pan. This helps ensure a clean release when you carefully open and remove the outer ring.
- Slice into generous portions of this truly impressive, easy-to-make Peanut Butter Dream Cheesecake. Prepare for oohs, aahs, and requests for seconds!
Presenting Your Peanut Butter Dream Cheesecake: The Art of Serving
The beauty of this Peanut Butter Dream Cheesecake isn’t just in its taste, but also in how stunningly it presents! Here are a few ways to elevate your serving game:
- The Garnish Extravaganza: The optional toppings aren’t just for show – they add an extra layer of flavor and texture!
- Chopped Reese’s Peanut Butter Cups: Sprinkle generously over the set ganache for an ultimate peanut butter chocolate explosion.
- Chopped Peanuts: A fantastic addition for a contrasting crunch and an extra nutty punch.
- Peanut Butter Drizzle: Gently warm a tablespoon or two of peanut butter in the microwave until it’s thin enough to drizzle. Create a beautiful pattern over the ganache for a professional touch.
- A Dusting of Cocoa: For a sophisticated look, a light dusting of unsweetened cocoa powder or powdered sugar can add elegance.
- Plating Perfection: When serving individual slices, place them on clean white plates to make the rich colors pop. A small dollop of extra whipped cream on the side, or even a few fresh raspberries (for a burst of color and tartness), can make each plate feel gourmet.
- Party Star: This cheesecake is a fantastic centerpiece for any gathering. Its firm texture means it holds up beautifully on a dessert table. Pair it with fresh coffee or a glass of cold milk for the ultimate comfort experience.
- Miniature Marvels: For individual servings, consider making mini cheesecakes in muffin tins lined with paper cups (adjusting crust and chilling times), perfect for portion control and easy handling at events.
No matter how you choose to present it, your Peanut Butter Dream Cheesecake is guaranteed to be a hit!
Storing Your Peanut Butter Dream Cheesecake & How Long It Lasts
You’ve made this magnificent Peanut Butter Dream Cheesecake, and if there are any slices left (a rare occurrence!), you’ll want to keep them fresh. Here’s how:
- Refrigeration: The best way to store your cheesecake is in the refrigerator. Ensure it’s tightly covered with plastic wrap or placed in an airtight container to prevent it from absorbing other food odors and to keep it from drying out. When stored properly, it will last for up to 5-7 days.
- Freezing for Later: Yes, you can freeze this delightful dessert!
- Whole Cheesecake: Once the cheesecake is completely set and chilled, remove it from the springform pan base. Place it on a freezer-safe plate or cardboard round. Freeze uncovered for about an hour until firm. Then, wrap it tightly in several layers of plastic wrap, followed by a layer of aluminum foil.
- Individual Slices: Freeze individual slices on a baking sheet for about 30 minutes until firm. Then, wrap each slice individually in plastic wrap and foil.
Frozen cheesecake can last for 1-2 months. To thaw, simply transfer it to the refrigerator overnight (for a whole cheesecake) or for a few hours (for individual slices) before serving. This ensures it retains its creamy texture.
- Serving Temperature: For the best flavor and texture, allow your cheesecake to sit at room temperature for about 15-20 minutes before serving, especially if it’s been deeply chilled. This helps soften the filling slightly, enhancing its creaminess.
With proper storage, you can enjoy your Peanut Butter Dream Cheesecake for days or even weeks to come!
FAQs About Your Peanut Butter Dream Cheesecake
- Can I use natural peanut butter for the filling?
It’s best to avoid natural peanut butter (the kind that separates) as it tends to be oilier and can affect the consistency and firmness of the no-bake filling. Creamy, no-stir peanut butter (like Jif or Skippy) works best for a smooth, stable texture.
- What if I don’t have a food processor for the OREO crust?
No problem! Place the OREO cookies in a large zip-top bag, seal it, and crush them with a rolling pin or the bottom of a heavy pan until fine crumbs form.
- My whipped cream isn’t forming stiff peaks. What went wrong?
Ensure your heavy whipping cream is very cold, and both your bowl and beaters are chilled. If it’s not cold enough, it won’t whip properly.
- Can I use low-fat cream cheese or sour cream?
For the best, richest texture and flavor of this Peanut Butter Dream Cheesecake, full-fat dairy products are highly recommended. Low-fat alternatives may result in a less creamy and firm cheesecake.
- How long does the cheesecake need to chill to set properly?
The cheesecake needs at least 4 hours to firm up. For best results and easier slicing, an overnight chill is ideal.
- Can I make this cheesecake ahead of time?
Absolutely! This Peanut Butter Dream Cheesecake is an excellent make-ahead dessert. You can prepare it 1-2 days in advance, allowing the flavors to meld beautifully.
- My ganache is too thick/thin. How can I fix it?
If it’s too thick, add a tiny splash more hot cream (1 teaspoon at a time) and whisk. If it’s too thin, let it sit and cool for a few more minutes; it will thicken as it cools. If still too thin, you can try adding a few more chocolate chips and letting them melt in the warm ganache.
- Can I add other mix-ins to the filling?
While the filling is perfect as is, you could gently fold in some mini chocolate chips or finely chopped Reese’s pieces just before adding the whipped cream for an extra textural surprise.
- What if I don’t have a springform pan?
You can use a 9×13 inch baking dish, lining it with parchment paper for easier lifting. However, the classic cheesecake presentation will be harder to achieve.
- Is this recipe gluten-free?
No, as written, the recipe is not gluten-free due to the OREO cookies. You would need to substitute gluten-free chocolate sandwich cookies for the crust to make it GF.
Peanut Butter Dream Cheesecake
Equipment
- Food Processor
- 9-inch Springform Pan
- Large mixing bowl
- Offset Spatula
- Heatproof Bowl
- Microwave-safe container
- Whisk
Ingredients
OREO Crust
- 45 OREO cookies whole, with filling
- 8 tablespoons salted butter melted
Peanut Butter Filling
- 0.5 cup heavy whipping cream very cold
- 24 ounces full-fat cream cheese softened to room temperature
- 1.5 cups powdered sugar
- 1 cup creamy peanut butter avoid natural, for best texture
- 0.75 cup full-fat sour cream or plain Greek yogurt at room temperature
- 1 teaspoon vanilla extract
Chocolate Ganache Topping
- 1 cup semi-sweet chocolate chips coarsely chopped
- 0.33 cup heavy whipping cream
Optional Garnishes
- Chopped Reese's peanut butter cups optional topping
- Chopped peanuts optional topping
- Peanut butter warm slightly to thin, optional drizzle
Instructions
- Get ready for a super simple, no-bake peanut butter cheesecake that tastes incredibly rich and satisfying, made with real, wholesome ingredients!
Step 1: Prepare Your Speedy OREO Crust.
- Place the whole OREO cookies into a food processor and pulse until fine crumbs form. Alternatively, crush them in a large zip-top bag with a rolling pin.
- Drizzle in the 8 tablespoons of melted salted butter and continue pulsing or mixing until the crumbs are evenly moistened.
- Firmly press this crumb mixture into the bottom and about 1 inch up the sides of a 9-inch springform pan. Cover the pan with plastic wrap and chill it in the refrigerator while you make the filling.
Step 2: Create the Dreamy Peanut Butter Filling.
- In a large mixing bowl, beat the very cold heavy whipping cream until stiff peaks form, which usually takes 2 to 3 minutes. Set this aside.
- In a separate bowl, beat the softened full-fat cream cheese for 2 to 3 minutes on medium-high speed until it's light and fluffy, scraping down the sides of the bowl as needed.
- Gradually beat in the 1 ½ cups of powdered sugar until the mixture is completely smooth and lump-free.
- Add the 1 cup of creamy peanut butter, ¾ cup of room-temperature sour cream (or plain Greek yogurt for a lighter option), and 1 teaspoon of vanilla extract. Continue beating on medium speed until everything is perfectly smooth and well combined.
- Gently fold the reserved whipped cream into the peanut butter mixture until it's fully incorporated and no streaks remain, ensuring a uniform and airy filling.
- Carefully pour this luscious filling over your chilled OREO crust in the springform pan and spread it out evenly with an offset spatula.
- Cover the pan with plastic wrap again and refrigerate for at least 4 hours, or until the cheesecake is firm and set.
Step 3: Make the Decadent Chocolate Ganache Topping.
- Place your coarsely chopped semi-sweet chocolate chips in a heatproof bowl.
- Heat the ⅓ cup of heavy whipping cream in a microwave-safe container in 30-second intervals until it just begins to simmer.
- Pour the hot cream over the chocolate chips, making sure all the chocolate is submerged. Let it sit undisturbed for 2 to 3 minutes to melt the chocolate.
- Gently whisk the mixture until the chocolate is completely melted and you have a smooth, glossy ganache.
- Allow the ganache to cool for 5 to 10 minutes until it's slightly warm but still easily spreadable. It's crucial not to pour hot ganache onto your cheesecake, or it will melt!
- Pour the cooled ganache over your firm, chilled cheesecake and spread it evenly with an offset spatula.
- Refrigerate the cheesecake for another 30 minutes to allow the ganache to set beautifully.
Step 4: Slice and Savor!
- For an extra special touch, you can garnish your cheesecake with chopped Reese's peanut butter cups, chopped peanuts, or a drizzle of warm peanut butter.
- Run a thin knife along the inside edge of the springform pan before carefully releasing and removing the outer ring.
- Slice into generous portions and enjoy this truly impressive, easy-to-make dessert!
Notes
Calories: 625kcal
Total Carbs: 48g
Net Carbs: 45g
Fats: 46g
Protein: 9g Feel free to garnish your cheesecake with chopped Reese's peanut butter cups, chopped peanuts, or a drizzle of warm peanut butter for an extra special touch.