Are you ready to create a dessert that doesn’t just taste incredible but also screams “I love you” with every single scoop? Forget the usual cakes and pies, because we’re about to unveil a show-stopping masterpiece: the Love Layer Bombe Ice Cream Cake! This isn’t just an ice cream cake; it’s a vibrant, multi-layered explosion of flavor and affection, designed to melt hearts (but not too quickly!). Perfect for anniversaries, birthdays, or just because you want to treat someone special, this bombe is surprisingly simple to assemble and guaranteed to leave a lasting impression. Get ready to embark on a sweet adventure that’s as fun to make as it is to devour!
Why You’ll Love This Recipe
The Love Layer Bombe Ice Cream Cake isn’t just another dessert; it’s an experience! Here are four fabulous reasons why this will become your new go-to special occasion treat:
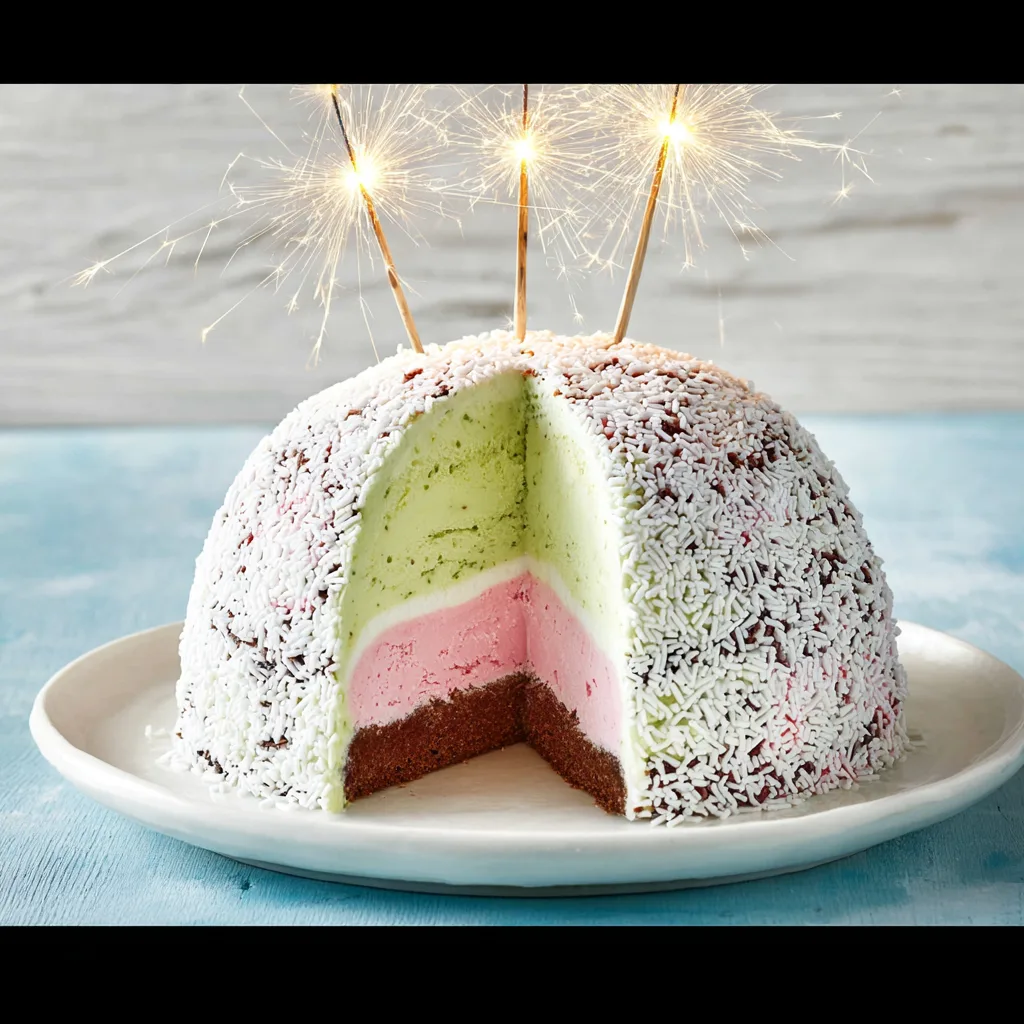
- Stunning Visual Appeal: With its distinct, colorful layers of ice cream, this bombe is a true feast for the eyes before it even touches the palate. It’s an instant centerpiece that looks far more complicated to make than it actually is, earning you major dessert-chef points!
- No-Bake Bliss: Say goodbye to ovens and complicated baking steps! This recipe is entirely no-bake, relying purely on the magic of your freezer. It’s perfect for summer entertaining or any time you want a spectacular dessert without heating up your kitchen.
- A Symphony of Flavors: Each layer brings a new delightful taste and texture – from sweet strawberry to rich chocolate-chip, nutty pistachio-almond, and deep Dutch chocolate. Every slice of this Love Layer Bombe Ice Cream Cake offers a journey through contrasting yet harmonizing flavors that will tantalize your taste buds.
- Easy to Customize: While we adore our chosen Blue Bell flavors, the beauty of this recipe lies in its adaptability. You can easily swap out ice cream flavors to suit your personal preferences or the occasion, making it endlessly versatile and always exciting.
Ingredients with Measurements
To craft your magnificent Love Layer Bombe Ice Cream Cake, you’ll need these delightful components. Remember, slightly softened ice cream is your best friend for smooth spreading!
- 🍓 6 cups Blue Bell Strawberry Ice Cream, slightly softened
- 🍫 5 cups Blue Bell Chocolate-Chip Ice Cream, slightly softened
- 💚 4 cups Blue Bell Pistachio-Almond Ice Cream, slightly softened
- 🤎 2 cups Blue Bell Dutch Chocolate Ice Cream, slightly softened
- 🤍 White sprinkles, for garnish
Detailed Step-by-Step Directions How to Make the Recipe
Creating your stunning Love Layer Bombe Ice Cream Cake is a joyful process. Just follow these steps, and patience with freezing times will be your secret ingredient!
- Prep the Bowl & First Layer: Grab a 3-quart metal mixing bowl – metal helps it chill faster! Line it meticulously with plastic wrap, ensuring a generous 2-inch overhang all around. Pop this lined bowl into the freezer for about 10 minutes to get it super cold. While it chills, gently mash your 6 cups of strawberry ice cream until it’s just soft enough to spread easily, but not melted. With a rubber spatula, carefully and evenly coat the inside of your chilled, plastic-lined bowl with this thick, luscious strawberry layer. Back into the freezer it goes for a full 2 hours to firm up nicely.
- Add the Middle Layers: Once your strawberry layer is rock solid, it’s time for layer number two. Gently mash 5 cups of chocolate-chip ice cream until it’s perfectly spreadable. Carefully spread this glorious layer evenly over the firm strawberry. Guess what? Back to the freezer for another 2 hours! Next up, repeat this delightful process with 4 cups of pistachio-almond ice cream. Mash, spread it lovingly over the chocolate-chip layer, and you guessed it – freeze for another 2 hours.
- The Final Layer & Freeze: For your grand finale, gently mash and fill the remaining space in the bowl with 2 cups of rich Dutch chocolate ice cream. Make sure it’s smoothed out on top. Once all your vibrant layers are beautifully in place, use that handy plastic wrap overhang to completely cover the top of the bowl. Now for the most important step: freeze your Love Layer Bombe Ice Cream Cake until it’s absolutely rock solid. This will take at least 8 hours, but for best results and easiest serving, an overnight freeze is highly recommended.
- Serve Your Sweet Creation: The moment of truth! When you’re ready to dazzle your loved ones, simply invert the completely frozen bombe onto your most charming serving plate. Carefully lift away the mixing bowl (the plastic wrap helps immensely here!) and then gently peel away the plastic wrap itself. Garnish your magnificent bombe by gently pressing white sprinkles all over its surface for that extra celebratory touch. If it feels a little too soft after decorating, a quick 10-minute return to the freezer won’t hurt. Then, slice and serve immediately to a chorus of “oohs” and “aahs”!
Detailed Different Ways You Can Present the Recipe and How to Serve It
The Love Layer Bombe Ice Cream Cake is already a showstopper, but with a few extra touches, you can elevate its presentation to an art form! Here’s how to serve this spectacular dessert:
- Classic Sprinkles & Drizzles: After inverting and unwrapping, go beyond just white sprinkles! Consider using red, pink, or multi-colored sprinkles for a festive look. For an extra touch of indulgence, gently drizzle a contrasting sauce like raspberry coulis, warm chocolate fudge, or caramel over the top and down the sides right before serving.
- Fresh Fruit Fanfare: Arrange a beautiful border of fresh berries – think sliced strawberries, raspberries, or blueberries – around the base of the bombe on the serving plate. A few mint leaves can add a pop of color and freshness.
- Portioning with Panache: For clean slices, use a sharp knife warmed in hot water and wiped dry between each cut. This helps glide through the frozen layers without sticking. Present individual slices on small dessert plates, perhaps with a dollop of whipped cream or a small scoop of a complementary sorbet on the side.
- Themed Garnishes: If you’re serving for a special occasion, tailor your garnish! For Valentine’s Day, use heart-shaped sprinkles or edible glitter. For a birthday, tiny candles can be placed around the base.
How You Can Store It and How Long Does It Last
Proper storage is key to keeping your exquisite Love Layer Bombe Ice Cream Cake fresh and delicious. Since it’s an ice cream cake, the freezer is your best friend!
After serving, if you have any leftover bombe (which is a big “if”!), slice any remaining portions and place them in an airtight freezer-safe container. Alternatively, if you haven’t sliced the entire bombe, you can re-wrap the remaining portion tightly in several layers of plastic wrap, followed by a layer of aluminum foil. This double-layer protection helps prevent freezer burn and keeps unwanted odors from permeating the delicate ice cream flavors.
When properly stored, your Love Layer Bombe Ice Cream Cake will maintain its quality for up to 2-3 weeks in the freezer. While it might last longer, the texture and flavors are best enjoyed within this timeframe. Remember to always keep it in the coldest part of your freezer.
FAQs Sections
- Q1: Can I use different ice cream flavors for my Love Layer Bombe Ice Cream Cake?
- Absolutely! The beauty of this recipe is its versatility. Feel free to swap out any of the Blue Bell flavors for your favorites, ensuring they complement each other. Just make sure the total cup measurements for each layer remain similar for the best shape.
- Q2: What if my ice cream gets too soft while I’m spreading it?
- If any layer becomes too soft and runny, simply pop the bowl (or the ice cream container) back into the freezer for 10-15 minutes to firm up slightly before continuing. This helps maintain distinct layers.
- Q3: Can I make this Love Layer Bombe Ice Cream Cake ahead of time?
- Yes, it’s highly recommended! The bombe needs at least 8 hours to solidify, but making it a day or two in advance allows it to freeze perfectly solid, making it easier to unmold and slice.
- Q4: My plastic wrap keeps slipping when I try to line the bowl. Any tips?
- Try spraying a very light layer of cooking spray or wiping the inside of the bowl with a damp paper towel before pressing the plastic wrap in. The slight stickiness will help it adhere better.
- Q5: How many servings does this Love Layer Bombe Ice Cream Cake yield?
- This generous Love Layer Bombe Ice Cream Cake is designed to serve 12 people, making it perfect for gatherings and celebrations.
- Q6: Can I use a different size bowl?
- You can, but you’ll need to adjust the quantities of ice cream accordingly. A smaller bowl will require less ice cream, and a larger one more. Ensure your layers are still thick enough to be distinct.
- Q7: What’s the best way to get clean slices?
- The key is a very sharp knife, warmed under hot running water for a few seconds, then wiped dry. Repeat this process for each slice. This will help the knife glide through the frozen layers cleanly.
- Q8: Can I add a cookie crust or candy pieces?
- Absolutely! For a cookie crust, press a layer of crushed cookies (like Oreos or Graham crackers mixed with a little melted butter) into the bottom of the bowl before the first ice cream layer. You can also sprinkle crushed candies or mini chocolate chips between ice cream layers for added texture.
- Q9: Why use a metal bowl? Does it matter?
- A metal bowl is preferred because metal conducts cold much more efficiently than glass or plastic. This helps the ice cream layers freeze faster and more evenly, ensuring a quicker and more stable set.
- Q10: My bombe isn’t coming out of the bowl easily. What should I do?
- If it’s stuck, run the outside of the bowl under warm (not hot!) water for just a few seconds, making sure not to get water inside. The brief warmth will slightly release the plastic wrap from the bowl, making it easier to invert. If it’s still stuck, ensure it’s frozen solid before trying again.
Love Layer Bombe Ice Cream Cake 💘
Equipment
- 3-quart metal mixing bowl
- Plastic Wrap
- Rubber Spatula
- Serving Plate
Ingredients
- 6 cups Blue Bell Strawberry Ice Cream slightly softened
- 5 cups Blue Bell Chocolate-Chip Ice Cream slightly softened
- 4 cups Blue Bell Pistachio-Almond Ice Cream slightly softened
- 2 cups Blue Bell Dutch Chocolate Ice Cream slightly softened
- White sprinkles for garnish
Instructions
- First, grab a 3-quart metal mixing bowl. Line it carefully with plastic wrap, making sure to leave about a 2-inch overhang all around the edges. Pop it in the freezer for about 10 minutes to chill.
- While it's chilling, gently mash your 6 cups of strawberry ice cream until it's just soft enough to spread.
- Using a rubber spatula, evenly coat the inside of your chilled, plastic-lined bowl with a generous, thick layer of the strawberry ice cream. Place the bowl back in the freezer for 2 hours to firm up.
- After the strawberry layer is firm, repeat the process. Gently mash 5 cups of chocolate-chip ice cream until spreadable. Spread it evenly over the strawberry layer. Return to the freezer for another 2 hours.
- Next, do the same with 4 cups of pistachio-almond ice cream. Mash it, spread it over the chocolate-chip layer, and freeze for another 2 hours.
- For your last layer, gently mash and fill the remaining space in the bowl with 2 cups of Dutch chocolate ice cream.
- Once all layers are in place, cover the top of the bowl completely with the plastic wrap overhang. Freeze the bombe until it's rock solid, which will take at least 8 hours, or preferably overnight.
- When you're ready to serve this delightful treat, simply invert the frozen bombe onto a pretty serving plate.
- Carefully remove the mixing bowl and peel away the plastic wrap.
- Garnish your beautiful bombe by gently pressing white sprinkles all over its surface.
- You can return it to the freezer for a few more minutes if needed, or slice and serve it immediately to your loved ones! Enjoy this indulgent, easy-to-make dessert!
Notes
Calories: 550
Total Carbohydrates: 60g
Net Carbohydrates: 58g
Fats: 30g
Protein: 7g