💖 Get ready to spread some love, one delicious bite at a time! This Valentine’s Day (or any day you need a little extra sweetness), forget the store-bought generic treats. We’re about to whisk you away on a journey to create the most adorable, heart-warming, and downright delightful cookies you’ve ever imagined. Introducing our enchanting recipe for Lovely Heart Cookie Delights – easy to make, utterly charming, and perfect for sharing with your sweethearts!
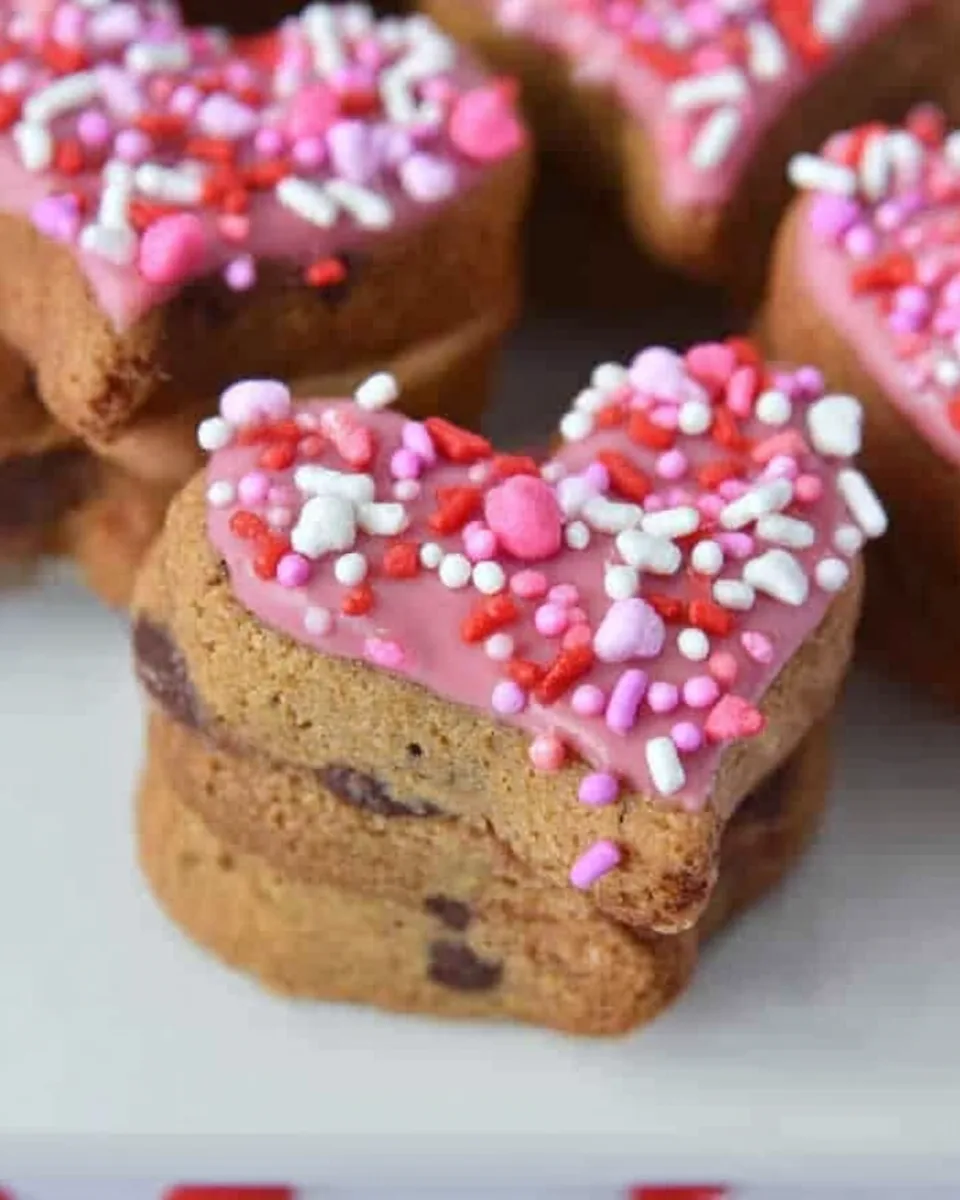
Imagine soft, chewy chocolate chip cookies shaped like perfect little hearts, dipped in vibrant pink or red candy, and showered with playful sprinkles. They’re not just a treat; they’re a tiny hug in cookie form. Whether you’re celebrating a special occasion, planning a cozy night in, or simply want to brighten someone’s day, these delightful cookies are your secret weapon. Let’s dive into a world of simple baking magic and create something truly special!
Why You’ll Love This Recipe
- Effortlessly Elegant: Who knew baking such beautiful cookies could be so easy? By starting with prepared cookie dough and a handy silicone mold, you skip all the fuss of rolling and cutting, making the process smooth and enjoyable. You’ll impress everyone with minimal effort!
- Wholesome & Customizable: We believe treats can be both delicious and a little better for you! This recipe encourages using “better-for-you” cookie dough brands, naturally colored candy melts, and dye-free sprinkles. Feel good about what you’re baking, and customize colors to suit any occasion.
- Perfect for Gifting (or Sharing!): These heart-shaped beauties aren’t just for eating – they’re a dream for gifting! Their charming appearance makes them ideal for Valentine’s Day boxes, thoughtful party favors, or simply as a lovely gesture to show someone you care.
- Quick & Rewarding: In just over 20 minutes of active time, you can have a batch of these adorable cookies ready to delight. The simple steps mean less time in the kitchen and more time enjoying your delicious creations and the smiles they bring.
Ingredients with Measurements
Gather your delightful components! Here’s what you’ll need to create your batch of Lovely Heart Cookie Delights:
- 1 (16 oz) package prepared chocolate chip cookie dough: Opt for a “better-for-you” brand if available, or use your favorite wholesome homemade recipe for an extra personal touch.
- 1 (12 oz) bag pink or red candy melts: To add that vibrant, loving hue! Look for naturally colored options for a healthier choice.
- 1/4 cup festive sprinkles: Choose natural, dye-free sprinkles to keep your treats wholesome and beautifully adorned.
Detailed Step-by-Step Directions How to Make the Recipe
Let’s get baking! Follow these simple steps to bring your Lovely Heart Cookie Delights to life:
- Preheat Your Oven: Get things started by preheating your oven to 350°F (175°C). This ensures your oven is perfectly ready when your dough is.
- Fill the Molds: Take your prepared chocolate chip cookie dough and firmly press it into each heart-shaped cavity of a silicone mold. Fill each cavity about three-quarters of the way full. Make sure it’s nice and compact to ensure beautifully shaped cookies.
- Bake to Golden Perfection: Place the filled silicone mold onto a sturdy baking sheet (this makes it easier to transfer in and out of the oven). Pop it into your preheated oven and bake for approximately 10-13 minutes, or until the edges of the cookies look lightly golden and set.
- Cool Completely: Once baked, carefully remove the mold from the oven. This next step is crucial for easy release: let the cookies cool down completely in the mold. Patience here pays off!
- Release the Hearts: Gently pop the cooled cookie hearts out of their molds. They should release effortlessly when fully cooled and firm.
- Prepare for Dipping: Pour your colorful sprinkles into a small, shallow bowl. Lay out some wax paper or a silicone mat nearby; this will be the resting place for your dipped cookies.
- Melt the Candy: Melt the candy melts according to the package directions. This usually involves a quick microwave session, stirring frequently until smooth and creamy.
- Dip & Decorate: Take one half of each cooled cookie heart and dip it into the melted candy. Immediately after dipping, press the candy-coated half into your bowl of sprinkles for a pretty, festive coating. Place each decorated cookie on your wax paper or silicone mat to set until the candy coating hardens.
- Share the Love: Once the candy has hardened, your Lovely Heart Cookie Delights are ready! Share and enjoy these lovely, homemade treats.
Detailed Different Ways You Can Present the Recipe and How to Serve It
Beyond just being delicious, Lovely Heart Cookie Delights are a feast for the eyes! Here are some fun ways to present and serve them:
- Classic Platter Presentation: Arrange them artfully on a decorative plate or a tiered dessert stand. Mix and match different sprinkle colors for an even more vibrant display.
- Charming Gift Bags: Stack a few cookies in clear cellophane bags, tie them with a pretty ribbon, and add a small personalized tag. Perfect for Valentine’s Day gifts, party favors, or “thinking of you” treats.
- “Cookie Bouquet”: For a truly unique presentation, insert a lollipop stick into the base of each cookie while the candy melt is still soft (or after dipping if they are thick enough). Once set, arrange them like a bouquet in a small vase or mug.
- Edible Cupcake Toppers: These dainty hearts are the perfect size to sit atop cupcakes with a swirl of frosting, adding an extra layer of charm and flavor.
- Coffee & Tea Companion: Serve them alongside a warm cup of coffee, tea, or a glass of milk for a comforting afternoon pick-me-up or a delightful after-dinner treat.
- Dessert Board Star: Incorporate them into a larger dessert charcuterie board alongside fresh berries, chocolates, and other small sweets for an impressive spread.
How You Can Store It and How Long Does It Last
To keep your Lovely Heart Cookie Delights fresh and delicious, proper storage is key:
- At Room Temperature: Once the candy melts have fully set, store the cookies in an airtight container at room temperature for up to 3-5 days. Keep them away from direct sunlight or heat, which can soften the candy coating.
- In the Refrigerator: If you prefer to extend their shelf life slightly, or if your home is particularly warm, you can store them in an airtight container in the refrigerator for up to a week. Let them come to room temperature for a few minutes before serving for optimal texture.
- Freezing for Longer: For longer storage, these cookies freeze beautifully! Place the completely cooled and set cookies in a single layer on a baking sheet and freeze for about an hour until firm. Then, transfer them to a freezer-safe airtight container or a heavy-duty freezer bag, separating layers with parchment paper to prevent sticking. They can be stored in the freezer for up to 2-3 months. Thaw at room temperature when ready to enjoy.
FAQs Sections
- Can I use homemade cookie dough instead of prepared dough?
Absolutely! If you have a favorite chocolate chip cookie recipe, feel free to use it. Just ensure the dough has a consistency suitable for pressing into a mold. - What if I don’t have a heart-shaped silicone mold?
You can roll out your cookie dough and use a heart-shaped cookie cutter. The baking time might need slight adjustment, so watch for golden edges. Alternatively, you can bake round cookies and decorate them with heart designs. - Can I use different colored candy melts?
Yes! Feel free to use white, purple, blue, or even multiple colors for dipping to match different themes or preferences. - Are there alternatives to candy melts for dipping?
Melted chocolate chips (milk, dark, or white) can be used, but they might require tempering for a smooth, shiny finish that hardens well. You can also use a simple glaze made from powdered sugar and milk/water for a less intense flavor. - How do I prevent the cookies from sticking to the silicone mold?
Silicone molds are generally non-stick, but ensuring the cookies are completely cooled before attempting to remove them is the best way to prevent sticking and breakage. - Can I make these Lovely Heart Cookie Delights ahead of time?
Yes, these cookies are perfect for making ahead! You can bake the cookies, let them cool, and then store them undecorated for a day or two before dipping and decorating. Or, store the fully decorated cookies as mentioned in the storage section. - What kind of sprinkles work best?
Any festive sprinkles work! Nonpareils, jimmies, or even small edible glitter can create a beautiful effect. For a wholesome touch, choose natural, dye-free options. - How many cookies does this recipe make?
This recipe yields approximately 24 delightful heart-shaped cookies, making it perfect for sharing or a small gathering. - Can kids help make these Lovely Heart Cookie Delights?
Absolutely! This is a fantastic recipe for getting kids involved. They can help press the dough into the molds, dip the cookies (with adult supervision for the melted candy), and, of course, add the sprinkles! - What if my candy melts seize or get too thick?
If your candy melts seize (become grainy and hard) or get too thick, try stirring in a small amount of vegetable shortening or a specialized candy melt thinning agent (like paramount crystals) a little at a time until you reach the desired consistency.
Lovely Heart Cookie Delights
Equipment
- Silicone heart-shaped mold
- Baking Sheet
- Small Bowl
- Wax paper or silicone mat
Ingredients
- 1 package (16 oz) prepared chocolate chip cookie dough opt for a "better-for-you" brand or make your favorite wholesome recipe!
- 1 bag (12 oz) pink or red candy melts choose naturally colored options if available for a healthier touch!
- 1/4 cup festive sprinkles pick natural, dye-free sprinkles to keep it wholesome!
Instructions
- Get your oven ready by preheating it to 350°F (175°C).
- Firmly press your cookie dough into each heart-shaped cavity of a silicone mold, filling it about three-quarters of the way. Make sure it's nice and compact!
- Place the filled mold onto a baking sheet and pop it into the preheated oven. Bake for about 10-13 minutes, or until the edges look lightly golden.
- Once baked, carefully remove the mold from the oven and let the cookies cool down completely in the mold. This is key for easy release!
- Gently pop the cooled cookie hearts out of their molds. They should release effortlessly when fully cooled.
- Pour your colorful sprinkles into a small bowl and lay out some wax paper or a silicone mat nearby.
- Melt the candy melts following the package directions – usually a quick microwave session!
- Dip one half of each cookie heart into the melted candy, then immediately dip it into the sprinkles for a pretty coating. Place them on the wax paper to set until the chocolate hardens.
- Share and enjoy your lovely, homemade Valentine's treats!
Notes
Calories: 89 kcal
Total Carbs: 12g
Net Carbs: 12g
Fats: 4g
Protein: <1g #ValentinesDayCookies #HeartShapedTreats #EasyValentinesDessert #WholesomeSweethearts