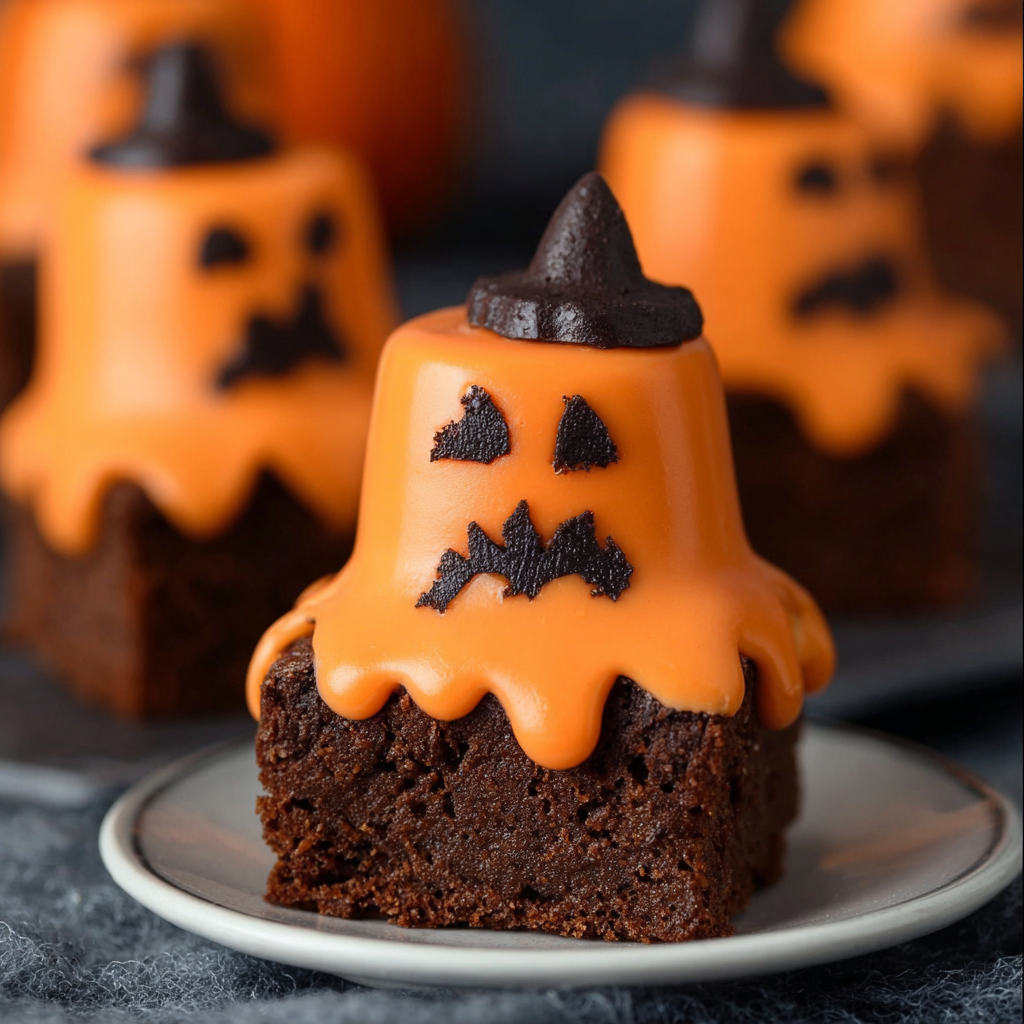
Get ready to summon the sweetest spirits this Halloween with a treat so charming, it’s spooky! Forget the same old pumpkin pie; we’re diving headfirst into the world of rich chocolate, fluffy marshmallows, and vibrant orange candy with our irresistible Melted Jack O’ Lantern Brownies. Imagine biting into a deliciously moist brownie, then hitting that gooey marshmallow surprise, all dressed up in an adorable jack o’ lantern costume. These aren’t just brownies; they’re edible works of art that are as fun to make as they are to devour!
Whether you’re hosting a ghoulish gathering or just want to bring some festive cheer to your kitchen, these Melted Jack O’ Lantern Brownies are your go-to. They combine classic comfort with a playful Halloween twist that will have everyone reaching for more. Let’s get baking and create some magic!
Why You’ll Love This Recipe
Prepare to fall head over heels for these charming Halloween delights. Here are four fantastic reasons why our Melted Jack O’ Lantern Brownies will become your new spooky season favorite:
- Festively Adorable: Let’s be honest, they’re incredibly cute! The melted marshmallow “ghosts” transformed into jack o’ lanterns are an instant showstopper, making them perfect for any Halloween spread or party.
- Seriously Delicious: Beneath that vibrant orange exterior lies a perfectly moist, rich chocolate brownie base, studded with extra chocolate chunks. It’s a double dose of chocolatey goodness that will satisfy any sweet tooth.
- Fun & Easy to Make: No need for complex techniques here! This recipe is straightforward, making it a fantastic project for bakers of all skill levels, and even a wonderful activity to do with kids. The decorating part is pure creative joy!
- Perfect Party Treat: Serving nine individual squares, these Melted Jack O’ Lantern Brownies are ideal for sharing. They’re portion-controlled, easy to pick up, and guaranteed to be the star of any Halloween gathering.
Ingredients with Measurements
Gather your ghoulish goodies! Here’s everything you’ll need to conjure up these amazing Melted Jack O’ Lantern Brownies:
- 🍫 1/3 cup unsweetened cocoa powder
- 🧁 1/2 cup all-purpose flour
- 🧂 1/4 teaspoon salt
- 🧁 1/4 teaspoon baking powder
- 🧈 1/2 cup (1 stick) butter, melted and cooled
- 🍚 1 cup granulated sugar
- 🥚 2 large eggs
- 🌿 1 teaspoon vanilla extract
- 🍫 1/2 cup semi-sweet chocolate chunks
- 🍊 12 oz orange candy melts
- 🍬 9 large marshmallows
- 🍫 1/2 cup semi-sweet chocolate chips (divided for stems and faces)
Detailed Step-by-Step Directions on How to Make the Recipe
Ready to transform simple ingredients into bewitching brownies? Follow these steps to create your own batch of Melted Jack O’ Lantern Brownies:
- Preheat & Prep: Set your oven to a warm 350°F (175°C). Lightly grease an 8×8-inch baking pan. A little non-stick spray or butter will ensure your brownies pop out easily.
- Combine Dry Ingredients: In a medium bowl, whisk together the cocoa powder, all-purpose flour, salt, and baking powder. Set this aside for a moment.
- Mix Wet Ingredients: In a large mixing bowl, combine your melted and cooled butter with the granulated sugar, eggs, and vanilla extract. Whisk until everything is well incorporated and looks smooth.
- Bring it Together: Gently fold the dry ingredient mixture into the wet ingredients. Mix until just combined – be careful not to overmix! Stir in your semi-sweet chocolate chunks, ensuring they’re evenly distributed throughout the batter.
- Bake the Brownies: Pour the luscious brownie batter into your prepared 8×8-inch pan. Spread it evenly. Bake for 30 minutes, or until a toothpick inserted into the center comes out with moist crumbs, but not wet batter.
- Cool Completely: This step is crucial for perfect decorating! Let the brownies cool *completely* in the pan on a wire rack. Patience, my friend, is a virtue, especially when it comes to chocolatey goodness.
- Cut & Arrange: Once fully cooled, carefully cut the brownies into 9 equal squares. Line a clean surface (like a baking sheet) with parchment paper and place your brownie squares apart, ready for their spooky transformation.
- Melt the Orange Magic: Following the package directions, melt your orange candy melts. This usually involves a microwave at 30-second intervals, stirring in between, or a double boiler. You want it smooth and dippable.
- Marshmallow Pumpkins: Dip each large marshmallow into the melted orange candy, coating it completely. Immediately place one coated marshmallow in the center of each brownie square. Gently tap the brownies on the counter a few times to help the candy coating settle and smooth out around the base of the marshmallow, creating that “melted” look.
- Add Stems: While the orange coating is still wet (or slightly tacky), place a semi-sweet chocolate chip on top of each marshmallow, pointy side up, to create the pumpkin stem.
- Let Set: Allow the orange candy coating and stems to set and harden for at least 30 minutes at room temperature.
- Pipe the Faces: Melt the remaining semi-sweet chocolate chips. Transfer the melted chocolate to a small Ziploc bag, snip a tiny corner off, and use it to pipe spooky or silly jack o’ lantern faces onto your orange marshmallows. Get creative!
- Final Harden: Let the chocolate faces harden for another 15 minutes before serving or storing.
Detailed Different Ways You Can Present the Recipe and How to Serve It
Our Melted Jack O’ Lantern Brownies are already a feast for the eyes, but with a little extra flair, you can take their presentation to the next level!
- Spooky Platter Perfection: Arrange your brownies on a dark, festive platter. Add a few edible “spiderwebs” made from melted white chocolate, or scatter some plastic spiders around for an extra touch of creepiness.
- Individual Servings: For a more elegant party presentation, place each brownie on its own small dessert plate. A dollop of whipped cream or a small scoop of vanilla ice cream alongside makes for a delightful contrast.
- Haunted House Dessert Bar: If you’re creating a full Halloween dessert table, nestle these brownies among other treats like ghost meringues, “bloody” cupcakes, and candy corn for a truly immersive experience.
- Sweet & Savory Combo: Pair these rich brownies with something savory like a cheese board or salty pretzels to balance the sweetness, offering your guests a full range of flavors.
- Warm Up! While delicious at room temperature, briefly warming the brownies in the microwave for 10-15 seconds can make the marshmallow extra gooey and the brownie even more fudgy.
- Garnishes Galore: A light dusting of cocoa powder or a drizzle of caramel sauce over the serving plate can add a gourmet touch. For an extra pop of color, sprinkle some festive Halloween sprinkles around the base of the brownies.
However you choose to present them, these Melted Jack O’ Lantern Brownies are sure to bring smiles (and a few spooky gasps!) to your gathering.
How You Can Store It and How Long Does It Last
So, you’ve baked these amazing Melted Jack O’ Lantern Brownies, and by some miracle, there are leftovers! Here’s how to keep them fresh and delicious:
- Airtight is Right: The golden rule for keeping brownies moist and the candy coating pristine is an airtight container. This prevents them from drying out and protects the delicate decorations.
- Room Temperature: Store your brownies at room temperature. The marshmallows and candy melts hold up well, and the brownie texture is best when not chilled. If you live in a very warm or humid climate, you might consider refrigerating them, but bring them back to room temperature before serving for optimal flavor and texture.
- Layering for Longevity: If you’re stacking the brownies, place a piece of parchment paper between layers to prevent the decorated tops from sticking to each other.
- Shelf Life: These delightful Melted Jack O’ Lantern Brownies will stay wonderfully fresh and delicious for up to 3 days when stored correctly in an airtight container at room temperature.
FAQs Sections
Got questions about whipping up these ghoulishly good Melted Jack O’ Lantern Brownies? We’ve got answers!
“`
Melted Jack O’ Lantern Brownies 🎃
Equipment
- 8×8-inch Pan
Ingredients
- 1/3 cup unsweetened cocoa powder
- 1/2 cup all-purpose flour
- 1/4 teaspoon salt
- 1/4 teaspoon baking powder
- 1/2 cup butter 1 stick, melted and cooled
- 1 cup granulated sugar
- 2 large eggs
- 1 teaspoon vanilla extract
- 1/2 cup semi-sweet chocolate chunks
- 12 oz orange candy melts
- 9 large marshmallows
- 1/2 cup semi-sweet chocolate chips
Instructions
- Preheat oven to 350°F and grease an 8×8-inch pan.
- Mix cocoa powder, flour, salt, and baking powder in a bowl.
- In a large bowl, combine melted butter, sugar, eggs, and vanilla.
- Fold in dry ingredients and chocolate chunks until just mixed.
- Pour batter into prepared pan and bake for 30 minutes.
- Cool completely, then cut into 9 squares.
- Line a surface with parchment paper and place brownies apart.
- Melt orange candy melts as directed.
- Dip marshmallows into melted candy, then place on brownies’ centers.
- Tap brownies gently to smooth coating.
- Add chocolate chips on marshmallows for pumpkin stems.
- Let the candy coating set for 30 minutes.
- Melt remaining chocolate chips and pipe faces on brownies.
- Allow faces to harden for 15 minutes.
- Store in an airtight container for up to 3 days.
Notes
- Calories: 267 kcal
- Total Carbs: 50 g
- Net Carbs: 48 g
- Fats: 7 g
- Protein: 4 g