Ever dreamt of a treat that captures the magic of winter, the refreshing zing of mint, and the comforting hug of chocolate all in one adorable bite? Get ready to unwrap the secret to the most enchanting holiday cookie! Introducing our delightful Minty Chocolate Snowball Bites – tiny spheres of joy that are as fun to make as they are to eat. Imagine biting into a soft, tender cookie, bursting with cool mint and rich chocolate chips, all dusted in a delicate snowy coat of powdered sugar. These aren’t just cookies; they’re miniature masterpieces designed to bring a smile to every face and a festive sparkle to any occasion. Perfect for cozy evenings, holiday gatherings, or simply treating yourself to something special, these green-hued wonders are about to become your new favorite obsession!
Why You’ll Love These Minty Chocolate Snowball Bites
There are countless reasons to fall head over heels for these charming cookies, but here are four compelling ones that make our Minty Chocolate Snowball Bites truly irresistible:
- A Flavor Combination Made in Heaven: Mint and chocolate are a legendary duo, and these snowball bites celebrate that pairing perfectly. The cool, refreshing mint extract beautifully complements the sweet, melt-in-your-mouth mini chocolate chips, creating a balanced and incredibly satisfying taste experience that’s both festive and comforting.
- Effortlessly Easy & Super Quick: Don’t let their elegant appearance fool you – these Minty Chocolate Snowball Bites are surprisingly simple to whip up! With a mere 10 minutes of prep and a quick 8-minute bake time, you can have a batch of these delectable treats ready in under 20 minutes (plus chill time). They’re perfect for last-minute cravings or busy holiday schedules.
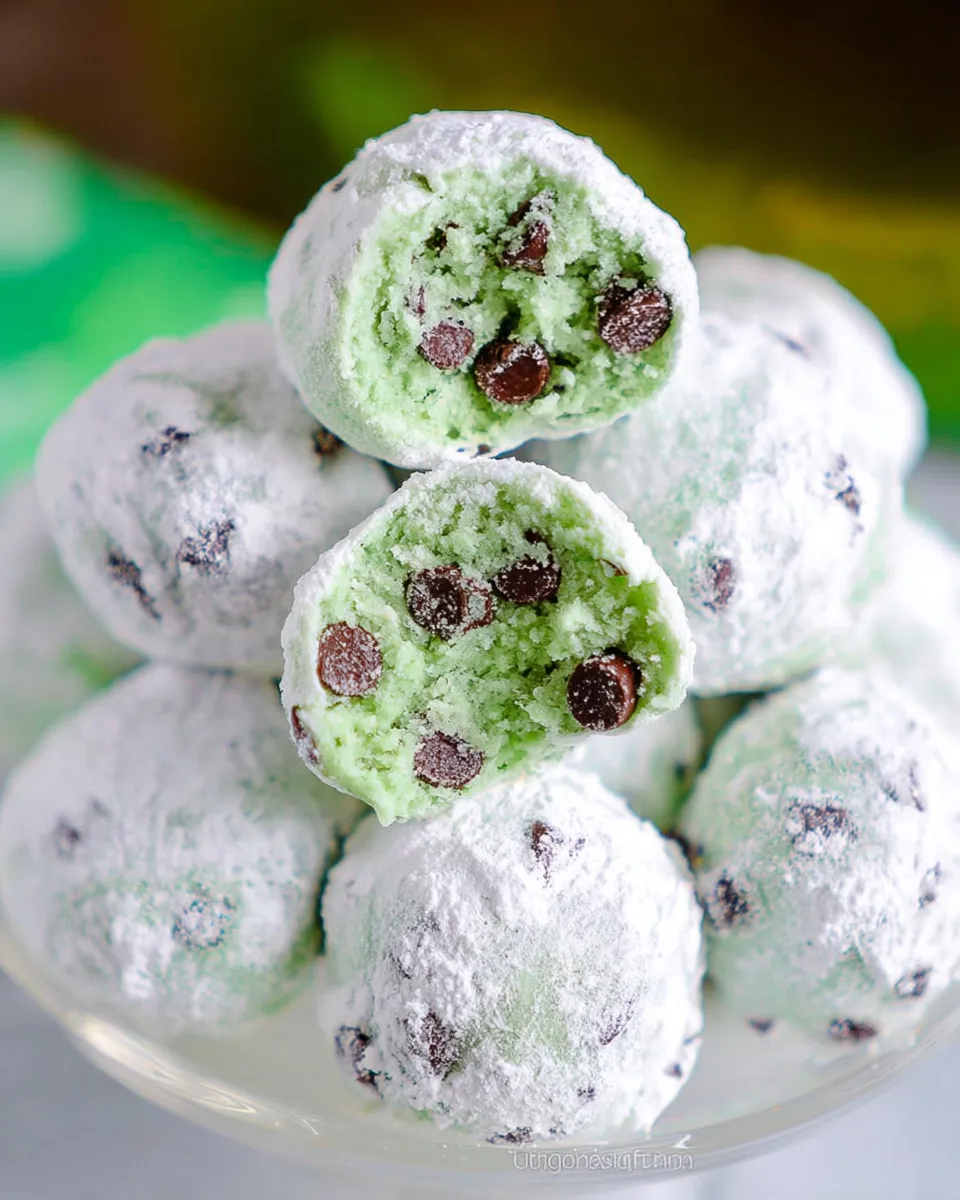
- Picture-Perfect & Festively Fun: Beyond their amazing taste, these cookies are a feast for the eyes! The vibrant green hue, coupled with the “snowy” powdered sugar coating, makes them incredibly visually appealing. They instantly evoke winter wonderland vibes and add a delightful pop of color to any cookie platter or dessert table.
- The Ultimate Crowd-Pleaser: Whether you’re baking for family, friends, or a holiday party, these Minty Chocolate Snowball Bites are guaranteed to be a hit. Their unique flavor, charming appearance, and delightful texture make them universally adored, ensuring there are never any leftovers!
Ingredients for Your Minty Chocolate Snowball Bites
Gather your magic ingredients to create these enchanting Minty Chocolate Snowball Bites:
- 🧈 1 cup unsalted butter, softened
- 🍬 ⅔ cup powdered sugar, sifted
- 🌾 2 ¼ cups all-purpose flour, spooned and leveled
- 🧂 ½ teaspoon salt
- 🍃 1 teaspoon mint extract (or peppermint extract)
- 🎨 Green food coloring (gel works best)
- 🍫 ¾ cup mini chocolate chips
- ✨ Additional powdered sugar, for dusting
Detailed Directions: Crafting Your Minty Chocolate Snowball Bites
Follow these simple steps to bring your Minty Chocolate Snowball Bites to life:
- **Prepare Your Workspace:** First things first, grab a large cookie sheet and line it with parchment paper. This clever trick ensures your cookies won’t stick and makes cleanup an absolute breeze! Set it aside.
- **Cream the Essentials:** In a spacious mixing bowl, combine your softened butter and sifted powdered sugar. Beat them together until the mixture transforms into a luscious, light, and wonderfully fluffy cloud.
- **Introduce the Dry & Minty:** Gently fold in the all-purpose flour, salt, and your fragrant mint extract. Mix until everything is just barely combined. Remember, the secret to tender cookies is avoiding overmixing!
- **Go Green!** Now for the fun part! Add a few drops of green food coloring to your dough. Stir it in thoroughly until you achieve that perfect, festive minty shade you’re aiming for. Gel coloring truly gives the best vibrant results.
- **Fold in the Chocolatey Goodness:** Carefully fold in the mini chocolate chips. Make sure they are lovingly distributed throughout the dough, promising a burst of chocolate in every bite of your Minty Chocolate Snowball Bites.
- **Shape Your Snowballs:** Scoop out approximately one tablespoon of dough at a time. Roll each portion into a cute, uniform little ball between your palms. Place these perfectly formed dough balls onto your prepared cookie sheet.
- **Chill Out!** Cover your tray of dough balls and pop them into the refrigerator to chill for at least 30 minutes. This crucial step helps them maintain their gorgeous snowball shape and prevents spreading during baking.
- **Preheat Power:** While your dough is chilling, preheat your oven to a cozy 375°F (190°C).
- **Bake to Perfection:** Bake your Minty Chocolate Snowball Bites for a short and sweet 7 to 8 minutes. You’re looking for them to be just barely set, with a very light golden hue on the bottom. Let them cool on the cookie sheet for 5 minutes – they’ll be delicate at first!
- **First Snow Dusting:** While your cookies are still slightly warm, line a second large baking sheet with fresh parchment paper and dust it generously with powdered sugar. Carefully transfer the still-warm cookies onto this sheet and give them another generous dusting of powdered sugar.
- **Cool Completely:** Patience is a virtue! Allow the Minty Chocolate Snowball Bites to cool completely on the baking sheet before moving on.
- **The Grand Finale – Second Roll!** For that iconic “snowball” finish, fill a small bowl halfway with powdered sugar. One by one, roll each completely cooled cookie in the sugar until it’s fully coated. For an extra frosty, winter-wonderland look, give them a second roll in the sugar!
- **Enjoy!** Your beautiful, delicious Minty Chocolate Snowball Bites are now ready to be devoured or shared!
Presenting and Serving Your Minty Chocolate Snowball Bites
These Minty Chocolate Snowball Bites aren’t just a treat for the taste buds; they’re also a delight for the eyes! Their charming appearance makes them perfect for a variety of presentations and serving occasions. For a stunning display, arrange them on a festive platter in a towering pyramid, or alternate layers with other holiday cookies for a colorful assortment. Place individual snowball bites into mini cupcake liners for an elegant touch, or package them in clear cellophane bags tied with a ribbon for thoughtful homemade gifts. To serve, pair these delightful cookies with a steaming mug of hot cocoa topped with whipped cream, a comforting cup of coffee, or a refreshing glass of milk. They are an absolute showstopper on any holiday dessert table, perfect for Christmas parties, cookie exchanges, or simply as a cozy indulgence with loved ones after dinner. Their vibrant green color also makes them a fantastic addition to a St. Patrick’s Day celebration or any event where a touch of minty magic is desired!
Storage and Shelf Life of Your Minty Chocolate Snowball Bites
Once you’ve indulged in a few (or more!) of your delicious Minty Chocolate Snowball Bites, you’ll want to store the rest properly to maintain their freshness and tender texture. The good news is they store beautifully! Simply transfer any leftover treats into an airtight container. This is key to preventing them from drying out and absorbing other odors. Store the container at room temperature on your counter or in your pantry. When stored correctly, these delightful Minty Chocolate Snowball Bites will stay fresh and delicious for up to four days. If you want to extend their life even further, you can freeze them (see FAQ for details) for several weeks!
FAQs About Minty Chocolate Snowball Bites
Q1: What’s the best type of mint extract to use for these cookies?
A: Peppermint extract is typically preferred for Minty Chocolate Snowball Bites as it delivers that classic, refreshing holiday mint flavor. Spearmint extract has a slightly different, milder taste, so stick with peppermint for the most authentic experience.
Q2: Can I use regular-sized chocolate chips instead of mini ones?
A: While you can, mini chocolate chips are highly recommended for Minty Chocolate Snowball Bites. They distribute more evenly in the small cookie balls and make them easier to roll and eat without large chunks breaking the structure.
Q3: Why is chilling the dough for Minty Chocolate Snowball Bites important?
A: Chilling the dough is a crucial step! It solidifies the butter, which helps prevent the cookies from spreading too much in the oven, ensuring they maintain their perfect spherical “snowball” shape and a tender texture.
Q4: Can I make the dough for Minty Chocolate Snowball Bites ahead of time?
A: Absolutely! You can prepare the dough, roll it into balls, and chill it in the refrigerator for up to 2-3 days before baking. Just make sure it’s well-covered to prevent it from drying out.
Q5: How do I get the green color just right for my Minty Chocolate Snowball Bites?
A: Gel food coloring works best for a vibrant, concentrated color without adding extra liquid to the dough. Start with a few drops, mix well, and then add more one drop at a time until you achieve your desired minty shade.
Q6: Can I make these Minty Chocolate Snowball Bites gluten-free?
A: You can try substituting the all-purpose flour with a 1:1 gluten-free baking flour blend. Results may vary slightly in texture, but many readers have had success with this substitution in similar shortbread-style cookies.
Q7: My cookies spread too much during baking. What went wrong?
A: The most common reasons for spreading are insufficient chilling of the dough, or your butter was too soft when you started mixing. Ensure your butter is softened, not melted, and don’t skip the chilling step!
Q8: Can I freeze Minty Chocolate Snowball Bites?
A: Yes! You can freeze the baked and fully cooled cookies (before the final powdered sugar roll) in an airtight container for up to 3 months. Thaw at room temperature and then roll in powdered sugar before serving. You can also freeze the unbaked dough balls.
Q9: Why do I dust the Minty Chocolate Snowball Bites with powdered sugar twice?
A: The first dusting while warm helps the sugar adhere better and creates a base layer. The second roll after they’ve completely cooled provides that beautiful, crisp, and substantial “snowball” finish, making them look extra frosty.
Q10: Are these Minty Chocolate Snowball Bites crunchy or soft?
A: These cookies are delightfully tender and melt-in-your-mouth soft, with a slightly crumbly texture akin to a classic shortbread. The powdered sugar coating adds a delicate crispness to the exterior.
Minty Chocolate Snowball Bites ❄️
Equipment
- Large Cookie Sheet
- Parchment Paper
- Mixing Bowl
Ingredients
- 1 cup unsalted butter softened
- 2/3 cup powdered sugar sifted
- 2 1/4 cups all-purpose flour spooned and leveled
- 1/2 teaspoon salt
- 1 teaspoon mint extract (or peppermint extract)
- green food coloring (gel works best)
- 3/4 cup mini chocolate chips
- powdered sugar for dusting
Instructions
- Start by lining a large cookie sheet with parchment paper and set it aside. This makes cleanup a breeze!
- In a mixing bowl, beat together the softened butter and sifted powdered sugar until the mixture becomes wonderfully light and fluffy.
- Next, gently blend in the flour, salt, and mint extract until everything is just combined. Avoid overmixing to keep them tender.
- Add a few drops of green food coloring to achieve your desired minty shade, stirring it in well.
- Fold in the mini chocolate chips, making sure they're nicely distributed throughout the dough.
- Scoop out about one tablespoon of dough at a time and roll it into a cute little ball. Place these onto your prepared cookie sheet.
- Cover the dough balls and pop them into the refrigerator to chill for at least 30 minutes. This quick chill helps them maintain their perfect snowball shape during baking.
- Preheat your oven to 375°F (190°C).
- Bake the cookies for 7 to 8 minutes. You're looking for them to be just barely set and very lightly browned on the bottom. Let them cool on the cookie sheet for 5 minutes.
- While they're slightly warm, line another large baking sheet with parchment paper and dust it generously with powdered sugar. Transfer the still-warm cookies onto this sheet and dust them with even more powdered sugar.
- Allow the cookies to cool completely before the final step.
- For that signature "snowball" finish, fill a small bowl halfway with powdered sugar. Roll each completely cooled cookie in the sugar until it's fully coated. For an extra frosty look, give them a second roll!
- Store any leftover delightful treats in an airtight container for up to four days.