
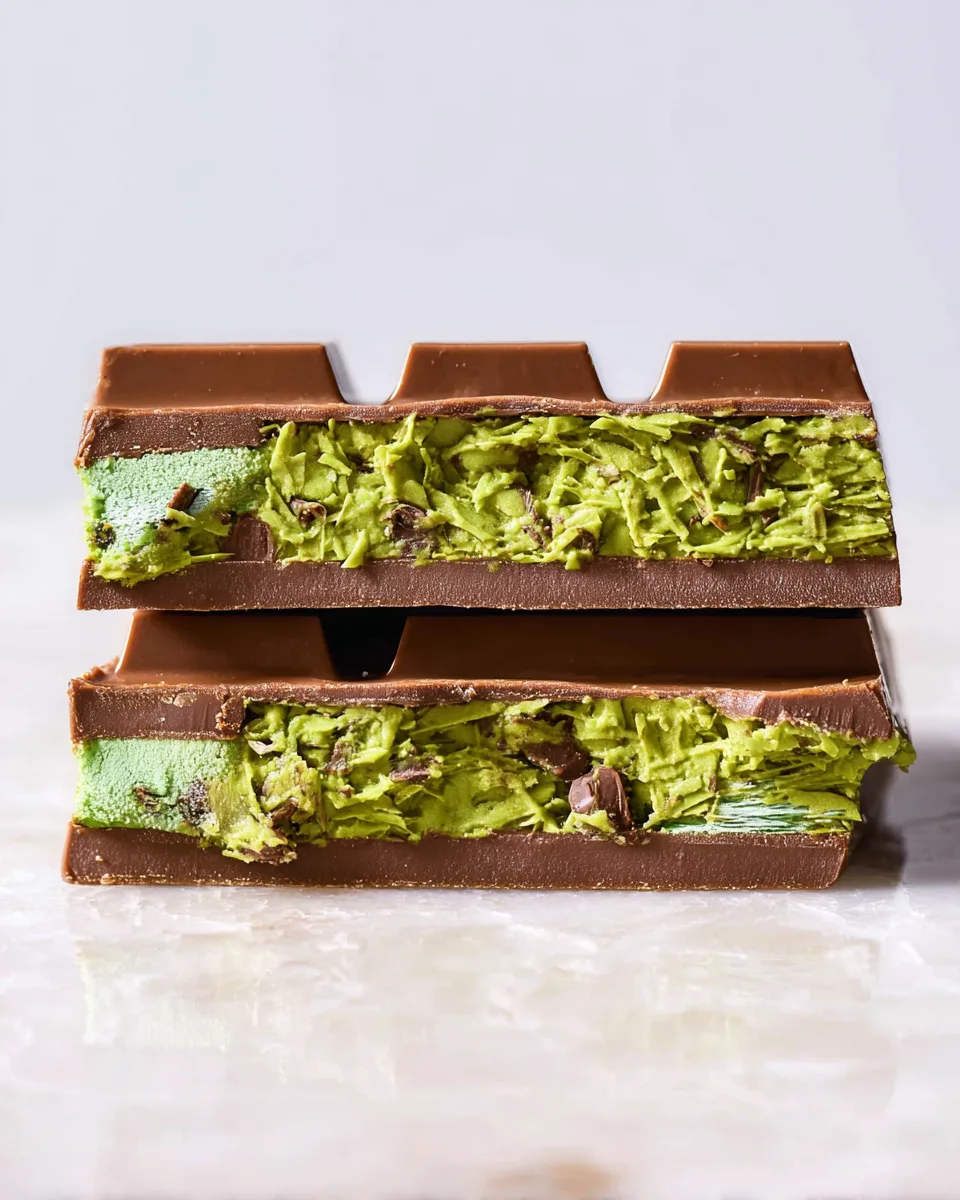
Summer is here, and with it comes the insatiable craving for something cool, refreshing, and utterly decadent. But let’s be honest, sometimes a melting ice cream cone just doesn’t hit the spot for that sophisticated sweet tooth. What if we told you there’s a secret weapon to conquer your summer dessert desires? Enter the Summer Chocolate Oasis Crunch Bar – a treat so delightful, it feels like a culinary mirage come to life. Imagine crisp, golden pastry embracing a vibrant, creamy pistachio filling, all enrobed in luscious milk chocolate. This isn’t just a dessert; it’s an experience, a mini vacation for your taste buds, promising a symphony of textures and flavors that will make you forget all about the heat. Get ready to dive into your new favorite warm-weather indulgence!
Why You’ll Love This Summer Chocolate Oasis Crunch Bar Recipe
This isn’t just another chocolate bar; it’s a gourmet escape designed for ultimate enjoyment. Here are four irresistible reasons why the Summer Chocolate Oasis Crunch Bar will become your go-to treat:
- Unforgettable Texture Play: Prepare for a party in your mouth! The star is the incredibly crispy kataifi pastry, offering a delightful crunch that perfectly contrasts the smooth, creamy pistachio filling and the rich, melt-in-your-mouth chocolate shell. It’s a textural masterpiece you won’t find anywhere else.
- Vibrant & Exotic Flavor Profile: Step away from the ordinary with the luxurious taste of pistachio. The creamy pistachio butter, complemented by a hint of earthy tahini and a touch of salt, creates a sophisticated flavor that’s both comforting and exciting. Paired with quality milk chocolate, it’s a match made in dessert heaven.
- A Stunning Showstopper: With its optional vivid green pistachio layer and artistic white chocolate drizzles, this crunch bar is as beautiful to look at as it is delicious to eat. It’s perfect for impressing guests or simply treating yourself to something visually spectacular.
- Surprisingly Simple & Make-Ahead Friendly: Despite its gourmet appeal, this recipe is straightforward to follow. Plus, it’s designed for convenience – make it in advance and store it in the fridge, so you always have a delightful, chilled treat ready to grab and enjoy whenever a craving strikes.
Summer Chocolate Oasis Crunch Bar: Ingredients
Gather your high-quality ingredients to create this luxurious Summer Chocolate Oasis Crunch Bar. Precision in measurement ensures perfection!
- 🧈 2 tablespoons unsalted butter or coconut oil, divided
- 🌴 5 ounces coarsely chopped kataifi pastry dough (about 2 packed cups), thawed if frozen
- 🌰 1 (7- to 8-ounce) jar creamy pistachio butter or pistachio cream
- 🥄 2 tablespoons well-stirred tahini
- 🧂 1/4 teaspoon kosher salt
- 🍫 3 tablespoons white chocolate chips that contain cocoa butter, such as Guittard
- 💚 1 to 4 drops liquid or gel green food coloring (optional)
- 🍫 12 ounces good-quality milk chocolate chips (about 2 cups), divided
Detailed Directions: Crafting Your Summer Chocolate Oasis Crunch Bar
Ready to transform simple ingredients into an extraordinary Summer Chocolate Oasis Crunch Bar? Follow these steps carefully for a perfect result:
- Crisp the Kataifi: In a large nonstick skillet, melt 2 tablespoons of butter (or coconut oil) over medium heat. Add the 5 ounces of coarsely chopped kataifi pastry dough. Stir occasionally for 8 to 10 minutes until it turns beautifully golden-brown and crispy. Transfer this to a medium bowl.
- Mix the Pistachio Filling: While the kataifi is still warm, immediately stir in the 1 jar of creamy pistachio butter, 2 tablespoons of tahini, and 1/4 teaspoon of kosher salt. Mix until everything is perfectly combined and evenly coated, creating a delicious filling.
- Prepare for Molding: Place your rectangular silicone chocolate mold(s) (either 2 large or 1 extra-large) on a baking sheet, ready for the chocolate magic.
- Melt White Chocolate & Decorate: Fill a small saucepan halfway with water and bring it to a gentle simmer. Set a heatproof medium bowl over the simmering water (this creates a double boiler) and add the 3 tablespoons of white chocolate chips. Stir constantly for about 1 minute until completely melted and smooth. Carefully remove the bowl from the heat. If you like, stir in 1 to 4 drops of green food coloring for a vibrant touch. Drizzle this melted white chocolate artfully over the bottom of your chocolate mold(s) to create an irregular, pretty pattern. Pop the molds into the freezer for a quick chill while you prepare the milk chocolate.
- Melt Milk Chocolate & Create Base Layer: Set aside 1/4 cup of the milk chocolate chips from your 12 ounces. If needed, add a bit more water to your saucepan, then place the same bowl back over the simmering water (no need to clean it). Add the remaining milk chocolate chips (about 1 ¾ cups) and the remaining 1 tablespoon of unsalted butter to the bowl. Heat, stirring continuously, for about 2 minutes until fully melted and glossy.
- Temper & Coat Molds: Remove the bowl from the heat and stir in the 1/4 cup of reserved milk chocolate chips until they are completely melted and the mixture is silky smooth. Carefully spread just enough of this melted chocolate (about 1/4 cup) to thinly and evenly coat the bottom and sides of your mold(s). Freeze these coated molds for about 10 minutes to set firmly.
- Fill with Pistachio Crunch: Now, gently add the delicious pistachio cream mixture into your chocolate mold(s). Use an offset spatula or the back of a spoon to lightly spread and press the filling into an even layer, ensuring every bite will be perfectly crunchy.
- Seal with Chocolate: Pour the remaining melted milk chocolate over the pistachio filling and spread it evenly to fill the mold completely. Using a bench scraper or an offset spatula, lightly scrape across the top to level the bars and remove any excess chocolate, ensuring a neat, professional finish.
- Chill & Enjoy: Refrigerate the bars until they are completely set, which will take at least 40 minutes. Once firm, carefully remove the bar(s) from the mold(s). If desired, use a knife to trim off any overhanging chocolate for a perfect edge.
Serving & Presentation Ideas for Your Summer Chocolate Oasis Crunch Bar
Your beautiful Summer Chocolate Oasis Crunch Bar deserves to be presented as spectacularly as it tastes! Here are some creative ways to serve and present your homemade delicacy:
- Elegant Slices: Once fully set, use a sharp, warm knife to cut the large bar(s) into individual squares, rectangles, or even triangles. The clean lines will showcase the layers beautifully. For extra neatness, wipe the knife clean between each cut.
- Garnish Galore: Elevate the look with simple garnishes. A sprinkle of finely chopped pistachios or a delicate dusting of edible gold dust can add a touch of sophistication. A tiny pinch of flaky sea salt on top can also enhance the chocolate and pistachio flavors.
- Dessert Platter Star: Arrange the cut pieces on a beautiful serving platter alongside fresh summer berries like raspberries or blueberries. The fruit’s tartness will complement the rich chocolate and pistachio perfectly.
- Individual Indulgences: For a personalized touch, wrap individual bars in parchment paper and tie with a ribbon. These make fantastic edible gifts or party favors.
- Deconstructed Dream: Break a bar into rustic chunks and serve them alongside a scoop of vanilla bean ice cream or a dollop of whipped cream for a more decadent, deconstructed dessert experience.
- Coffee Companion: These bars are excellent when paired with a chilled iced coffee or a warm espresso, making for a luxurious afternoon treat.
Storing Your Summer Chocolate Oasis Crunch Bar
To keep your exquisite Summer Chocolate Oasis Crunch Bar fresh and delicious, proper storage is key. Once your bars are completely set and trimmed, store them in an airtight container. Keep this container in the refrigerator to maintain their firm texture and prevent melting, especially during warmer months. Stored this way, your delightful crunch bars will remain fresh and enjoyable for up to 3 weeks. They are best served chilled, offering a refreshing crunch with every bite, straight from the fridge!
FAQs About the Summer Chocolate Oasis Crunch Bar
- What is kataifi pastry?
Kataifi (also spelled Kadaif or Knafeh) is a shredded phyllo dough, resembling fine vermicelli noodles. It’s commonly used in Mediterranean and Middle Eastern desserts for its delicate, crispy texture when baked or fried. - Can I use a different nut butter instead of pistachio?
While pistachio butter is central to the unique flavor of this Summer Chocolate Oasis Crunch Bar, you could experiment with almond butter or cashew butter for a different, but still delicious, variation. The green food coloring would then be purely for aesthetic flair. - Is green food coloring necessary?
No, the green food coloring is entirely optional. It’s added to enhance the visual appeal and highlight the pistachio flavor, but the bar will taste just as wonderful without it. - Why is it important to “temper” the chocolate by adding reserved chips?
This technique, called seeding, helps to properly temper the chocolate. It ensures a stable chocolate crystal structure, resulting in a shiny, snap-able chocolate that resists melting at room temperature and avoids bloom (white streaks). - What if I don’t have a silicone chocolate mold?
You can use a parchment-lined 8×4-inch loaf pan or an 8×8-inch baking dish. You would then cut the large slab into bars once fully set. - Can I use dark chocolate instead of milk chocolate?
Absolutely! If you prefer a more intense chocolate flavor and less sweetness, good-quality dark chocolate chips (around 60-70% cocoa) would be a fantastic substitute for the milk chocolate. - How do I know the kataifi is crispy enough?
The kataifi should be beautifully golden-brown and feel dry and brittle to the touch. It will have a pronounced crunch when you taste a small piece. Don’t rush this step for maximum crunch! - What if my white chocolate seizes or becomes clumpy?
This usually happens if water gets into the chocolate or it’s overheated. To fix it, try stirring in a tiny amount (1/4 teaspoon) of vegetable oil or melted butter. If it’s too far gone, it’s best to start with fresh chocolate. - Can this recipe be made dairy-free?
Yes! Use coconut oil instead of butter, ensure your milk and white chocolate chips are dairy-free varieties (check labels carefully), and you’ll have a delicious dairy-free version of the Summer Chocolate Oasis Crunch Bar. - How many servings does this recipe yield?
This recipe makes two large bars, which can then be cut into 14 individual servings. The exact number will depend on how big you cut your pieces, but 14 is a good estimate for generous portions.
Summer Chocolate Oasis Crunch Bar 🌴
Equipment
- Large Nonstick Skillet
- Medium Bowl
- Rectangular silicone chocolate mold(s)
- Baking Sheet
- Small Saucepan
- Heatproof medium bowl
- Offset Spatula
- Bench scraper
- Knife
Ingredients
- 2 tablespoons unsalted butter or coconut oil divided
- 5 ounces coarsely chopped kataifi pastry dough (about 2 packed cups), thawed if frozen
- 1 jar creamy pistachio butter or pistachio cream (7- to 8-ounce)
- 2 tablespoons tahini well-stirred
- 1/4 teaspoon kosher salt
- 3 tablespoons white chocolate chips that contain cocoa butter, such as Guittard
- 1 to 4 drops liquid or gel green food coloring (optional)
- 12 ounces good-quality milk chocolate chips (about 2 cups), divided
Instructions
- Crisp the Kataifi: In a large nonstick skillet, melt 2 tablespoons of butter (or coconut oil) over medium heat. Add the 5 ounces of coarsely chopped kataifi pastry dough. Stir occasionally for 8 to 10 minutes until it turns beautifully golden-brown and crispy. Transfer this to a medium bowl.
- Mix the Pistachio Filling: While the kataifi is still warm, immediately stir in the 1 jar of creamy pistachio butter, 2 tablespoons of tahini, and 1/4 teaspoon of kosher salt. Mix until everything is perfectly combined and evenly coated, creating a delicious filling.
- Prepare for Molding: Place your rectangular silicone chocolate mold(s) (either 2 large or 1 extra-large) on a baking sheet, ready for the chocolate magic.
- Melt White Chocolate & Decorate: Fill a small saucepan halfway with water and bring it to a gentle simmer. Set a heatproof medium bowl over the simmering water (this creates a double boiler) and add the 3 tablespoons of white chocolate chips. Stir constantly for about 1 minute until completely melted and smooth. Carefully remove the bowl from the heat. If you like, stir in 1 to 4 drops of green food coloring for a vibrant touch. Drizzle this melted white chocolate artfully over the bottom of your chocolate mold(s) to create an irregular, pretty pattern. Pop the molds into the freezer for a quick chill while you prepare the milk chocolate.
- Melt Milk Chocolate & Create Base Layer: Set aside 1/4 cup of the milk chocolate chips from your 12 ounces. If needed, add a bit more water to your saucepan, then place the same bowl back over the simmering water (no need to clean it). Add the remaining milk chocolate chips (about 1 ¾ cups) and the remaining 1 tablespoon of unsalted butter to the bowl. Heat, stirring continuously, for about 2 minutes until fully melted and glossy.
- Temper & Coat Molds: Remove the bowl from the heat and stir in the 1/4 cup of reserved milk chocolate chips until they are completely melted and the mixture is silky smooth. Carefully spread just enough of this melted chocolate (about 1/4 cup) to thinly and evenly coat the bottom and sides of your mold(s). Freeze these coated molds for about 10 minutes to set firmly.
- Fill with Pistachio Crunch: Now, gently add the delicious pistachio cream mixture into your chocolate mold(s). Use an offset spatula or the back of a spoon to lightly spread and press the filling into an even layer, ensuring every bite will be perfectly crunchy.
- Seal with Chocolate: Pour the remaining melted milk chocolate over the pistachio filling and spread it evenly to fill the mold completely. Using a bench scraper or an offset spatula, lightly scrape across the top to level the bars and remove any excess chocolate, ensuring a neat, professional finish.
- Chill & Enjoy: Refrigerate the bars until they are completely set, which will take at least 40 minutes. Once firm, carefully remove the bar(s) from the mold(s). If desired, use a knife to trim off any overhanging chocolate for a perfect edge. Store them in an airtight container in the fridge for up to 3 weeks for a delightful, homemade treat!