
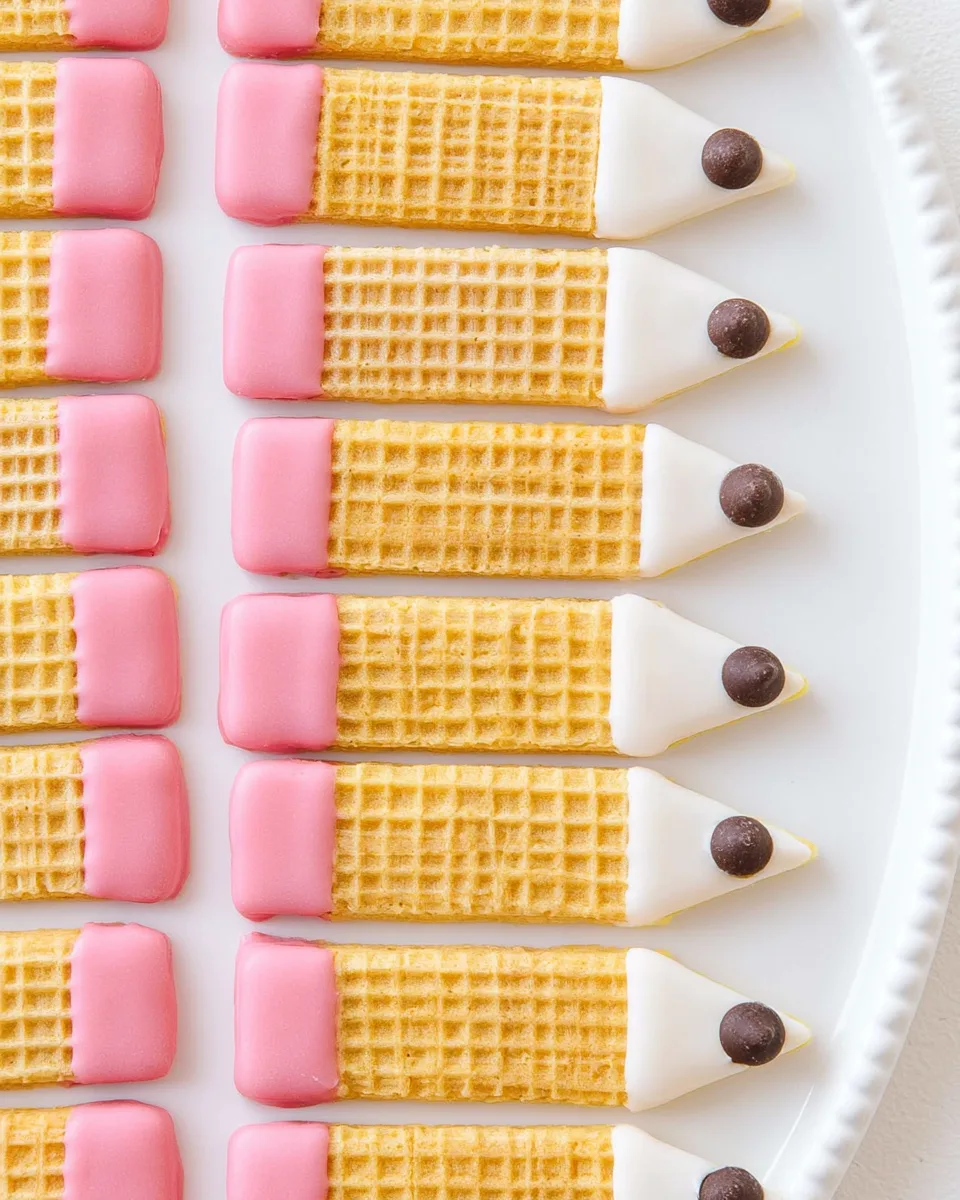
🍎📝 Back-to-school mornings just got a whole lot sweeter! Imagine opening a lunchbox to find cookies that look exactly like tiny pencils – complete with a pink eraser, a white “wood” body, and a chocolate chip lead. 📝 Pencil Cookies for Back-to-School Lunchbox Fun are the ultimate no‑bake treat that turns snack time into a playful classroom moment. Kids (and grown‑ups!) will double‑take, giggle, and gobble them up faster than you can say “pop quiz.” Plus, they’re ridiculously easy to make – you don’t even turn on the oven. Ready to craft the cutest cookies in the cafeteria? Let’s sharpen our skills!
Why You’ll Love This Recipe
- Zero Baking Required – No oven, no heat, no sweat. Just melt, dip, and chill. Perfect for hot days or when you want a quick project with little ones.
- Super Cute & Instagram‑Worthy – Each cookie looks like a real pencil. Lunchbox envy is guaranteed, and you’ll be the coolest parent (or teacher) on the block.
- Toddler‑Friendly Assembly – Simple dipping steps (with adult supervision for melting) let even tiny helpers get involved. Great for a back‑to‑school baking day!
- Only 5 Ingredients + 58 Calories Each – Wafer cookies, candy melts, and chocolate chips. Light enough for a lunchbox treat without overloading on sugar or fat.
Ingredients
- 🍪 20 wafer cookies (we used vanilla‐flavored)
- 🌸 ½ cup pink candy melts
- 🤍 ½ cup white candy melts
- 🍫 20 chocolate chips (milk or dark – your call!)
Pro tip: Want a yellow pencil or a blue one? Swap the pink melts for any color you like – just keep the white for the “wood” tip.
Step‑by‑Step Instructions
- Prep your workspace: Line a baking sheet with parchment paper. This catches drips and makes cleanup a breeze.
- Shape the pencils: Take one wafer cookie. Using a sharp knife, cut one end into a point by making two 45‑degree cuts (like you’re sharpening a real pencil!). Repeat for all 20 wafers.
- Melt the magic: Place pink candy melts in one microwave‑safe bowl and white candy melts in another. Heat in 20‑second bursts, stirring each time, until smooth and fully melted.
- Create the eraser: Dip the flat (uncut) end of each wafer into the pink melted candy. Let excess drip off, then place on the parchment. Do all 20 before moving to the next step.
- Add the “wood” tip: Hold the pointed end of a cookie and dip it into the white candy melts. Be careful not to let the pink eraser touch the white bowl (or you’ll get a pink mess). Place back on the parchment.
- Attach the lead: While the white coating is still wet, gently press one chocolate chip onto the tip – pointy side out – to mimic pencil lead. Repeat for each cookie.
- Set & harden: Let the cookies rest at room temperature for 30–45 minutes, or pop the sheet in the fridge for 10–15 minutes to speed things up. Once the candy is firm, your pencil cookies are ready to pack!
Ways to Present & Serve
- Mini Lunchbox Notes: Wrap each cookie in a small parchment paper “envelope” and add a silly pun: “You’re the sharpest kid in class!”
- Pencil Holder Display: Stand the cookies upright in a small jar filled with teddy graham “eraser shavings” or crushed graham crackers.
- Back‑to‑School Party Platter: Arrange the pencil cookies in a row next to apple slices, banana “pencils,” and a bowl of “paper” (white chocolate bark).
- Classroom Classroom Treat: Package 2‑3 cookies in a clear cellophane bag tied with a red ribbon. Attach a printable “No. 2 Pencil” tag.
- DIY Bar for Kids: Set out melted candy in different colors and let the kids dip their own wafers. They’ll love customizing “their” pencil!
Storage Tips
📦 Room temperature: Store your Pencil Cookies in an airtight container, layered between sheets of parchment paper. They’ll stay fresh for up to 5–7 days.
❄️ Freezer friendly: Want to prep ahead? Place the fully set cookies in a single layer in a freezer‑safe container, separating layers with wax paper. Freeze for up to 1 month. Thaw at room temperature for 15 minutes before packing.
⚠️ Avoid refrigerating for long periods – the wafers can absorb moisture and turn soft. A quick fridge set is fine, but for everyday storage, stick to a cool, dry cabinet.
FAQs About Pencil Cookies for Back‑to‑School Lunchbox Fun
Yes! Use melted dark or milk chocolate – but be aware it won’t set as hard as candy melts at room temperature. Add a teaspoon of coconut oil to thin it.
Wafers are fragile. Use a serrated knife and a gentle sawing motion. You can also freeze the wafers for 10 minutes before cutting – they’ll be less likely to crack.
Absolutely – look for gluten‑free wafer cookies (many brands make them) and double‑check your candy melts. The recipe is naturally gluten‑friendly otherwise.
Stir in a teaspoon of vegetable shortening or coconut oil until smooth. This thins the coating without affecting taste.
Make sure the white coating is still wet when you press the chip. If it’s already set, re‑dip the tip in a tiny drop of melted white candy and attach the chip again.
Exactly 20 pencil cookies – one per wafer. Scale up by doubling the ingredients for a larger batch.
Of course! Use red, yellow, or blue melts to match school colors or holidays. Green “apple” erasers are also fun.
Yes – small candy melts and chocolate chips are fine for ages 3+. However, the wafer itself is a choking hazard if not eaten carefully. Supervise young children.
You can – but then they won’t look like pencils! The pink end is what makes them stand out. However, you could just do white on both ends for a minimalist version.
Use a small spoon to drizzle the candy instead of dipping, or pour the melted candy into a tall, narrow glass for easier dipping. Let excess drip off thoroughly.
📝 Pencil Cookies for Back‑to‑School Lunchbox Fun – because every lunchbox deserves a little creativity! 🖍️🍎
“`
Pencil Cookies for Back-to-School Lunchbox Fun
Equipment
- Baking Sheet
- Parchment Paper
- Bowls
Ingredients
- 20 wafer cookies
- 1/2 cup pink candy melts
- 1/2 cup white candy melts
- 20 chocolate chips
Instructions
- Line a baking sheet with parchment paper.
- Cut one end of each wafer cookie into a point using two 45-degree cuts.
- Melt the pink and white candy melts in separate bowls according to package directions.
- Dip the flat (uncut) end of each wafer into the pink candy melts to make the "eraser."
- Carefully dip the pointed end into the white candy melts (avoid touching the pink end).
- While the white coating is still wet, press a chocolate chip onto the tip for the "pencil lead."
- Place the finished cookies on the prepared sheet. Let them set completely (pop in the fridge for a few minutes to speed it up).