Why You’ll Love This Recipe
Get ready to fall head over heels for these adorable and delicious Pocky Christmas Trees! Here are four fantastic reasons why this recipe will become your go-to holiday treat:
- 🎄 Super Quick & Easy: Forget complicated baking! These festive treats come together in mere minutes, making them perfect for last-minute holiday magic or busy afternoons.
- 👨👩👧👦 Kid-Friendly Fun: Little hands will love drizzling chocolate and adding sprinkles, turning snack time into a joyful crafting session. It’s a fantastic way to get everyone involved in the holiday spirit!
- ✨ Irresistibly Delicious & Festive: The classic combination of crispy Pocky sticks and rich dark chocolate, adorned with colorful sprinkles, is a guaranteed crowd-pleaser. They look as good as they taste!
- 💖 Healthy-ish Indulgence: With dark chocolate and perfectly portioned servings, these Pocky Christmas Trees offer a delightful treat that satisfies your sweet tooth without going overboard. Enjoy the goodness!
Sprinkle Some Magic: Meet Your New Favorite Holiday Treat!
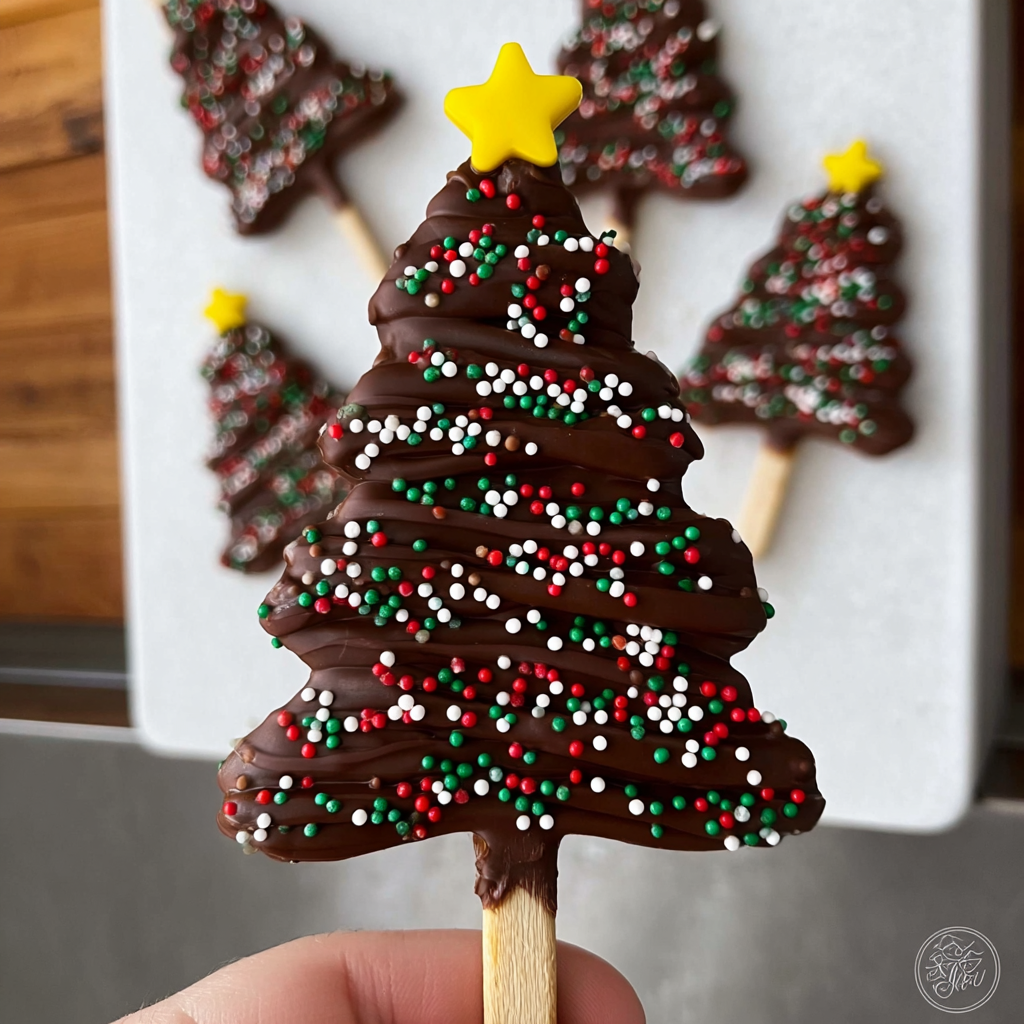
The air is crisp, the lights are twinkling, and the scent of holiday cheer is everywhere! What better way to embrace the festive season than with a treat that’s as charming as it is simple? Say hello to your new holiday obsession: Pocky Christmas Trees! Forget elaborate gingerbread houses or tricky sugar cookies. We’re about to show you how to transform humble Pocky sticks into adorable, edible masterpieces that will have everyone exclaiming with delight. Whether you’re hosting a festive gathering, looking for a fun activity with the kids, or just craving a little sprinkle of holiday magic, these Pocky Christmas Trees are your ticket to instant festive joy. They’re quick, they’re easy, and oh-so-delicious!
Ingredients You’ll Need
Gather your festive supplies! Making these delightful Pocky Christmas Trees couldn’t be simpler with these straightforward ingredients:
- 🍪 12-15 Pocky biscuit sticks: Chocolate flavor is highly recommended for that classic, comforting taste that pairs perfectly with extra dark chocolate.
- 🍫 1/2 cup (approx. 3 oz or 85g) dark chocolate melting wafers or high-quality dark chocolate chips: The richer, the better for that luxurious tree effect!
- ✨ 1-2 tablespoons festive colorful sprinkles: Think reds, greens, silvers, and golds – make your trees sparkle!
- 🌟 6-8 small star-shaped sprinkles: One for the very top of each majestic “tree” – the crowning glory!
Crafting Your Pocky Christmas Trees: A Step-by-Step Guide
Ready to bring your festive vision to life? Follow these simple steps to create your own enchanting Pocky Christmas Trees:
- Set Up Your Space: First things first, prepare your workspace. Lay a sheet of wax paper (or parchment paper) flat on a counter or a sturdy baking sheet. This non-stick surface is crucial for easily peeling off your Pocky Christmas Trees once they’ve set.
- Melt the Chocolate: Grab your microwave-safe bowl and add the dark chocolate wafers or chips. Heat them in the microwave using short 30-second bursts. After each burst, stir the chocolate well with a spoon or spatula. Continue this process until your chocolate is completely smooth, glossy, and free of any lumps. Patience is key here to prevent burning!
- Make a Simple Piping Bag: This trick makes drizzling a breeze! Take a clean plastic sandwich baggie and place it inside a tall cup, folding the top edges over the rim of the cup. This creates a stable holder. Now, carefully spoon all of your perfectly melted chocolate into this baggie.
- Create Your Trees: Snip off just a tiny corner from the bottom of the chocolate-filled baggie – you want a small opening for control. Hold a Pocky stick over your prepared wax paper. Starting near the top of the Pocky stick, begin drizzling the melted chocolate over it in a beautiful zigzag pattern. Start thin at the top, gradually widening your zigzags as you move downwards to form that iconic Christmas tree shape. The Pocky stick acts as the tree trunk!
- Decorate Instantly: This is where the magic happens! While the chocolate is still gloriously wet and shiny, immediately and gently sprinkle your colorful festive sprinkles all over each chocolate tree. Don’t forget the grand finale – carefully place a single small star-shaped sprinkle right at the very top of each tree, like a shining beacon.
- Let Them Harden: Your beautiful creations need a little rest! Allow your Pocky Christmas Trees to sit undisturbed at room temperature for about 15-30 minutes. The goal is for the chocolate to become completely firm and set. If you’re in a hurry (and who isn’t during the holidays?), you can pop them into the refrigerator for a quick 5-10 minute chill.
- Enjoy Your Treat: Once fully set and firm, gently peel your hardened Pocky Christmas Trees off the wax paper. Now, they’re ready to be served and admired! Get ready to enjoy this delightful, easy, and healthy-ish holiday snack!
Presenting and Serving Your Pocky Christmas Trees
Once your enchanting Pocky Christmas Trees are perfectly set, it’s time to show them off! Here are some creative and delightful ways to present and serve your festive treats:
- Festive Platter Perfection: Arrange your Pocky Christmas Trees upright (if sturdy enough) or lying flat on a beautiful white or holiday-themed platter. You can scatter extra sprinkles around for a snow effect, or add a few fresh cranberries or small sprigs of rosemary for an elegant touch.
- Edible Centerpiece: For a truly show-stopping display, “plant” your Pocky Christmas Trees into a small block of floral foam (wrapped in foil) or even a sturdy half orange, creating a miniature edible forest for your table centerpiece.
- Holiday Dessert Board: Integrate your Pocky Christmas Trees into a larger holiday charcuterie or dessert board. Pair them with other festive treats like gingerbread cookies, chocolate-covered pretzels, fresh fruit, and small candies for an abundant spread.
- Thoughtful Gift Packaging: These make wonderful homemade gifts! Once fully hardened, carefully place 2-3 Pocky Christmas Trees into small clear cellophane bags, tie them with a festive ribbon, and attach a personalized tag. Perfect for teachers, neighbors, or colleagues.
- Kids’ Party Activity: Instead of making them all beforehand, set up a “Decorate Your Own Pocky Christmas Tree” station! Provide melted chocolate, Pocky sticks, and various sprinkles, letting kids unleash their creativity (with adult supervision for the melted chocolate).
- Hot Chocolate Garnish: Serve your Pocky Christmas Trees alongside a steaming mug of hot chocolate or coffee. They make a fantastic stirrer or a delightful dip!
No matter how you choose to present them, these whimsical treats are sure to bring smiles and holiday cheer!
Storing Your Pocky Christmas Trees: Keeping Them Fresh
You’ve put so much effort into creating these delightful Pocky Christmas Trees, so let’s make sure they stay fresh and delicious! Proper storage is key for extending their crunch and chocolatey goodness.
- Airtight is Best: Always store your Pocky Christmas Trees in an airtight container. This prevents the biscuit sticks from going stale and the chocolate from absorbing any unwanted odors or moisture from the air.
- Room Temperature: If your home is cool (below 70°F or 21°C), you can store them at room temperature for up to 3-5 days. Keep them away from direct sunlight or any heat sources, which could cause the chocolate to melt or bloom.
- Refrigerator Storage: For warmer climates or if you want to extend their freshness slightly, you can store them in the refrigerator. Place them in an airtight container to prevent condensation. They will last for about 1 week in the fridge. Just be aware that chilled chocolate can be harder and the biscuit might become slightly firmer. Let them come to room temperature for a few minutes before serving for optimal taste and texture.
- Layering: If stacking, place a piece of wax paper or parchment paper between layers of Pocky Christmas Trees to prevent them from sticking together and to protect the delicate sprinkle decorations.
These festive treats are best enjoyed within a few days of making them to ensure the Pocky sticks remain wonderfully crisp.
FAQs About Pocky Christmas Trees
- Can I use milk chocolate or white chocolate instead of dark chocolate?
Yes, absolutely! While dark chocolate is recommended for a classic taste and slightly healthier profile, milk chocolate or white chocolate wafers/chips will work just as well and offer a different flavor profile. - What if I don’t have a piping bag?
No problem! A clean plastic sandwich baggie with a tiny corner snipped off works perfectly as a makeshift piping bag. Alternatively, you can use a spoon to drizzle the chocolate, though it might be a bit less precise. - Are Pocky Christmas Trees suitable for kids to make?
They are incredibly kid-friendly! Children will love drizzling the chocolate (with adult supervision for melting) and adding the sprinkles. It’s a fantastic holiday activity. - How long do the Pocky Christmas Trees take to set?
At room temperature, they usually set in about 15-30 minutes. If you’re in a hurry, popping them into the refrigerator for 5-10 minutes will speed up the hardening process significantly. - Can I make these Pocky Christmas Trees ahead of time for a party?
Yes, you can! These treats can be made 3-5 days in advance and stored in an airtight container at room temperature, or up to a week in the refrigerator. - What other types of sprinkles can I use for decoration?
Feel free to get creative! Nonpareils, sanding sugar, edible glitter, mini candy pearls, or even crushed peppermints would make wonderful festive additions. - Are Pocky Christmas Trees gluten-free?
Standard Pocky biscuit sticks are not gluten-free. If you need a gluten-free option, look for gluten-free pretzel sticks or biscuit alternatives and ensure your chocolate and sprinkles are also certified gluten-free. - How many Pocky Christmas Trees does this recipe yield?
This recipe typically yields 12-15 Pocky Christmas Trees, depending on how generously you apply the chocolate. - Can I use other types of biscuit sticks if I can’t find Pocky?
Certainly! Any thin, plain biscuit stick or even pretzel rods (for a sweet and salty twist) would work as a great base for your chocolate trees. - What’s the best way to melt chocolate without burning it?
Using a microwave in short 30-second bursts, stirring well after each, is effective. For a more controlled method, a double boiler (a heatproof bowl set over a pot of simmering water) works wonderfully, ensuring gentle, even melting.
Pocky Christmas Trees 🎄
Equipment
- Microwave-safe Bowl
- Plastic sandwich baggie
- Tall cup
- Wax Paper
- Baking Sheet
Ingredients
- 12 Pocky biscuit sticks to 15, chocolate flavor recommended for classic taste
- 1/2 cup dark chocolate melting wafers approx. 3 oz or 85g, or high-quality dark chocolate chips
- 1 tablespoon festive colorful sprinkles to 2 tablespoons
- 6 small star-shaped sprinkles to 8, one for the top of each “tree”
Instructions
- Set Up Your Space: Lay a sheet of wax paper flat on a counter or baking sheet. This creates a non-stick surface for your Pocky trees to dry on.
- Melt the Chocolate: Put the dark chocolate wafers or chips into a microwave-safe bowl. Heat them in the microwave for 30-second bursts, stirring well after each, until the chocolate is smooth and completely melted. Be careful not to burn it.
- Make a Simple Piping Bag: Place a clean plastic sandwich baggie inside a tall cup, folding the top edges over the rim. Spoon all the melted chocolate into this baggie.
- Create Your Trees: Snip a tiny corner off the bottom of the chocolate-filled baggie. Hold a Pocky stick over the wax paper and drizzle the melted chocolate over it in a zigzag pattern, starting thin at the top and widening downwards to form a Christmas tree shape.
- Decorate Instantly: While the chocolate is still wet and shiny, gently sprinkle your colorful festive sprinkles over each chocolate tree. Then, carefully place a small star-shaped sprinkle right at the very top of each tree.
- Let Them Harden: Allow your Pocky Christmas Trees to sit at room temperature for about 15-30 minutes, or until the chocolate is firm and completely set. For a quicker set, you can pop them in the refrigerator for 5-10 minutes.
- Enjoy Your Treat: Once fully set, gently peel the hardened trees off the wax paper and serve them as a delightful, easy, and healthy-ish holiday snack!
Notes
- Calories: 150
- Total Carbs: 20g (Net Carbs: 17g)
- Fats: 7.5g
- Protein: 2.5g