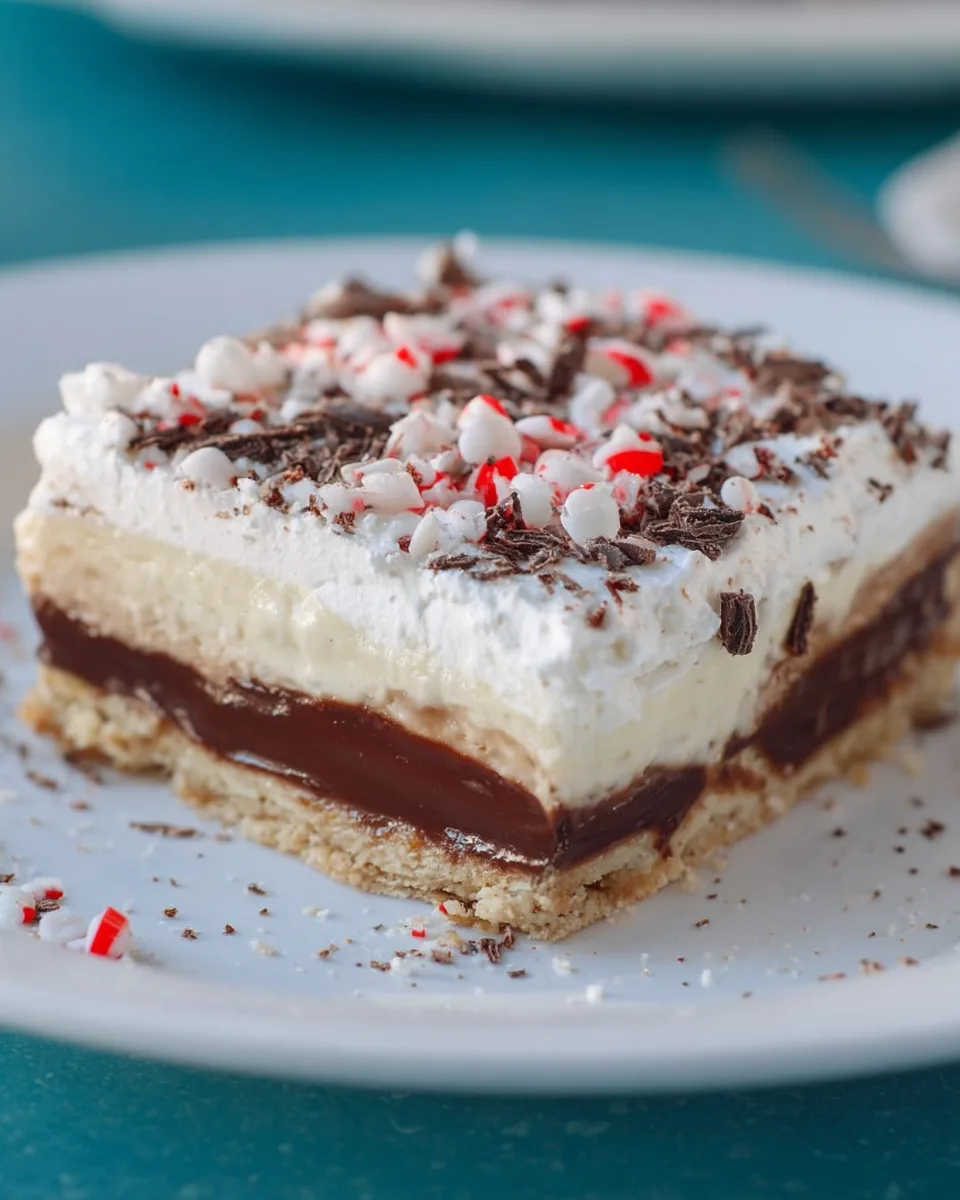
Ever dreamt of a dessert that perfectly captures the festive spirit, combines two beloved flavors, and is deceptively easy to make? Well, pinch yourself, because your dream just became a delicious reality! Get ready to discover the magic of the Chocolate Peppermint Dream Dessert. This layered masterpiece is more than just a treat; it’s a celebration in every bite, promising to be the star of your holiday table or any gathering where pure joy is on the menu. Prepare to impress without the stress, as we dive into creating this irresistible, minty, chocolatey delight!
Why You’ll Love This Recipe
The Chocolate Peppermint Dream Dessert isn’t just another sweet treat; it’s a dessert experience designed to delight. Here are four fantastic reasons why this will become your new go-to:
- Effortlessly Elegant: Despite its stunning layered appearance, this dessert is surprisingly simple to assemble. Most of the work is done with a mixer and a little folding, making you look like a pastry chef with minimal fuss.
- Flavor Explosion: The classic combination of rich chocolate and cool, refreshing peppermint is simply irresistible. Each layer brings a distinct texture and taste that perfectly harmonizes, creating a symphony for your taste buds.
- Crowd-Pleasing & Perfect for Holidays: Serving a generous 36 portions, this dessert is ideal for large family gatherings, holiday parties, or any event where you need to feed a happy crowd. Its festive colors and flavors scream “holiday!”
- Make-Ahead Magic: The best part? This dessert needs time to chill, meaning you can prepare it hours, or even a day, in advance. This frees you up to enjoy your guests or tackle other holiday tasks without last-minute dessert panic.
Ingredients You’ll Need
Gather these simple ingredients to create your show-stopping Chocolate Peppermint Dream Dessert:
- 🍪 1 cup all-purpose flour
- 🌰 ½ cup crushed pecans
- 🍚 ¼ cup granulated sugar
- 🧈 ½ cup salted butter, melted
- 🧀 8 ounces cream cheese, softened (full-fat brick style works best)
- ❄️ 1 cup powdered sugar
- 🍦 1 cup Cool Whip (from an 8 oz container, roughly half)
- 🌿 1 teaspoon peppermint extract
- 🍫 6.8 ounces instant chocolate pudding mix (typically two small boxes)
- 🥛 3 cups very cold milk (whole milk makes it extra creamy)
- 🍦 ⅓ cup Cool Whip (the remaining from your 8 oz container)
- 🍫 ¼ cup chocolate shavings or finely chopped chocolate
- 🍬 ¼ cup crushed candy canes
Step-by-Step Directions to Your Dream Dessert
Creating your exquisite Chocolate Peppermint Dream Dessert is a breeze with these detailed instructions:
- Get Ready: Preheat your oven to 375°F (190°C).
- Make the Crust: In a medium bowl, simply mix together the flour, crushed pecans, sugar, and melted butter until everything is well combined. This forms the delightful base of your dessert. Press this mixture firmly and evenly into the bottom of a 9×13 inch baking dish.
- Bake the Base: Bake your crust for 10 minutes. Once it’s done, take it out and let it cool completely. This step is super important for clean layers and a perfectly crisp foundation!
- Whip Up the Peppermint Layer: While the crust chills, beat the softened cream cheese with a mixer until it’s wonderfully light and fluffy. Add the powdered sugar and beat until smooth. Gently fold in 1 cup of Cool Whip and the peppermint extract until fully combined. This creates the refreshing middle layer of your Chocolate Peppermint Dream Dessert.
- Spread the Sweetness: Carefully spread this creamy peppermint mixture over your completely cooled crust. Ensure an even layer from edge to edge.
- Prepare the Pudding: In a separate bowl, whisk together the instant chocolate pudding mix and the very cold milk according to the package instructions until it begins to thicken. It should be noticeably thicker but still spreadable.
- Layer It On: Spread the chocolate pudding evenly over the peppermint cream cheese layer. Take your time to create a smooth, beautiful chocolate layer.
- Final Cloud Top: Gently top the chocolate pudding layer with the remaining ⅓ cup of Cool Whip. Use an offset spatula or the back of a spoon to spread it lightly, creating a cloud-like finish.
- Garnish & Chill: Sprinkle the chocolate shavings and crushed candy canes generously over the top. Now, cover your dessert and chill it in the refrigerator for at least 2 hours (the longer, the better!) until it’s perfectly set and ready to slice and serve. Each layer of your Chocolate Peppermint Dream Dessert will solidify into perfection!
Serving & Presentation Ideas
Presenting your magnificent Chocolate Peppermint Dream Dessert can be just as fun as making it! Here are some ideas to make it truly shine:
- Classic Slices: The 9×13 inch pan is perfect for serving generous rectangular slices. For clean cuts, wipe your knife with a warm, damp cloth between each slice.
- Individual Delights: For a more elegant presentation, consider serving individual portions in small glass dishes or clear dessert cups. Layer the crust, peppermint filling, pudding, and Cool Whip in miniature, then garnish.
- Extra Garnish Galore: Don’t stop at the recipe’s garnishes! Add a swirl of extra whipped cream on top of each slice, a whole mini candy cane, a sprig of fresh mint, or a dusting of cocoa powder for an extra flourish.
- Gift of Joy: This dessert makes a wonderful edible gift during the holidays! Prepare it in a festive disposable baking dish, wrap it beautifully, and share the joy of your homemade Chocolate Peppermint Dream Dessert.
- Pairing Perfection: Serve alongside a hot cup of coffee, a warm mug of cocoa, or a glass of cold milk to complete the ultimate cozy experience.
Storage & Longevity
To keep your delectable Chocolate Peppermint Dream Dessert tasting its best, proper storage is key:
- Refrigeration is a Must: Due to the dairy components (cream cheese, milk, Cool Whip), this dessert must be stored in the refrigerator.
- Airtight is Right: Cover the baking dish tightly with plastic wrap or aluminum foil, or transfer individual slices to an airtight container. This prevents the dessert from absorbing odors from other foods in your fridge and keeps it fresh.
- How Long Does It Last? When stored correctly in the refrigerator, your Chocolate Peppermint Dream Dessert will stay delicious for 3 to 5 days. After that, the texture and freshness may start to diminish.
- Freezing? Not Recommended: While you technically could freeze this dessert, the texture of the cream cheese and Cool Whip layers can become a bit watery or icy upon thawing. For the best quality and enjoyment of your Chocolate Peppermint Dream Dessert, it’s best consumed fresh from the refrigerator.
Frequently Asked Questions
Have questions about making your Chocolate Peppermint Dream Dessert? We’ve got answers!
- Can I use a different type of crust? Absolutely! A crushed Oreo cookie crust or a graham cracker crust would also work beautifully if you’re not a fan of pecans or want a different flavor profile. Just ensure the amount of butter is adjusted to hold it together.
- Can I use real whipped cream instead of Cool Whip? Yes, you can! Just be aware that real whipped cream might not hold its structure as firmly as Cool Whip, especially for the top layer. For best results, stabilize your whipped cream with a bit of powdered sugar or cream of tartar.
- Is there a substitute for pecans in the crust? Certainly! Walnuts, almonds, or even a mix of plain flour and oats can be used. If omitting nuts, you might need to slightly adjust the butter to ensure the crust holds.
- Can I make this dessert dairy-free? While challenging, it’s possible with dairy-free cream cheese, non-dairy milk (like almond or oat milk for the pudding), and dairy-free whipped topping. Results may vary slightly in taste and texture.
- How far in advance can I make the Chocolate Peppermint Dream Dessert? You can comfortably make this dessert up to 24 hours in advance. It actually benefits from the extra chilling time as the flavors meld and the layers set even more firmly.
- Why is it important for the crust to cool completely? Cooling the crust is crucial. If you spread the cold cream cheese layer over a warm crust, it will melt, resulting in a soggy bottom and messy layers. Patience here pays off!
- What if my pudding doesn’t set? Ensure you used *instant* pudding mix and *very cold* milk. Cold milk helps instant pudding set faster and firmer. If it’s still too loose, try chilling it longer. Sometimes adding a tiny bit more pudding mix (a tablespoon or two) can help, but generally, sticking to the package instructions with cold milk is key.
- Can I use hot or warm milk for the pudding? No, absolutely not! Instant pudding relies on very cold milk to set quickly and correctly. Warm or hot milk will prevent it from thickening properly.
- How many boxes of instant chocolate pudding mix do I need for 6.8 ounces? Typically, a standard small box of instant pudding is around 3.4 to 3.9 ounces. So, 6.8 ounces usually equates to two small boxes of instant chocolate pudding mix. Always check the package weight to be sure.
- Can I make individual servings of the Chocolate Peppermint Dream Dessert? Yes! Instead of a 9×13 pan, you can press the crust into the bottom of individual small glasses or ramekins. Then layer the peppermint mixture, pudding, and Cool Whip as directed. This makes for beautiful, portion-controlled servings.
Chocolate Peppermint Dream Dessert
Equipment
- 9x13 inch Baking Dish
- Medium Bowl
- Mixer
Ingredients
Crust
- 1 cup all-purpose flour
- 0.5 cup crushed pecans
- 0.25 cup granulated sugar
- 0.5 cup salted butter melted
Peppermint Cream Cheese Layer
- 8 ounces cream cheese softened, full-fat brick style works best
- 1 cup powdered sugar
- 1 cup Cool Whip from an 8 oz container, roughly half
- 1 tsp peppermint extract
Chocolate Pudding Layer
- 6.8 ounces instant chocolate pudding mix typically two small boxes
- 3 cups very cold milk whole milk makes it extra creamy
Topping
- 0.33 cup Cool Whip remaining from your 8 oz container
- 0.25 cup chocolate shavings or finely chopped chocolate
- 0.25 cup crushed candy canes
Instructions
- Get Ready: Preheat your oven to 375°F (190°C).
- Make the Crust: In a medium bowl, simply mix together the flour, crushed pecans, sugar, and melted butter until everything is well combined. Press this mixture firmly and evenly into the bottom of a 9x13 inch baking dish.
- Bake the Base: Bake your crust for 10 minutes. Once it’s done, take it out and let it cool completely. This step is super important for clean layers!
- Whip Up the Peppermint Layer: While the crust chills, beat the softened cream cheese with a mixer until it's wonderfully light and fluffy. Add the powdered sugar and beat until smooth. Gently fold in 1 cup of Cool Whip and the peppermint extract until fully combined.
- Spread the Sweetness: Carefully spread this creamy peppermint mixture over your completely cooled crust.
- Prepare the Pudding: In a separate bowl, whisk together the instant chocolate pudding mix and the very cold milk according to the package instructions until it begins to thicken.
- Layer It On: Spread the chocolate pudding evenly over the peppermint cream cheese layer.
- Final Cloud Top: Gently top the chocolate pudding layer with the remaining ⅓ cup of Cool Whip.
- Garnish & Chill: Sprinkle the chocolate shavings and crushed candy canes over the top. Now, cover your dessert and chill it in the refrigerator for at least 2 hours (the longer, the better!) until it's perfectly set and ready to slice and serve.
Notes
Calories: 134 kcal
Total Carbohydrates: 16g
Net Carbs: 15g
Fats: 7g
Protein: 2g For the best results in the peppermint layer, use full-fat brick style cream cheese. For an extra creamy chocolate pudding, whole milk is recommended. Chilling for longer than 2 hours will ensure the dessert is perfectly set!