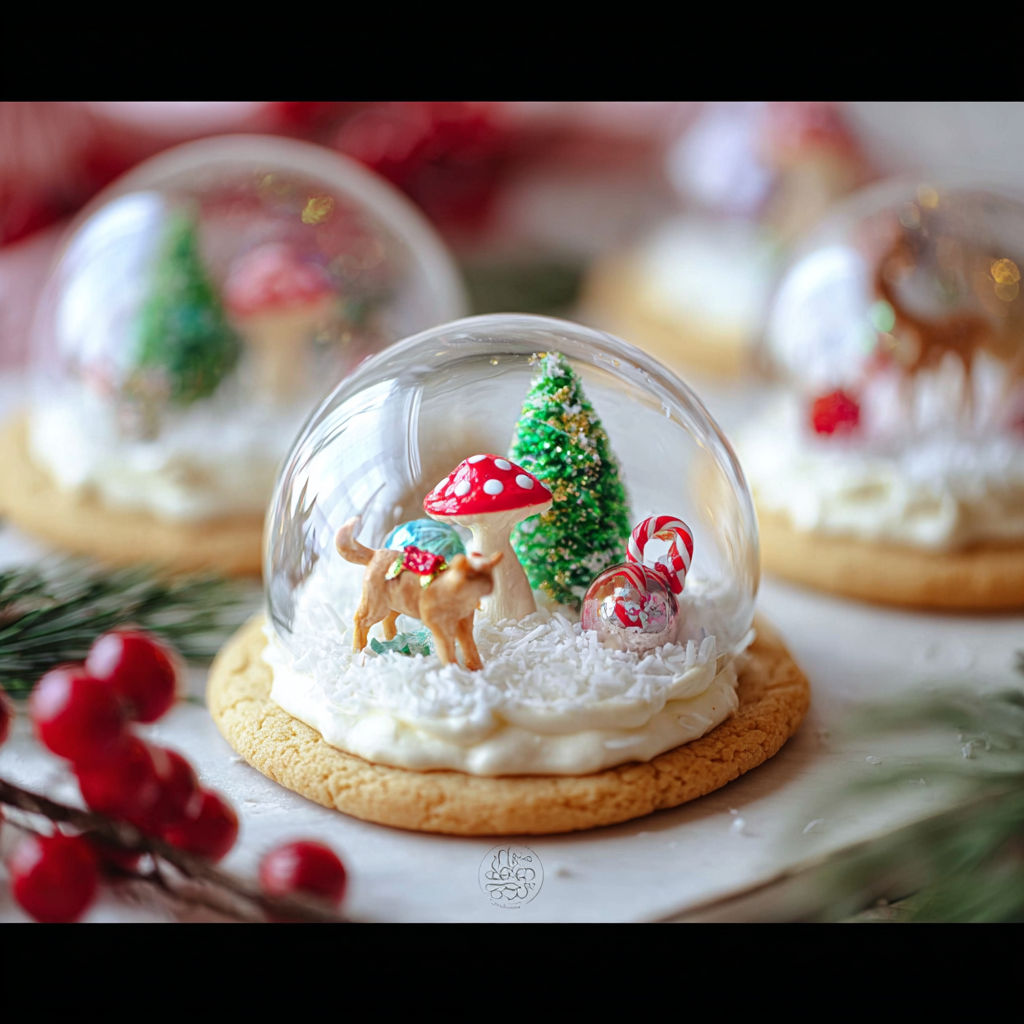
Imagine a tiny winter wonderland, perfectly encapsulated and sitting atop a delicious, buttery cookie. Sound like magic? It’s not! Get ready to sprinkle some serious holiday joy into your kitchen with our Festive Mini Snow Globe Cookies. These aren’t just cookies; they’re conversation starters, edible masterpieces, and the most delightful way to capture the spirit of the season in a single, charming bite. Forget boring old sugar cookies; we’re diving headfirst into a world where cookies become dazzling works of art, guaranteed to make your holiday spread unforgettable. Let’s make some magic!
Why You’ll Love This Recipe
These Festive Mini Snow Globe Cookies are more than just a sweet treat; they’re an experience! Here are four fantastic reasons why you’ll absolutely adore making them:
- Visually Stunning & Unique: Prepare for gasps of delight! These cookies are a showstopper, unlike anything else on the dessert table. The miniature snow globe effect creates a captivating visual that’s incredibly impressive, making them perfect for parties and gifts.
- Surprisingly Easy to Make: Don’t let their intricate appearance fool you. Thanks to smart shortcuts like refrigerated cookie dough and pre-made frosting, assembling these beauties is much simpler than it looks. It’s an easy holiday baking project perfect for all skill levels.
- Endlessly Customizable Fun: This recipe is a canvas for creativity! From choosing your tiny Christmas trinkets to experimenting with different “snow” effects, you can personalize each cookie. It’s a fantastic activity to do with family, letting everyone design their own mini winter scene.
- A Dash of Holiday Nostalgia: Snow globes evoke a sense of childhood wonder and holiday cheer. Combining that nostalgic charm with a delicious cookie creates a truly heartwarming treat that’s not just tasty but also brings back cherished festive memories.
Ingredients
Gather your festive supplies to create these delightful Festive Mini Snow Globe Cookies:
- Sugar Cookie Dough: 1 (16-ounce) package refrigerated (or your go-to homemade recipe for extra love)
- Vanilla Frosting: 1 cup light vanilla frosting (store-bought or homemade)
- “Snow” Topping: 1/4 cup shredded unsweetened coconut or white sprinkles
- Christmas Trinkets: Small Christmas trinkets (think miniature ornaments, tiny bottle brush trees, or edible holiday toppers)
- Clear Globes: Clear plastic ornament halves (food-safe, usually found in craft stores during the holidays)
Step-by-Step Directions
Follow these simple steps to bring your Festive Mini Snow Globe Cookies to life:
- Preheat & Prepare Your Workspace: Begin by preheating your oven to 350°F (175°C), or refer to your specific cookie dough package for its recommended temperature. Next, line a baking sheet with parchment paper; this crucial step prevents your cookies from sticking and ensures easy removal.
- Shape Your Cookie Bases: Lay out a piece of wax paper. Carefully unroll or place your sugar cookie dough onto it. Gently flatten the dough until it’s about 1/4 to 1/2 inch thick – aim for an even thickness to ensure uniform baking. Now, grab the rim of a small cup or a round cookie cutter that perfectly matches the size of your clear ornament halves. Cut out neat cookie circles, placing them gently on your prepared baking sheet.
- Bake to Golden Perfection: Slide your baking sheet into the preheated oven. Bake for approximately 8-12 minutes. Keep a close eye on them! The magic number is when the edges are just lightly golden brown. Overbaking can lead to dry, crumbly cookies, so pull them out as soon as they reach that perfect hue. Once baked, let them cool completely on the baking sheet before even thinking about decorating. Warm cookies will melt your frosting!
- Frost & Place Your Trinket: With your cookies completely cooled, it’s time for the fun part! Spread a thin, even layer of your vanilla frosting on top of each cookie. The frosting acts as both a delicious adhesive and a snowy base. Carefully position your chosen tiny Christmas trinket right in the center of the frosted cookie.
- Create Your Snowy Scene: Now, for the “snow”! Gently sprinkle a little shredded coconut or white sprinkles over the trinket and the frosting. This creates that magical, fresh snowfall effect, truly bringing your miniature scene to life.
- Assemble Your Globe: This is the moment of truth! Very gently, take a clear ornament half and set it directly over each decorated cookie, encapsulating your snowy scene. The frosting will act as a light adhesive, holding the globe in place. Voila! You now have a delightful, edible Festive Mini Snow Globe Cookie ready to dazzle and delight.
Presentation and Serving Suggestions
These Festive Mini Snow Globe Cookies are designed to impress! Here are some creative ways to present and serve them, making your holiday celebrations even more special:
- Dazzling Dessert Display: Arrange them on a tiered cake stand or a festive platter amidst other holiday treats. Their unique design will instantly draw attention and become the centerpiece of your dessert table.
- Individual Place Settings: Place one snow globe cookie at each guest’s spot at your holiday dinner. It acts as a charming, edible party favor and a beautiful decoration, sure to elicit smiles.
- Thoughtful Edible Gifts: Carefully package individual cookies in clear cellophane bags tied with a festive ribbon. They make perfect hostess gifts, teacher appreciation tokens, or small presents for friends and neighbors.
- Holiday Hot Cocoa Bar Companion: Serve these alongside mugs of rich hot cocoa, coffee, or mulled cider. The contrasting warmth of the drink with the cool, snowy aesthetic of the cookie creates a wonderful sensory experience.
- Interactive Party Favor: If you’re hosting a kids’ party, consider pre-baking the cookies and setting up a decorating station. Let the kids choose their trinkets, add frosting, and place their own globe for a fun, interactive activity.
- Festive Cookie Exchange Star: Bring these to your next cookie exchange and watch them become the most talked-about creation! Their originality and charm are guaranteed to win over fellow bakers.
No matter how you choose to present them, these cookies are truly a joyous addition to any holiday gathering.
Storage and Shelf Life
Keeping your Festive Mini Snow Globe Cookies fresh and beautiful requires a little care due to their unique construction:
- Assembled Cookies: For best results, fully assembled snow globe cookies are best enjoyed within 1-2 days. While the frosting acts as an adhesive, the sealed environment of the clear ornament half can sometimes lead to condensation, which might soften the cookie or affect the texture of the “snow.”
- Airtight Storage is Key: Store your assembled cookies in a single layer in an airtight container at room temperature. If stacking is necessary, place a piece of parchment paper between layers to protect the delicate globes and trinkets.
- Unassembled Components: If you want to prepare ahead of time, it’s best to store the baked cookies and frosting separately. Baked sugar cookies can be stored in an airtight container for up to 5-7 days at room temperature, or frozen for up to 3 months. The vanilla frosting can be stored in an airtight container in the refrigerator for up to 2 weeks.
- Assemble Just Before Serving: To maintain the freshest appearance and texture, consider baking and decorating the cookies ahead of time, but only adding the clear ornament halves an hour or two before you plan to serve them. This minimizes the risk of condensation and keeps everything looking pristine.
Enjoy these festive treats while they’re at their peak visual and culinary delight!
FAQs About Festive Mini Snow Globe Cookies
- What kind of clear ornaments should I use for the globes?
You should use clear, plastic, two-piece fillable ornament halves. Look for food-safe options, often found in craft stores during the holiday season. Ensure they are clean and dry before use. - Can I use my own homemade sugar cookie dough recipe?
Absolutely! While the recipe suggests refrigerated dough for ease, your favorite homemade sugar cookie recipe will work beautifully. Just ensure it bakes up into a sturdy, flat cookie suitable for decorating. - Are the Christmas trinkets edible?
The recipe suggests both “miniature ornaments” and “edible holiday toppers.” If you want the entire cookie to be edible, opt for edible toppers. If using non-edible trinkets, guests should be advised to remove them before eating. - How can I prevent condensation inside the globes?
Ensure your cookies are completely cool before frosting and assembling. Even a little warmth can cause condensation. Also, keep the frosting layer thin and store the finished cookies in a dry, cool place away from humidity. - What if I don’t have clear ornament halves?
The clear ornament halves are key to the “snow globe” effect. If you can’t find them, you could use clear plastic cups cut down, but the dome effect won’t be as pronounced. The cookies would still be cute with just the trinkets and “snow” on top! - Can I make these cookies ahead of time?
Yes, you can! Bake the cookies and prepare the frosting in advance. Store them separately. Assemble the snow globe cookies a day or two before your event for the best presentation. - What are some alternative “snow” toppings?
Besides shredded coconut and white sprinkles, you can use powdered sugar (dusted lightly), very small white nonpareils, or even finely crushed mini marshmallows for a fluffy snow look. - How do I transport these delicate cookies?
Transport them carefully in a box with individual cupcake inserts or dividers to prevent them from shifting. For longer distances, consider transporting the baked, unfrosted cookies and the globes separately, then assembling them at your destination. - Can I use other cookie flavors besides sugar cookie?
While sugar cookies offer a neutral canvas, you could experiment with a very light vanilla or almond-flavored cookie. Avoid dark or heavily spiced cookies, as they might detract from the “snow globe” aesthetic. - My cookies spread too much during baking. What went wrong?
This can happen if the dough is too warm, overmixed, or if your oven temperature is inconsistent. Try chilling your cut cookie dough shapes for 15-20 minutes before baking, avoid overmixing the dough, and ensure your oven thermostat is accurate.
Festive Mini Snow Globe Cookies ❄️
Equipment
- Oven
- Baking Sheet
- Parchment Paper
- Wax Paper
- Small Cup
- Cookie Cutter
Ingredients
Cookie Base
- 1 package refrigerated sugar cookie dough (or your favorite homemade recipe)
Decoration
- 1 cup light vanilla frosting
- 1/4 cup shredded unsweetened coconut or white sprinkles
- Small Christmas trinkets (like miniature ornaments or edible holiday toppers)
Instructions
- Get your oven ready by preheating it to 350°F (175°C), or whatever temperature your cookie dough package suggests. Line a baking sheet with parchment paper to prevent sticking.
- On a piece of wax paper, gently flatten your cookie dough until it's about 1/4 to 1/2 inch thick. Use the rim of a small cup or a cookie cutter that matches the size of your clear ornament halves to cut out neat cookie circles.
- Carefully place your shaped cookies onto the prepared baking sheet. Bake for about 8-12 minutes, keeping a close watch! You'll know they're ready when the edges are just lightly golden. Let them cool completely on the baking sheet before decorating.
- Once your cookies are cool, spread a thin, even layer of vanilla frosting on top of each one. Carefully place a tiny Christmas trinket in the center of the frosting.
- Sprinkle a little shredded coconut or white sprinkles over the trinket and frosting to create a magical snowy scene.
- Gently set a clear ornament half over each decorated cookie. The frosting acts as a light adhesive, keeping everything in place. Now you have a delightful, edible snow globe!
Notes
- Calories: 190
- Total Carbs: 28g
- Net Carbs: 25g
- Fats: 10g
- Protein: 2g