Get ready to infuse your holiday season with a burst of festive flavor and a touch of homemade magic! Imagine biting into a delicate, melt-in-your-mouth treat that whispers “Christmas” with every chew. That’s exactly what you get with our incredible recipe for Soft Christmas Peppermints. Forget store-bought candies; this year, you can craft your own vibrant, deliciously chewy peppermints that are as much a joy to make as they are to eat. Perfect for gifting, sharing, or simply treating yourself to a moment of sweet holiday bliss, these peppermints are super easy, require no baking, and promise to be a new favorite tradition. Let the aroma of peppermint fill your home and the smiles light up faces as you unveil these delightful holiday confections!
Why You’ll Love These Soft Christmas Peppermints
There are countless reasons to fall head over heels for these charming Soft Christmas Peppermints, but here are four compelling ones that will have you running to the kitchen:
-
Effortlessly Easy & No Bake Magic:
Tired of complicated recipes? These peppermints are a dream! With no baking required, you’ll be amazed at how quickly you can whip up a batch of these festive treats. It’s perfect for beginner bakers or busy holiday elves who want maximum impact with minimal fuss.
-
Bursting with Festive Flavor:
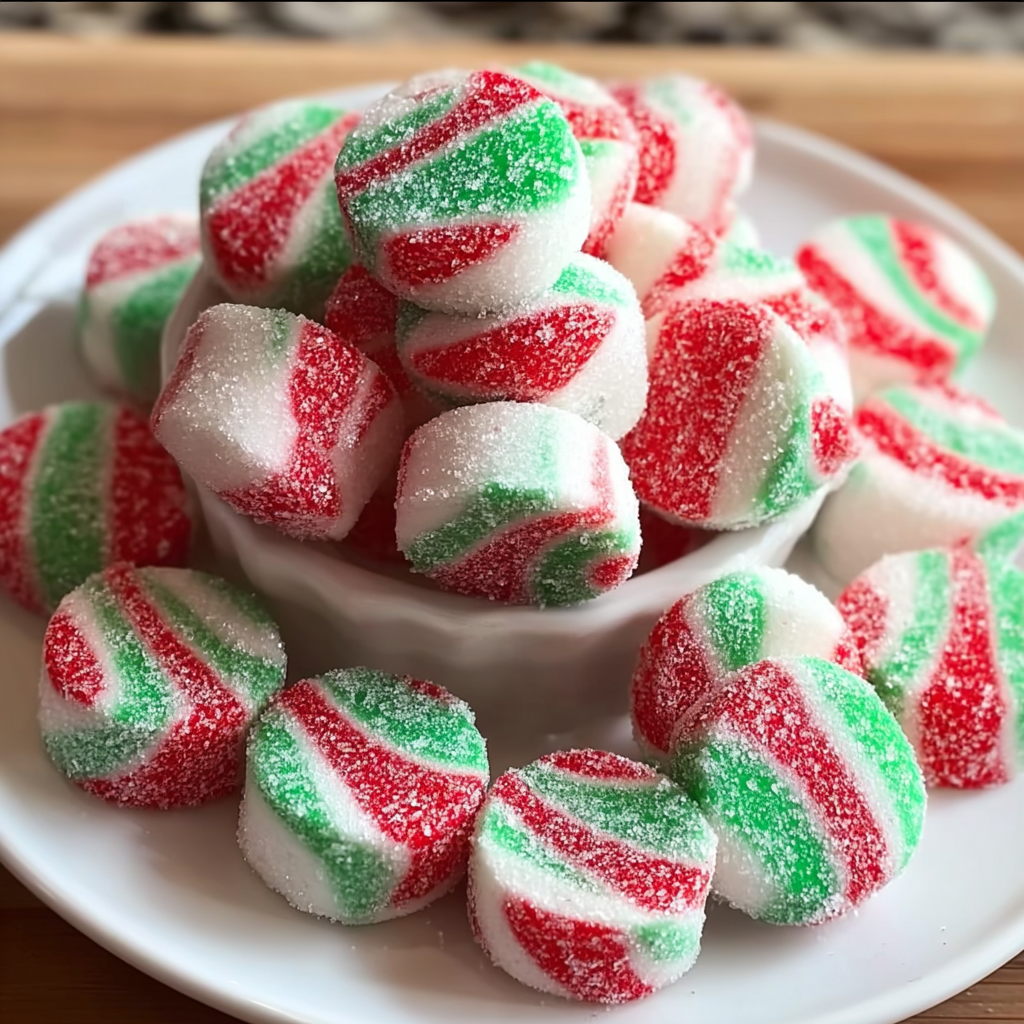
Each bite delivers a delightful punch of cool, refreshing peppermint, perfectly balanced with a sweet, creamy texture. The classic red, green, and white swirls don’t just look like Christmas; they taste exactly like the holidays should!
-
Perfect for Gifting & Sharing:
Handmade gifts always carry an extra sprinkle of love. These Soft Christmas Peppermints are ideal for holiday goodie bags, hostess gifts, or a sweet surprise for neighbors and friends. They’re beautiful, delicious, and show you care.
-
A Fun & Engaging Activity:
From kneading the colorful dough to twisting the ropes, this recipe is incredibly fun to make, especially with kids! It’s a fantastic way to create cherished holiday memories in the kitchen, turning simple ingredients into edible works of art.
Ingredients for Your Soft Christmas Peppermints
Gather your simple ingredients to create these enchanting Soft Christmas Peppermints. You likely have most of these on hand already!
- 3¾ cups powdered sugar (plus extra for dusting)
- ⅓ cup sweetened condensed milk
- ½ teaspoon peppermint extract
- Red and green gel food coloring
- Granulated sugar (for coating)
Detailed Step-by-Step Directions to Make Them
Let’s get crafting these delightful Soft Christmas Peppermints! Follow these easy steps for perfect results:
-
Prep the Sugar:
Grab a large mixing bowl and carefully sift 3¾ cups of powdered sugar. Sifting is key here; it helps prevent any lumps, ensuring your peppermints are perfectly smooth. Once sifted, set aside just a tiny amount of this powdered sugar – you’ll use it later to dust your workspace.
-
Make the Dough Base:
To the sifted powdered sugar in your bowl, add the ⅓ cup of sweetened condensed milk and the ½ teaspoon of peppermint extract. Begin stirring slowly with a sturdy spatula or spoon. You’ll notice a sticky, thick dough starting to form. Once it’s mostly combined, gently turn it out and knead it by hand. Continue kneading until your dough is smooth, uniform, and has a pliable, playdough-like consistency. If your dough feels too sticky or wet, gradually add a tablespoon more of powdered sugar. If it seems too dry or crumbly, add just a tiny drop more of condensed milk until it’s just right.
-
Color the Dough:
Now for the festive part! Divide your smooth dough into three roughly equal portions. Leave one portion as is – this will be your classic white peppermint. For the second portion, add a few drops of red gel food coloring and knead it thoroughly until the color is vibrant and evenly distributed. Repeat this process with the third portion, using green gel food coloring. Make sure each color is deep and consistent.
-
Roll and Twist:
Lightly dust your clean countertop with that reserved powdered sugar. Take each colored dough portion (red, green, and white) and roll it into a long, thin rope. Aim for a thickness of about ½ inch for each rope. Once all three ropes are ready, place them side by side on your dusted surface. Gently press them together at one end, then carefully twist all three ropes together. This creates that iconic, beautiful candy-cane swirl effect that makes these Soft Christmas Peppermints so visually appealing.
-
Shape the Mints:
Using a sharp knife, cut your twisted dough rope into individual 2-inch segments. At this point, you have options! You can either roll these segments into small, uniform balls for a classic look, or gently flatten them into charming disc shapes. Whichever you choose, ensure they are roughly the same size for even drying.
-
Coat and Dry:
Place some granulated sugar in a shallow dish. Take each shaped mint and roll it completely in the granulated sugar until it’s thoroughly coated. This gives them a lovely sparkle and a pleasant crispness once dry. Arrange your coated peppermints on a baking sheet that you’ve lined with parchment paper, making sure they don’t touch each other. Now comes the patience part: let them dry at room temperature. This can take several hours, or even better, overnight. They’re ready when they feel firm to the touch. Once completely dry, you’ll have delightful Soft Christmas Peppermints with a lovely crisp exterior and a wonderfully soft, creamy center!
Detailed Ways to Present and Serve Your Soft Christmas Peppermints
Once your exquisite Soft Christmas Peppermints are dry and ready, the fun continues with presentation! Here are some creative ways to showcase and serve these festive treats:
-
Elegant Candy Dishes:
Arrange your colorful peppermints in a beautiful glass or ceramic candy dish. Place it on your coffee table, dining table, or entryway console for a welcoming holiday display that guests can easily grab from. The red, green, and white swirls will add instant cheer to any room.
-
Charming Gift Bags & Boxes:
These peppermints make fantastic homemade gifts! Fill small cellophane bags, decorative tins, or cute gift boxes with a mix of the various shapes. Tie with festive ribbons, add a personalized tag, and you have a thoughtful, delicious present for friends, neighbors, teachers, and colleagues.
-
Garnish for Desserts:
Elevate your holiday dessert spread by using these peppermints as a garnish. Crush a few to sprinkle over vanilla ice cream, chocolate mousse, or frosted cupcakes. You can also place whole peppermints around the base of a holiday cake or pie for an extra festive touch and a burst of peppermint flavor.
-
Hot Chocolate Stirrers:
While designed to be eaten whole, a small, firm peppermint can be gently dipped into a steaming mug of hot chocolate for a delightful peppermint infusion. The warmth will slowly melt the candy, adding a burst of flavor and a beautiful aroma. (Ensure they are fully firm before attempting this!)
-
Part of a Holiday Platter:
Create a stunning holiday treat platter by combining your Soft Christmas Peppermints with other festive goodies like sugar cookies, chocolate-covered pretzels, and small truffles. The vibrant colors and unique texture of the peppermints will stand out beautifully amidst the other treats.
However you choose to present them, these homemade peppermints are sure to be a delightful addition to your holiday celebrations!
How to Store Your Soft Christmas Peppermints and How Long They Last
Proper storage is key to keeping your delightful Soft Christmas Peppermints fresh and delicious for as long as possible. Fortunately, they’re quite easy to store!
Once your peppermints are completely dry and firm to the touch (this is crucial to prevent them from sticking together), transfer them to an airtight container. A cookie tin, a plastic food storage container with a tight-fitting lid, or even a heavy-duty zip-top bag will work perfectly.
Store the airtight container in a cool, dry place at room temperature. A pantry, cupboard, or countertop away from direct sunlight and heat sources is ideal. Avoid refrigerating these peppermints, as the moisture in the fridge can cause them to become sticky or lose their texture.
When stored correctly, your Soft Christmas Peppermints will last for up to 2-3 weeks. Over time, they might become slightly firmer, but their flavor will remain wonderfully fresh. They are best enjoyed within the first week or two for optimal texture.
FAQs About Soft Christmas Peppermints
-
Q: Can I use liquid food coloring instead of gel?
A: Gel food coloring is highly recommended. Liquid food coloring can add too much moisture to the dough, making it sticky and harder to handle. If you only have liquid, use it very sparingly and be prepared to add a bit more powdered sugar.
-
Q: My dough is too sticky. What should I do?
A: This is a common issue! Simply knead in a small amount (about a tablespoon at a time) of extra powdered sugar until the dough reaches a smooth, pliable, non-sticky consistency.
-
Q: My dough is too dry and crumbly. How can I fix it?
A: Add a tiny bit more sweetened condensed milk (a ¼ teaspoon at a time) and knead it in until the dough comes together and is smooth and easy to work with.
-
Q: Can I make these peppermints ahead of time for Christmas?
A: Absolutely! These Soft Christmas Peppermints are perfect for making 1-2 weeks in advance. Just ensure they are fully dried and stored in an airtight container at room temperature.
-
Q: Can I substitute the peppermint extract for another flavor?
A: Yes! You can experiment with other extracts like almond, vanilla, or even a touch of cinnamon for different flavor profiles, though they won’t be “peppermints” then. Always use good quality extracts.
-
Q: How long does the drying process really take?
A: The drying time can vary based on humidity levels in your home. While several hours might suffice, leaving them overnight (8-12 hours) ensures they are perfectly firm on the outside with that lovely soft interior.
-
Q: Do I need to sift the powdered sugar?
A: Yes, sifting the powdered sugar is highly recommended. It prevents lumps and ensures your dough is smooth and easy to work with, resulting in a better final texture for your Soft Christmas Peppermints.
-
Q: Can I skip the granulated sugar coating?
A: You can, but the granulated sugar coating adds a delightful slightly crisp texture to the exterior and a lovely sparkle, enhancing the overall experience. It also helps prevent them from sticking.
-
Q: Are these peppermints gluten-free?
A: Yes, based on the ingredients listed (powdered sugar, condensed milk, extract, food coloring, granulated sugar), these Soft Christmas Peppermints are naturally gluten-free.
-
Q: Can I freeze these peppermints?
A: Freezing is generally not recommended as it can affect their delicate soft texture and may cause them to become watery upon thawing. They are best stored at room temperature.
Soft Christmas Peppermints 🍬
Equipment
- Mixing Bowl
- Spatula
- Knife
- Baking Sheet
- Parchment Paper
Ingredients
- 3.75 cups powdered sugar (plus extra for dusting)
- 0.33 cup sweetened condensed milk
- 0.5 tsp peppermint extract
- red gel food coloring
- green gel food coloring
- granulated sugar (for coating)
Instructions
- Prep the Sugar: In a large mixing bowl, sift 3¾ cups of powdered sugar to ensure it’s lump-free. Set aside a small amount for dusting your workspace later.
- Make the Dough Base: Add the sweetened condensed milk and peppermint extract to the sifted powdered sugar. Stir slowly with a spatula or spoon until a sticky dough begins to form. Gently knead it by hand until it’s smooth and pliable, like playdough. If it feels too wet, add a tablespoon of powdered sugar; if too dry, add a tiny bit more condensed milk.
- Color the Dough: Divide the dough into three equal portions. Leave one portion plain white. Using a few drops of gel food coloring, knead red into the second portion and green into the third until the colors are vibrant and evenly mixed.
- Roll and Twist: Lightly dust your clean countertop with powdered sugar. Roll each colored dough portion into a long, thin rope, about ½ inch thick. Place the red, green, and white ropes side by side and gently twist them together to create a beautiful candy-cane swirl effect.
- Shape the Mints: Using a sharp knife, cut the twisted dough rope into 2-inch segments. You can roll these pieces into small balls or gently flatten them into disc shapes.
- Coat and Dry: Roll each shaped mint in granulated sugar until completely coated. Arrange the coated mints on a baking sheet lined with parchment paper. Let them dry at room temperature for several hours or overnight until they are firm to the touch. Once dry, they’ll have a delightful crisp exterior and a soft, creamy center!
Notes
Calories: 50 kcal
Total Carbs: Not provided
Net Carbs: Not provided
Fats: Not provided
Protein: Not provided