Why You’ll Love This Sunshine Lemon Dream Cake
Prepare to fall head over heels for the Sunshine Lemon Dream Cake! This isn’t just any lemon cake; it’s a magical dessert that delivers on every front. Here are four irresistible reasons why it’s about to become your new favorite:
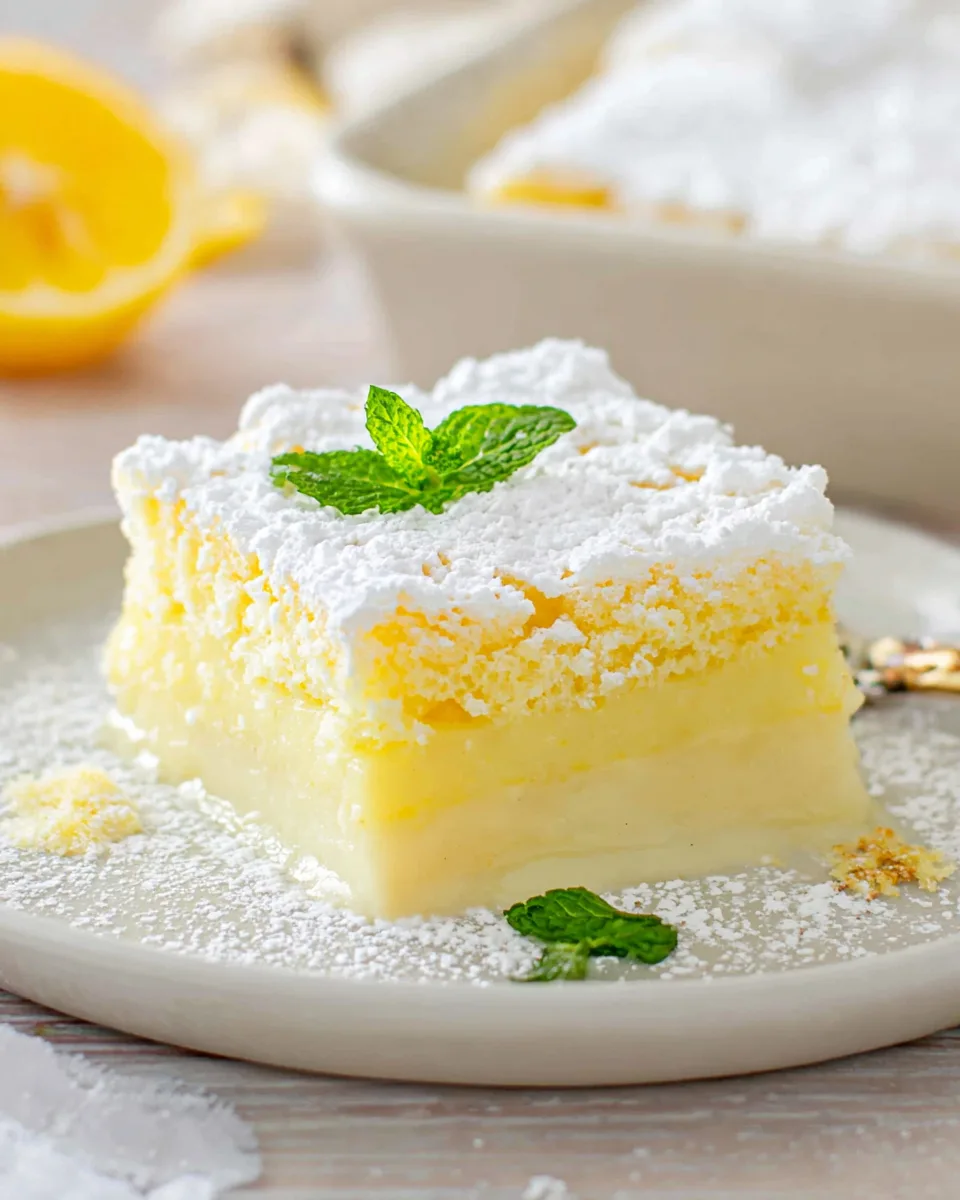
- A Symphony of Layers in One Bake: Imagine baking a single batter and getting three distinct layers – a dense, custardy bottom, a light, fluffy cake middle, and a delicate sponge top. It’s pure baking enchantment that will dazzle your guests!
- Zesty, Bright, and Refreshingly Light: Packed with fresh lemon juice and vibrant zest, this cake sings with a bright, sunny flavor that’s never too heavy. It’s the quintessential treat for warm days and sunny dispositions.
- Surprisingly Simple to Master: Don’t let its sophisticated appearance fool you! While the technique is unique, the steps are straightforward and incredibly satisfying to follow. You’ll feel like a baking wizard creating this layered wonder.
- The Ultimate Summer Indulgence: With its airy texture and refreshing citrus kick, this Sunshine Lemon Dream Cake is the perfect palate cleanser and a joyful ending to any meal. It’s a guilt-free pleasure that lightens up your dessert table.
Unlock the Magic of the Sunshine Lemon Dream Cake!
Picture this: a warm, gentle breeze, the scent of fresh lemons, and a slice of pure sunshine on your plate. Welcome to the world of the Sunshine Lemon Dream Cake – a dessert so enchanting, it practically bakes itself into three magical layers! Forget everything you thought you knew about traditional cake; this unique creation starts as one simple batter and transforms into a delightful trinity of textures: a rich, dense custard base, a light and airy cake middle, and a delicate, fluffy sponge on top. It’s a culinary marvel that brings a burst of zesty joy and sophisticated simplicity to your kitchen. Perfect for lazy summer afternoons or brightening up any gathering, this is more than just a cake – it’s an experience. Get ready to bake some dreams!
Gather Your Sunny Ingredients
To create your very own slice of the Sunshine Lemon Dream Cake, you’ll need these fresh and simple components:
- 🥚 4 large eggs, room temperature (yolks and whites separated)
- 🍚 ¾ cup granulated sugar
- 🧈 ½ cup unsalted butter, melted
- 🍦 1 teaspoon vanilla extract
- 🌾 ¾ cup all-purpose flour
- 🍋 ¼ cup fresh lemon juice
- 🍋 2 tablespoons fresh lemon zest
- 🥛 1¾ cups milk, lukewarm
- ❄️ Powdered sugar, for dusting
Your Journey to a Dreamy Lemon Cake: Step-by-Step Directions
- Preheat & Prep: Kick things off by preheating your oven to a gentle 325°F (163°C). Lightly grease an 8×8 inch square baking pan, or line it with parchment paper, leaving an overhang for easy removal. This little trick ensures your cake lifts out beautifully!
- Whip Those Whites: Carefully separate your egg yolks and whites. Pop the egg whites into a sparkling clean mixer bowl. Using the whisk attachment, beat them until they transform into stiff, airy peaks – think fluffy clouds! Gently transfer these whipped wonders to a separate bowl and set them aside. They’re the secret to the cake’s light-as-air top layer.
- Golden Yolks & Sweetness: In the same mixer bowl (no need to clean!), beat the egg yolks with the granulated sugar until the mixture becomes wonderfully light and fluffy. Now, pour in the melted butter and fragrant vanilla extract, beating for another minute or two until everything is smoothly combined and looks inviting.
- Flour Power: Gradually add the all-purpose flour to your yolk mixture, mixing until the batter is completely smooth and utterly lump-free. Patience here pays off for a perfect texture!
- Zest & Juice Infusion: Stir in the sunny fresh lemon juice and vibrant lemon zest. The aroma alone will make you smile! Then, slowly pour in the lukewarm milk, bit by bit, beating gently until all ingredients are perfectly blended. This keeps your batter light and beautifully consistent.
- The Magic Fold: Now for the enchanting part! Gently fold about a third of your whipped egg whites into the batter using a rubber spatula. Use a light touch, trying not to deflate those airy whites. Repeat this process two more times with the remaining egg whites. Don’t overmix; it’s absolutely okay if a few white streaks remain – this is the key to creating those distinct, magical layers.
- Bake Your Dream: Pour the light batter into your prepared baking pan. Slide it into your preheated oven and bake for 40 to 70 minutes. Start checking around the 40-minute mark; your Sunshine Lemon Dream Cake is ready when the top is lightly golden, feels firm to the touch, and has a slight, delicate jiggle in the center. The lower baking temperature is crucial for those stunning layers to form.
- Cool & Set: Once baked, remove the cake from the oven and let it cool completely in the pan on a wire rack. This step is absolutely crucial for the layers to set properly and for the cake to firm up. Resist the urge to cut it prematurely!
- Serve Your Sunshine: Once completely cool, dust generously with powdered sugar for a final, healthy-looking, sweet touch. Slice into squares, and prepare to be amazed by the refreshing, multi-textured goodness of your Sunshine Lemon Dream Cake!
Presenting Your Sunshine Lemon Dream Cake: A Feast for the Eyes
The beauty of the Sunshine Lemon Dream Cake lies not only in its taste but also in its elegant, multi-layered appearance. Here are some delightful ways to present and serve your masterpiece:
- Classic & Chic: The simplest and most elegant way is a generous dusting of powdered sugar, as suggested. This creates a beautiful snowy contrast against the golden top and highlights its delicate nature.
- Berry Bliss: Pair slices with a handful of fresh, vibrant berries. Raspberries, blueberries, or a mix of summer berries add a lovely pop of color, a tangy counterpoint, and extra freshness that complements the lemon beautifully.
- Creamy Cloud: A dollop of lightly sweetened whipped cream or a spoonful of Greek yogurt on the side can add a luscious, creamy element that melts delightfully with each bite.
- Lemon Lover’s Dream: For an extra burst of lemon, drizzle a thin stream of homemade or store-bought lemon curd over each slice just before serving.
- Minty Fresh Garnish: A few fresh mint leaves strategically placed around the plate can add a touch of sophisticated green and an aromatic lift.
- Customized Sizing: For a tea party or a lighter dessert, cut smaller squares. For a more indulgent treat after dinner, opt for larger slices.
- Best Served Chilled: While delicious at room temperature, this cake truly shines when served slightly chilled. The layers become more defined, and the lemon flavor is even more refreshing.
Storing Your Sunshine Lemon Dream Cake: Keep the Magic Fresh
To ensure your Sunshine Lemon Dream Cake stays delightful and delicious, proper storage is key:
- Refrigeration is Best: Due to its custardy layer and milk content, this cake is best stored in the refrigerator.
- Airtight is Right: Once completely cooled, cover the cake tightly with plastic wrap or transfer slices to an airtight container. This prevents it from drying out and absorbing other fridge odors.
- Shelf Life: Stored correctly in the refrigerator, your Sunshine Lemon Dream Cake will maintain its wonderful texture and flavor for 3-4 days. While it might firm up slightly, it will still be incredibly enjoyable.
- Serving Tip: For the best experience, you can take it out of the fridge about 15-20 minutes before serving to allow it to come slightly closer to room temperature, which can enhance the texture, though many enjoy it perfectly chilled.
- Freezing (Not Recommended for Best Texture): While technically possible, freezing is generally not recommended for this specific cake due to its unique multi-layered, delicate texture. The custard layer might separate or become grainy upon thawing, compromising the “dream” aspect. It’s best enjoyed fresh within its refrigerated shelf life.
FAQs About Your Sunshine Lemon Dream Cake
- Q1: What exactly makes this a “Dream Cake” with distinct layers?
- A1: The magic lies in the specific technique! By gently folding whipped egg whites into a thin batter containing milk and fat, and then baking at a low temperature, the different components naturally separate during baking. The heavier custard sinks to the bottom, the cake batter forms the middle, and the light, airy egg white mixture rises to create the sponge top.
- Q2: Why is it important to separate egg yolks and whites and whip the whites separately?
- A2: Separating allows us to whip the egg whites into stiff peaks, incorporating air that creates the cake’s light and airy top layer and contributes to the overall rise and delicate texture. The yolks, with their fat and emulsifying properties, provide richness and structure to the bottom and middle layers.
- Q3: Can I use a different size baking pan?
- A3: An 8×8 inch square pan is ideal for the thickness of the layers. If you use a larger pan, the cake will be thinner, and baking time will be shorter. A smaller pan might make it too thick, requiring longer baking and potentially altering the layer separation. Adjust baking time as needed if you deviate.
- Q4: Is fresh lemon juice and zest absolutely necessary, or can I use bottled?
- A4: For the true “Sunshine Lemon Dream Cake” experience, fresh lemon juice and zest are highly recommended. They provide a vibrant, natural, and potent lemon flavor that bottled alternatives simply can’t replicate. The zest, in particular, carries much of the essential lemon oil and aroma.
- Q5: Why is it important for the eggs and milk to be at room temperature?
- A5: Room temperature ingredients emulsify and combine much more smoothly and effectively. Cold ingredients can cause the batter to seize up or become lumpy, preventing the smooth, consistent texture needed for proper layer separation and a harmonious final product.
- Q6: How do I know when the Sunshine Lemon Dream Cake is perfectly baked?
- A6: Look for a lightly golden top, and gently touch the center – it should feel firm to the touch but still have a slight, delicate jiggle. A wooden skewer inserted into the center won’t come out completely clean because of the custardy bottom, so rely more on the visual cues and the gentle jiggle test.
- Q7: Can I make this Sunshine Lemon Dream Cake gluten-free?
- A7: Yes, you can! Substitute the all-purpose flour with a 1:1 gluten-free baking flour blend that contains xanthan gum. The rest of the ingredients are naturally gluten-free. The texture might vary slightly but should still be delicious.
- Q8: Can I add other flavors or extracts?
- A8: While lemon is the star, you can certainly experiment! A tiny dash of almond extract could complement the lemon, or you could substitute some of the lemon zest with orange zest for a lemon-orange dream. Just be mindful not to overpower the delicate lemon flavor.
- Q9: The recipe mentions “healthy choice.” How healthy is this cake really?
- A9: In the context of cakes, this Sunshine Lemon Dream Cake is considered a lighter option due to its airy texture and refreshing lemon flavor, making it feel less heavy than a traditional dense cake. While it contains sugar and butter, the portion sizes and the light feeling can contribute to it being a “healthier choice” compared to some richer desserts. It’s all about balance and moderation!
- Q10: Why is cooling the cake completely in the pan so important?
- A10: The complete cooling process allows the delicate layers, especially the custardy bottom, to fully set and firm up. If you try to remove or slice the cake while it’s still warm, the layers might collapse or separate messily, and the texture won’t be as distinct or pleasant.
Sunshine Lemon Dream Cake 🍋✨
Equipment
- 8x8 inch square baking pan
- Mixer
Ingredients
- 4 large eggs room temperature, yolks and whites separated
- 0.75 cup granulated sugar
- 0.5 cup unsalted butter melted
- 1 tsp vanilla extract
- 0.75 cup all-purpose flour
- 0.25 cup fresh lemon juice
- 2 tbsp fresh lemon zest
- 1.75 cups milk lukewarm
- powdered sugar for dusting
Instructions
- Preheat your oven to 325°F (163°C). Lightly grease an 8x8 inch square baking pan, or line it with parchment paper for easy removal.
- Carefully separate the egg yolks from the whites. Place the egg whites in a clean mixer bowl. Whip them using the whisk attachment until they form stiff, airy peaks. Transfer these whipped whites to a separate bowl and set aside.
- In the mixer bowl, beat the egg yolks with the granulated sugar until the mixture is light and fluffy. Next, pour in the melted butter and vanilla extract, beating for another minute or two until everything is smoothly combined. Gradually add the all-purpose flour, mixing until the batter is completely smooth and lump-free.
- Stir in the fresh lemon juice and vibrant lemon zest. Then, slowly pour in the lukewarm milk, bit by bit, beating gently until all ingredients are well blended.
- Gently fold in about a third of your whipped egg whites into the batter using a rubber spatula. Repeat this process two more times with the remaining egg whites. Do not overmix; it's okay if a few white streaks remain.
- Pour the light batter into your prepared baking pan. Bake for 40 to 70 minutes. The cake is ready when the top is lightly golden and feels firm to the touch, with a slight jiggle in the center.
- Once baked, remove the cake from the oven and let it cool completely in the pan. This is crucial for the layers to set properly.
- Before serving, dust generously with powdered sugar. Slice into squares and enjoy this refreshing summer treat!
Notes
Calories: 247 kcal
Total Carbs: 28g
Net Carbs: 27.6g
Fats: 13g
Protein: 5g Feel free to adjust the amount of lemon zest for a more intense lemon flavor.