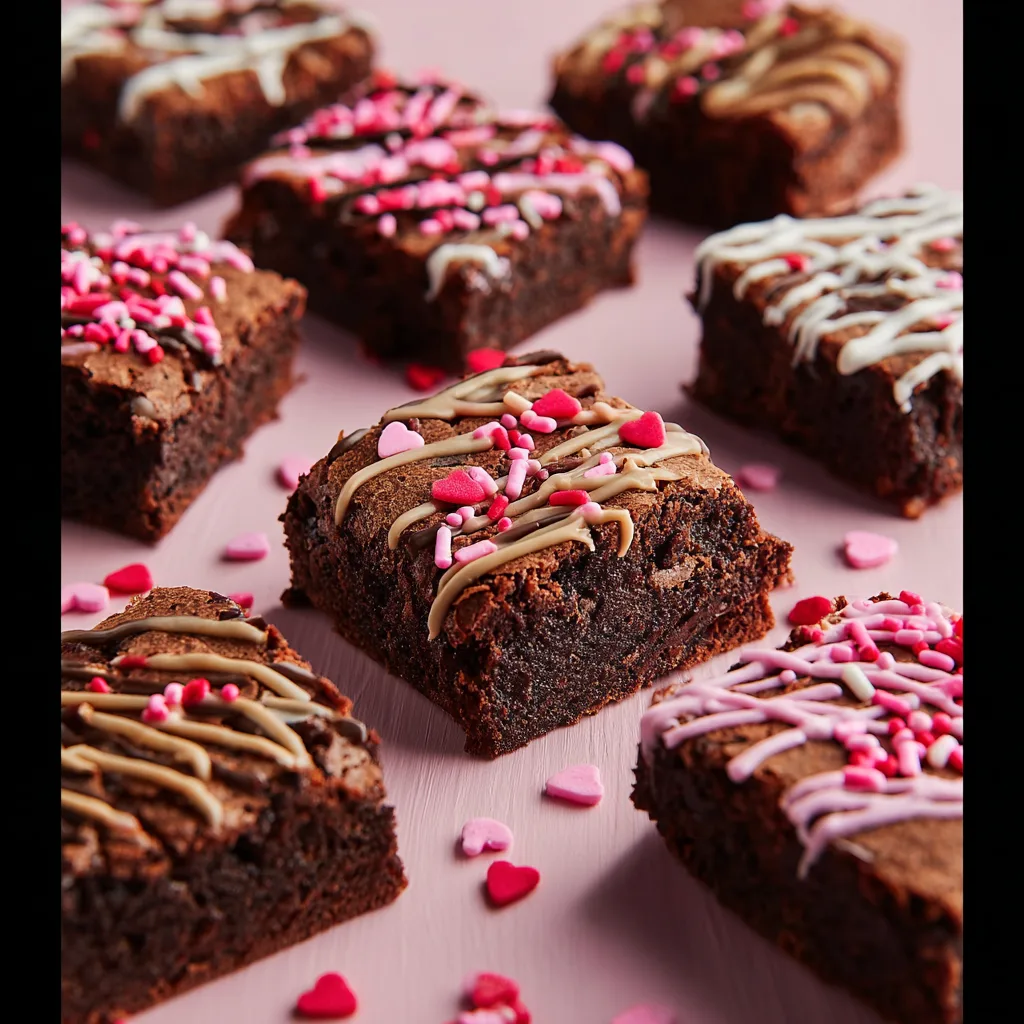
Love is in the air, and what better way to celebrate than with a treat that melts hearts and tantalizes taste buds? Forget store-bought chocolates; this year, show your affection with something homemade, heartfelt, and utterly irresistible. We’re talking about the ultimate expression of chocolatey devotion: our incredible Sweetheart Fudgy Brownies! These aren’t just any brownies; they’re dense, intensely chocolatey, and sport a perfect crackly top, adorned with festive drizzles and sprinkles that scream “I love you!” Get ready to bake up some serious romance and fill your kitchen with the most amazing aroma. This recipe is so fun and straightforward, you’ll be a brownie boss in no time!
Why You’ll Love This Recipe
- Unbelievable Fudginess: Say goodbye to dry, cakey brownies! Our recipe uses a generous amount of butter and chocolate, ensuring every bite of these Sweetheart Fudgy Brownies is dense, chewy, and gloriously moist. The secret? A precise ratio of wet to dry ingredients and a careful baking time that locks in all that gooey goodness.
- Easy & Straightforward: Don’t let the gourmet look fool you. This recipe is surprisingly simple, perfect for bakers of all skill levels. With clear, step-by-step instructions and minimal fuss, you’ll have a batch of these exquisite brownies ready to impress without breaking a sweat. It’s a fantastic project for a cozy afternoon!
- Perfect for Gifting: What’s better than a homemade gift? These Sweetheart Fudgy Brownies are ideal for Valentine’s Day, anniversaries, or just to show someone you care. Their beautiful presentation, especially with the optional colorful drizzles and sprinkles, makes them look professionally made and incredibly thoughtful. Wrap them up in a cute box, and you’re golden!
- Customizable & Fun: This recipe offers a fantastic canvas for your creativity! While we suggest Valentine’s-themed decorations, you can easily adapt the drizzles and sprinkles for any holiday or occasion. Want more chocolate? Add some chocolate chips to the batter! Feeling nutty? Fold in some pecans. The possibilities are endless, making each batch a unique masterpiece.
Ingredients with Measurements
- 🧈 1 cup unsalted butter
- 🍫 ½ cup semi-sweet chocolate morsels
- 🍚 2 cups granulated sugar
- 🥚 4 large eggs
- 🥣 1 teaspoon vanilla extract
- 🍫 ¾ cup unsweetened cocoa powder
- 🌾 1 cup all-purpose flour
- 🧂 ½ teaspoon kosher salt
- 🥄 ½ teaspoon baking powder
- 🍫 5 oz (about ½ package) Ghirardelli dark or milk chocolate melting wafers
- 🍬 Red, pink, or white melting wafers (optional, for colorful drizzles)
- ✨ Valentine’s sprinkles (heart shapes, pink and red jimmies)
Detailed Step-by-Step Directions How to Make the Recipe
- Get Ready to Bake: Preheat your oven to 350°F (175°C). Line a 13×9-inch baking dish with parchment paper, leaving some overhang on the sides to easily lift the brownies out later. Set it aside. This parchment sling is a game-changer for easy removal!
- Make the Chocolate Base: In a medium saucepan, gently melt the butter over medium heat until it’s fully liquid. Take the pan off the heat right away and stir in the semi-sweet chocolate morsels and granulated sugar. Keep stirring until the chocolate is completely melted and everything is smooth and glossy – this usually takes a couple of minutes with the residual heat. The warmth of the butter will work its magic!
- Whip in Wet Ingredients: Add the eggs one at a time to the chocolate mixture, stirring well after each addition until fully combined. This step is crucial for that beautiful fudgy texture. Once all eggs are in, stir in the vanilla extract until it’s evenly mixed.
- Fold in Dry Ingredients Gently: Now, add the cocoa powder, all-purpose flour, salt, and baking powder directly into the saucepan. Using a wooden spoon or spatula, carefully fold the dry ingredients into the wet mixture. Stop stirring as soon as you no longer see any dry streaks. It’s super important not to overmix, as this keeps your brownies wonderfully fudgy, not cakey! Overmixing develops gluten, which we want to avoid for ultimate fudginess.
- Bake to Perfection: Pour the brownie batter into your prepared pan and spread it evenly into the corners with a spatula. Bake for about 22-24 minutes. The brownies are ready when the edges look set and the center still appears a little soft with moist crumbs on a toothpick – avoid overbaking to keep them delightfully gooey. Remove from the oven and let them cool completely in the pan for at least 15 minutes, or even a few hours for the best cutting results. Patience is key here for perfect slices!
- Slice and Prepare for Decorating: Once thoroughly cooled, use the parchment paper overhang to lift the entire brownie slab onto a cutting board. With a sharp knife, cut into 24 even squares (6 rows by 4 rows). For super clean cuts, wipe your knife between each slice. For extra festive flair, you can even use a heart-shaped cookie cutter before decorating!
- Add a Chocolate Drizzle: Melt the chocolate wafers according to their package directions (usually short bursts in the microwave, stirring often, until smooth). Transfer the melted chocolate to a ziplock bag and snip off a tiny corner. Line a clean cookie sheet with fresh parchment paper. Drizzle the chocolate artfully over each brownie square in zigzags, lines, or swirls. If using colored wafers, repeat for an extra festive touch!
- Sprinkle and Set: Immediately after drizzling, scatter your Valentine’s sprinkles over the wet chocolate so they stick perfectly. Move the decorated brownies to a fresh piece of parchment paper and let them sit at room temperature for about 30 minutes until the chocolate hardens, or pop them in the fridge for 10-15 minutes to speed things up.
Detailed Different Ways You Can Present the Recipe and How to Serve It
These Sweetheart Fudgy Brownies are already a showstopper, but with a few creative touches, you can elevate their presentation and serving experience even further! Make them truly unforgettable.
Presentation Ideas:
- Heart-Shaped Brownies: Before decorating, after the brownies have cooled, use a sharp heart-shaped cookie cutter to create individual brownie hearts. This makes them extra special for Valentine’s Day!
- Elegant Platter: Arrange the drizzled and sprinkled brownies artfully on a beautiful ceramic platter. A light dusting of cocoa powder or powdered sugar around the edges can add a touch of sophistication.
- Gifting Boxes: For a perfect gift, line small bakery boxes with colorful tissue paper (red or pink for Valentine’s) and nestle a few brownies inside. Tie with a pretty ribbon and a handwritten tag.
- Layered Display: If serving a crowd, consider stacking a few brownies pyramid-style on a multi-tiered dessert stand, interspersing them with fresh red berries like strawberries or raspberries for a pop of color.
Serving Suggestions:
- Classic & Simple: Serve them as is with a cup of coffee or tea – their rich flavor shines on its own.
- A La Mode: Warm a brownie slightly and top it with a scoop of vanilla bean ice cream. A drizzle of warm fudge sauce or caramel takes it over the top!
- Berry Bliss: Pair a brownie with a dollop of fresh whipped cream and a handful of mixed berries (strawberries, raspberries, blueberries). The tartness of the berries beautifully complements the rich chocolate.
- Milkshake Delight: Crumble a brownie into a vanilla or chocolate milkshake for an extra indulgent treat.
- Dessert Board Star: Include these brownies as part of a larger dessert charcuterie board, alongside cookies, fruits, nuts, and other small sweets.
How You Can Store It and How Long Does It Last
Proper storage ensures your delicious Sweetheart Fudgy Brownies stay fresh and fudgy for as long as possible, letting you enjoy them for days or even weeks!
Room Temperature:
- Once the chocolate drizzle has fully set, store the brownies in an airtight container at room temperature.
- Placed on the counter, they will stay wonderfully fresh and fudgy for about 3-4 days. For optimal texture, keep them out of direct sunlight and away from heat sources.
Refrigerator:
- If you prefer a denser, chewier brownie or want to extend their shelf life, store them in an airtight container in the refrigerator.
- Refrigerated brownies will last up to a week. Before serving, allow them to come to room temperature for about 15-20 minutes, or gently warm them in the microwave for a few seconds for that fresh-baked feel.
Freezer:
- These Sweetheart Fudgy Brownies freeze beautifully! Once completely cooled and decorated, place them in a single layer on a baking sheet and freeze for about an hour until firm.
- Then, transfer the frozen brownies to a freezer-safe airtight container or heavy-duty freezer bag, separating layers with parchment paper to prevent sticking.
- They can be stored in the freezer for up to 3 months.
- To thaw, simply remove the desired number of brownies from the freezer and let them sit at room temperature for an hour or two, or overnight in the refrigerator. You can also warm them gently in the microwave if you like them gooey.
FAQs
- What makes these Sweetheart Fudgy Brownies so fudgy?
The key to their fudginess lies in the high butter-to-flour ratio, the inclusion of melted chocolate (morsels) in addition to cocoa powder, and the specific amount of eggs. Crucially, avoiding overmixing and not overbaking also preserves that dense, moist texture. - Can I use different types of chocolate for the base?
Yes, you can! While semi-sweet chocolate morsels are recommended for balance, you could use dark chocolate morsels for a more intense chocolate flavor or milk chocolate morsels for a sweeter, milder brownie. Adjust the sugar slightly if using very dark chocolate. - Do I have to use parchment paper?
While not strictly mandatory, using parchment paper with an overhang is highly recommended. It acts as a sling, making it incredibly easy to lift the entire slab of cooled brownies out of the pan for clean, effortless cutting and decorating. It also helps prevent sticking! - How do I know when the brownies are done baking?
The edges should look set, but the center should still appear a little soft and slightly wobbly. When you insert a toothpick into the center, it should come out with moist crumbs, not wet batter, but also not completely clean. Overbaking leads to cakey brownies. - Can I make these Sweetheart Fudgy Brownies ahead of time?
Absolutely! Brownies actually improve in texture and flavor the next day as the flavors meld. You can bake them a day or two in advance, store them as directed, and then decorate them just before serving if you wish. - How can I cut super clean squares?
The trick is to ensure the brownies are completely cooled (chilling them in the fridge for 30 minutes can help too). Use a long, sharp knife, pressing straight down. Wipe your knife clean with a damp cloth after each cut to prevent crumbs from sticking and ensure pristine edges. - What if I don’t have melting wafers for the drizzle?
You can use good quality chocolate chips (milk, semi-sweet, or dark). Melt them gently in the microwave or over a double boiler. You might need to add a tiny bit of coconut oil or shortening (½ teaspoon per cup) to achieve a smooth, drizzly consistency that hardens well. - Can I add nuts or other mix-ins to the brownie batter?
Definitely! Chopped walnuts, pecans, chocolate chips, or even white chocolate chunks would be delicious additions. Fold them gently into the batter along with the dry ingredients in step 4. About ½ to ¾ cup of mix-ins works well. - Why is cooling completely so important for brownies?
Cooling allows the brownies to finish setting and firm up. Attempting to cut warm brownies often results in a crumbly, messy disaster. It also allows the fudgy texture to fully develop, ensuring they are perfectly dense and chewy when you finally slice into them. - Are these Sweetheart Fudgy Brownies good for other occasions, not just Valentine’s Day?
Yes, they are incredibly versatile! Simply change up the colors of your melting wafers and sprinkles to match any holiday or celebration. Green and red for Christmas, orange and black for Halloween, or just colorful sprinkles for birthdays!
Sweetheart Fudgy Brownies ❤️
Equipment
- 13x9-inch baking dish
- Parchment Paper
- Medium Saucepan
- Sharp Knife
- Cookie Sheet
Ingredients
Brownie Base
- 1 cup unsalted butter
- 0.5 cup semi-sweet chocolate morsels
- 2 cups granulated sugar
- 4 large eggs
- 1 teaspoon vanilla extract
- 0.75 cup unsweetened cocoa powder
- 1 cup all-purpose flour
- 0.5 teaspoon kosher salt
- 0.5 teaspoon baking powder
Topping & Decoration
- 5 oz Ghirardelli dark or milk chocolate melting wafers about ½ package
- Red, pink, or white melting wafers optional, for colorful drizzles
- Valentine's sprinkles heart shapes, pink and red jimmies
Instructions
- 1. Get Ready to Bake: Preheat your oven to 350°F (175°C). Line a 13x9-inch baking dish with parchment paper, leaving some overhang on the sides to easily lift the brownies out later. Set it aside.
- 2. Make the Chocolate Base: In a medium saucepan, gently melt the butter over medium heat until it's fully liquid. Take the pan off the heat right away and stir in the semi-sweet chocolate morsels and granulated sugar. Keep stirring until the chocolate is completely melted and everything is smooth and glossy – this usually takes a couple of minutes with the residual heat.
- 3. Whip in Wet Ingredients: Add the eggs one at a time to the chocolate mixture, stirring well after each addition until fully combined. Once all eggs are in, stir in the vanilla extract until it's evenly mixed.
- 4. Fold in Dry Ingredients Gently: Now, add the cocoa powder, all-purpose flour, salt, and baking powder directly into the saucepan. Using a wooden spoon or spatula, carefully fold the dry ingredients into the wet mixture. Stop stirring as soon as you no longer see any dry streaks. It's super important not to overmix, as this keeps your brownies wonderfully fudgy, not cakey!
- 5. Bake to Perfection: Pour the brownie batter into your prepared pan and spread it evenly into the corners with a spatula. Bake for about 22-24 minutes. The brownies are ready when the edges look set and the center still appears a little soft with moist crumbs on a toothpick – avoid overbaking to keep them delightfully gooey. Remove from the oven and let them cool completely in the pan for at least 15 minutes, or even a few hours for the best cutting results.
- 6. Slice and Prepare for Decorating: Once thoroughly cooled, use the parchment paper overhang to lift the entire brownie slab onto a cutting board. With a sharp knife, cut into 24 even squares (6 rows by 4 rows). For super clean cuts, wipe your knife between each slice.
- 7. Add a Chocolate Drizzle: Melt the chocolate wafers according to their package directions (usually short bursts in the microwave, stirring often, until smooth). Transfer the melted chocolate to a ziplock bag and snip off a tiny corner. Line a clean cookie sheet with fresh parchment paper. Drizzle the chocolate artfully over each brownie square in zigzags, lines, or swirls. If using colored wafers, repeat for an extra festive touch!
- 8. Sprinkle and Set: Immediately after drizzling, scatter your Valentine's sprinkles over the wet chocolate so they stick perfectly. Move the decorated brownies to a fresh piece of parchment paper and let them sit at room temperature for about 30 minutes until the chocolate hardens, or pop them in the fridge for 10-15 minutes to speed things up.
Notes
Calories: 185
Total Carbs: 26g
Net Carbs: 24.5g
Fats: 9g
Protein: 2.5g