Get ready to cast a spell of deliciousness this Halloween with a dessert so simple, so colorful, and so utterly delightful, it’ll vanish faster than a ghost in broad daylight! Forget about slaving over a hot oven; we’re diving headfirst into the world of no-bake magic. Imagine vibrant layers of creamy goodness, a crunchy cookie base, and a spooky sprinkle finish – all without ever turning on your stove. This isn’t just a dessert; it’s a festive centerpiece, a crowd-pleasing treat, and your new favorite way to celebrate the season. Prepare to amaze your friends and family with this incredible, yet incredibly easy, creation. Your Halloween party just found its star attraction!
Why You’ll Love This Recipe
This Easy No-Bake Halloween Lush Dessert isn’t just another sweet treat; it’s a game-changer for your spooky season celebrations. Here’s why you’ll fall head over heels for it:
- Effortlessly Easy & No-Bake: Ditch the oven and the stress! This recipe is a dream come true for busy hosts or anyone who prefers a hassle-free approach. With no baking required, you’ll spend less time in the kitchen and more time enjoying the festivities.
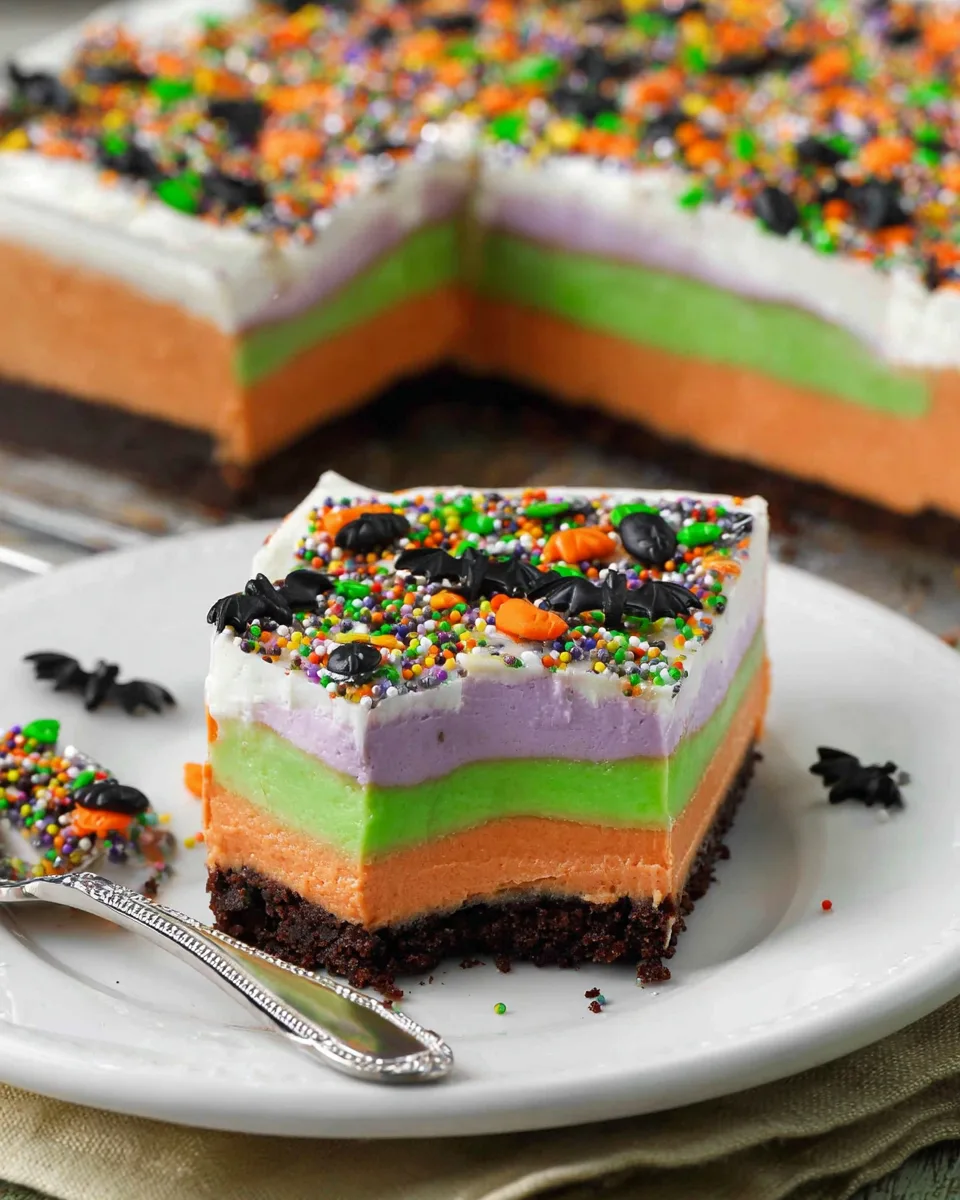
- Vibrantly Festive Colors: Those striking orange, purple, and green layers scream Halloween fun! The eye-catching hues make this dessert a showstopper, perfectly complementing your spooky decor and adding a pop of joyful color to any party spread.
- Irresistibly Layered Texture & Flavor: From the rich chocolate cookie crust to the smooth, creamy orange cheesecake layer, the silky purple vanilla pudding, and the refreshing green pistachio layer, topped with fluffy whipped cream, every bite offers a delightful medley of textures and tastes. It’s a symphony for your taste buds!
- A Guaranteed Crowd-Pleaser: Kids and adults alike will flock to this dessert! Its familiar, comforting flavors combined with the playful Halloween theme make it universally appealing. Whether it’s for a school party, a family gathering, or a spooky dinner with friends, this lush dessert is sure to be devoured.
Ingredients with Measurements
Gather your ghoulish goodies! Here’s everything you’ll need for your Easy No-Bake Halloween Lush Dessert:
- For the Crust:
- 1 ½ cups chocolate cookie crumbs (from about 24 Oreo cookies)
- ¼ cup melted butter
- For the Orange Layer:
- 8 ounces softened cream cheese
- 1 cup powdered sugar
- 1 cup whipped topping (like Cool Whip), divided
- Orange food coloring
- For the Purple Layer:
- 3.4 ounces instant vanilla pudding mix
- 1 ¾ cups cold milk
- Purple food coloring
- For the Green Layer:
- 3.4 ounces instant pistachio pudding mix (or vanilla for a nut-free option)
- Green food coloring
- For the Topping & Decor:
- Remaining 1 cup whipped topping (from the divided amount above)
- Halloween-themed sprinkles
Detailed Step-by-Step Directions
Let’s conjure up this magical Easy No-Bake Halloween Lush Dessert, layer by delicious layer!
- Conjure the Cookie Crust: Grab a medium bowl and toss in your chocolate cookie crumbs. Drizzle in the melted butter and stir it all together until every crumb is wonderfully moistened. Now, firmly press this mixture into the bottom of a 9×13-inch baking dish. This is your foundation! Pop it into the refrigerator to chill while you move on to the next enchanting layer.
- Whip Up the Orange Delight: In a large mixing bowl, beat the softened cream cheese and powdered sugar until it’s unbelievably smooth and fluffy – no lumps allowed! Gently fold in 1 cup of your whipped topping until it’s perfectly incorporated and creamy. Now for the magic: add a few drops of orange food coloring. Mix, mix, mix until you achieve a bright, festive hue that screams Halloween! Carefully spread this vibrant orange layer evenly over your chilled cookie crust. Return the pan to the fridge.
- Mix the Mysterious Purple Layer: Grab a separate medium bowl. Whisk together the instant vanilla pudding mix and cold milk vigorously until it begins to thicken beautifully. Drop in some purple food coloring and stir until you have a lovely, even purple shade. Delicately spread this purple pudding layer over the orange cream layer, taking care not to mix them. Back into the fridge it goes!
- Create the Ghoulish Green Layer: In yet another medium bowl, whisk together the instant pistachio pudding mix (or vanilla, if you’re going nut-free) and cold milk until it thickens up nicely. Add your green food coloring and mix until it’s the perfect spooky green. Gently spread this vibrant green layer over the purple layer, maintaining those clean, distinct lines.
- Add the Fluffy Topping & Chill Out: Finally, spread the remaining 1 cup of whipped topping smoothly and evenly over the green layer. Now, patience is a virtue! Refrigerate the entire dessert for at least 2 hours. This crucial chilling time allows all those beautiful layers to set perfectly, making for clean cuts and a stable dessert.
- Decorate & Devour: Just before it’s time to serve your masterpiece, scatter your fun Halloween-themed sprinkles generously over the whipped topping. Cut into neat squares and present your delightfully easy, colorful, and creamy Easy No-Bake Halloween Lush Dessert. Enjoy the cheers!
Creative Ways to Present and Serve Your Lush Dessert
Your Easy No-Bake Halloween Lush Dessert is already a showstopper, but with a little extra flair, you can elevate its presentation from great to absolutely spellbinding! Here are some creative serving ideas:
- Individual Portions: Instead of a large pan, assemble the layers in clear glass jars, ramekins, or even festive Halloween-themed plastic cups. This makes for easy serving at a party and gives each guest their own delightful mini-dessert. Layering in jars also beautifully showcases the vibrant colors!
- “Graveyard” Theme: After spreading the final whipped topping, sprinkle crushed Oreo crumbs (extra “dirt”) on top. Then, stand up rectangular cookies or Milano cookies as “tombstones.” You can even write “R.I.P.” on them with edible food markers. Gummy worms peeking out from the “dirt” add a creepy-crawly touch!
- Spooky Silhouettes: Before adding sprinkles, place Halloween cookie cutters (ghosts, bats, pumpkins) on the whipped topping. Fill the cut-out areas with different colored sprinkles or fine cocoa powder, then carefully remove the cutters to reveal spooky shapes.
- Ghoulish Garnishes: Beyond regular sprinkles, consider adding candy corn, edible googly eyes (especially fun on individual servings), mini chocolate chips, or even a drizzle of chocolate or caramel sauce for extra indulgence.
- Cut with Care: For super clean slices, dip your knife in hot water and wipe it clean between each cut. This will prevent the layers from dragging and smearing, ensuring a picture-perfect presentation every time.
- Serving Suggestions: This Easy No-Bake Halloween Lush Dessert is perfect for potlucks, costume parties, school events, or as a fun family dessert after a spooky movie night. Its chilled nature makes it refreshing and a welcome treat after all the Halloween candy.
How to Store It and How Long Does It Last
Once you’ve whipped up your spectacular Easy No-Bake Halloween Lush Dessert, you’ll want to ensure it stays fresh and delicious for as long as possible. Here’s how to store it properly:
- Refrigeration is Key: Due to the dairy components (cream cheese, milk, whipped topping), this dessert absolutely needs to be stored in the refrigerator. Do not leave it out at room temperature for extended periods, especially after it has been served.
- Airtight is Best: To keep the dessert from drying out and absorbing other fridge odors, cover the baking dish tightly with plastic wrap or aluminum foil. If you’ve made individual servings, cover each cup or jar securely.
- Longevity: When stored correctly in the refrigerator, this Easy No-Bake Halloween Lush Dessert will stay fresh and delightful for 3-4 days. The cookie crust might soften a little over time, but the creamy layers will remain delicious.
- Sprinkle Timing: For the best aesthetic, add the Halloween-themed sprinkles just before serving. If you add them too far in advance, some types of sprinkles can dissolve or bleed color into the whipped topping, especially if they are exposed to moisture.
- Freezing (Not Recommended): While you might be tempted to freeze leftovers, it’s generally not recommended for this type of layered lush dessert. The texture of the cream cheese and pudding layers can become grainy or watery upon thawing, and the whipped topping may separate. It’s best enjoyed fresh from the fridge!
So, plan to enjoy your Halloween masterpiece within a few days of making it for optimal taste and texture!
FAQs
Got questions about your Easy No-Bake Halloween Lush Dessert? We’ve got answers!
- Can I use different cookie crumbs for the crust? Absolutely! While Oreo crumbs provide a classic chocolatey base, you could use graham cracker crumbs, vanilla wafers, or even a mix of Halloween-themed cookies for a unique twist. Adjust melted butter as needed for consistency.
- Can I make this dessert ahead of time? Yes, this dessert is perfect for making ahead! It requires at least 2 hours of chilling to set, but can be made up to 24 hours in advance. Just remember to add the sprinkles right before serving.
- What if I can’t find Cool Whip, or prefer a homemade option? You can definitely use stabilized homemade whipped cream instead of Cool Whip. Simply whip heavy cream with a bit of powdered sugar and a touch of vanilla extract until stiff peaks form. Stabilized whipped cream (with a little cream cheese or gelatin) will hold up better.
- Can I change the pudding flavors or colors? Get creative! You can swap the vanilla pudding for chocolate, cheesecake, or even banana. For colors, feel free to use any combination you like to match your party theme – think black and orange, or even rainbow layers.
- Is there a nut-free option for the green layer? Yes, the recipe specifically mentions using instant vanilla pudding mix for a nut-free alternative to pistachio. Just add green food coloring to the vanilla pudding!
- Can I make this dessert dairy-free? Making it completely dairy-free would require significant substitutions. You’d need dairy-free cream cheese, dairy-free milk, and a dairy-free whipped topping. Ensure your instant pudding mixes are also dairy-free, as some may contain milk solids.
- How long does this dessert need to chill to set properly? At least 2 hours is crucial for the layers to firm up and allow for clean slicing. For best results, chill for 4 hours or even overnight.
- Why isn’t my pudding thickening? Make sure you are using *instant* pudding mix and *cold* milk. The temperature of the milk is important for the pudding to set correctly. Also, whisk thoroughly for the recommended time.
- What’s the best way to cut clean slices? For neat squares, use a sharp knife and run it under hot water, then wipe it dry before each cut. This helps prevent the layers from sticking and dragging, giving you perfect portions.
- Can I make this in a different size dish? Yes, you can. A 9×13-inch dish yields about 12 servings. If you use a smaller dish (like an 8×8-inch), your layers will be thicker, and you might get fewer servings. For a larger dish, you might need to scale up the ingredients to ensure adequate layer thickness.
“`
Easy No-Bake Halloween Lush Dessert 🎃
Equipment
- 9x13 inch Baking Dish
- Medium Bowl
- Large mixing bowl
Ingredients
Crust
- 1.5 cups chocolate cookie crumbs from about 24 Oreo cookies
- 0.25 cup melted butter
Orange Cream Cheese Layer
- 8 ounces softened cream cheese
- 1 cup powdered sugar
- 1 cup whipped topping like Cool Whip, for orange layer
- orange food coloring
Purple Pudding Layer
- 3.4 ounces instant vanilla pudding mix
- 1.75 cups cold milk
- purple food coloring
Green Pudding Layer
- 3.4 ounces instant pistachio pudding mix or vanilla for a nut-free option
- 1.75 cups cold milk
- green food coloring
Topping & Garnish
- 1 cup whipped topping remaining from divided amount, for topping
- Halloween-themed sprinkles
Instructions
- In a medium bowl, combine your chocolate cookie crumbs and melted butter, stirring until the crumbs are fully moistened. Press this mixture firmly into the bottom of a 9x13-inch baking dish. Place it in the refrigerator to chill while you prepare the next layers.
- In a large mixing bowl, beat the softened cream cheese and powdered sugar together until it's wonderfully smooth. Gently fold in 1 cup of whipped topping until everything is well incorporated and creamy. Add a few drops of orange food coloring and mix until you reach your desired bright, festive hue. Spread this vibrant orange layer evenly over your chilled cookie crust, then return the pan to the fridge.
- In a separate medium bowl, whisk together the instant vanilla pudding mix and cold milk until it begins to thicken nicely. Stir in purple food coloring until the mixture is evenly colored with a lovely purple hue. Carefully spread this purple layer over the orange cream layer, then pop the pan back into the fridge.
- In another medium bowl, whisk together the instant pistachio pudding mix (or vanilla, if preferred) and cold milk until it starts to thicken up. Add green food coloring and mix until it's the perfect spooky green. Gently spread this green layer over the purple layer.
- Spread the remaining 1 cup of whipped topping smoothly over the green layer. Now, comes the crucial chilling time! Refrigerate the entire dessert for at least 2 hours to allow all those beautiful layers to set perfectly.
- Just before you're ready to serve, scatter your fun Halloween-themed sprinkles evenly over the whipped topping. Cut into squares and enjoy this delightfully easy, colorful, and creamy dessert chilled!
Notes
Nutrition Information:
- Calories: 335 kcal
- Carbohydrates: 40g
- Net Carbs: 39.8g
- Fat: 18g
- Protein: 5g