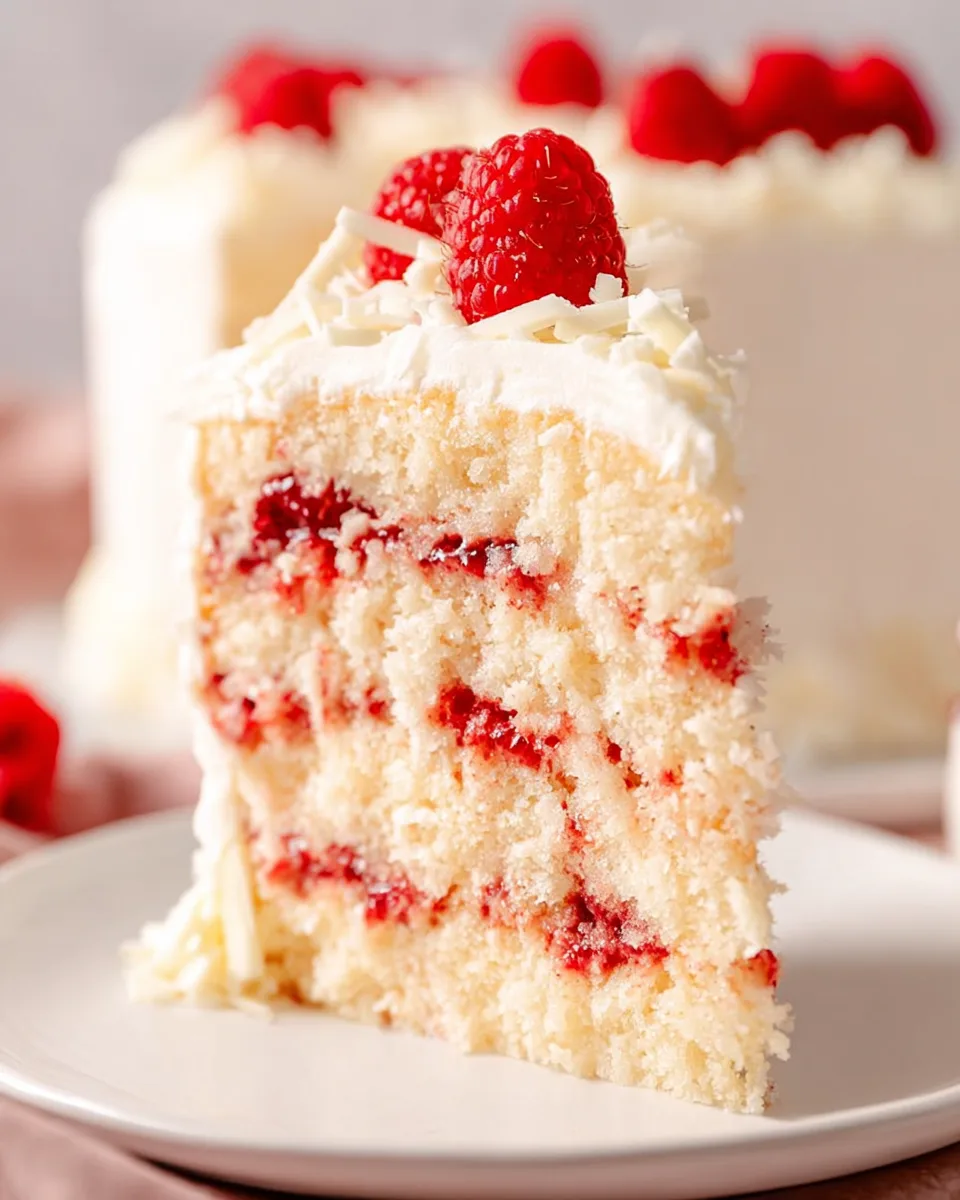
Tired of mundane desserts? Get ready to elevate your baking game with the most enchanting treat that promises to steal the show at any gathering: the magnificent White Chocolate Raspberry Delight!. Imagine sinking your teeth into layers of impossibly moist vanilla cake, generously filled with bright, tangy raspberry preserves, and crowned with a cloud of decadent white chocolate buttercream. This isn’t just a cake; it’s an experience, a symphony of flavors and textures that will have everyone begging for the recipe. So, roll up your sleeves, put on your favorite apron, and let’s dive into creating a masterpiece that’s as fun to make as it is to devour!
Why You’ll Love This Recipe
Prepare to fall head over heels for this White Chocolate Raspberry Delight! for so many scrumptious reasons:
- A Symphony of Flavors: The delicate sweetness of white chocolate perfectly balances the tart burst of fresh raspberries, creating a harmonious and utterly irresistible taste sensation that excites the palate.
- Impressively Beautiful, Surprisingly Easy: This cake looks like it came straight from a high-end patisserie, yet our detailed steps make it totally achievable for home bakers of all skill levels. You’ll be amazed at the showstopper you can create!
- Perfect for Any Occasion: Whether it’s a birthday, anniversary, holiday, or just a Tuesday treat, the elegant appeal of this White Chocolate Raspberry Delight! makes it the ideal centerpiece for celebrations big and small.
- Unforgettable Texture: Experience the dream team of a super moist, tender vanilla cake, the jammy chew of preserves, and the incredibly light, fluffy white chocolate buttercream. Every bite is a delightful journey of textures!
Ingredients for Your White Chocolate Raspberry Delight!
Vanilla Cake
- 2 cups Granulated Sugar
- 2¾ cups Cake Flour, spooned and leveled
- 2½ teaspoons Baking Powder
- ½ teaspoon Salt
- ¾ cup Unsalted Butter, softened
- 1 cup Heavy Cream
- ½ cup Buttermilk
- 2 teaspoons Vanilla Extract
- 1 cup Egg Whites, at room temperature
Filling
- ½ cup Raspberry Preserves, divided
White Chocolate Buttercream Frosting
- 12 ounces White Chocolate, finely chopped
- 2 cups Unsalted Butter, softened
- 4 cups Powdered Sugar
- ¼ cup Heavy Cream (or whole milk)
Garnish (Optional)
- 1 cup Fresh Raspberries
- White Chocolate Curls (from a bar)
Detailed Directions: Crafting Your White Chocolate Raspberry Delight!
For the Simple Vanilla Cake:
- Preheat & Prep Pans: Get your oven ready at 350°F (175°C). Lightly grease three 8-inch round cake pans and line the bottoms with parchment paper.
- Combine Dry Ingredients: In a large stand mixer bowl with the paddle attachment, gently mix the granulated sugar, flour, baking powder, and salt on low speed until just combined.
- Add Butter: Add the softened butter to the dry mixture. Increase the mixer speed to medium and beat for about 3 minutes until the mixture looks like damp, coarse sand.
- Wet Ingredients: Reduce the mixer speed to its lowest setting. Gradually pour in the heavy cream, buttermilk, and vanilla extract.
- Mix Well: Increase the speed to medium and beat for 2 minutes. The batter will be delightfully thick!
- Scrape & Whisk: Stop the mixer and use a spatula to thoroughly scrape down the sides and bottom of the bowl. Mix on medium for another 30 seconds.
- Egg Whites: With the mixer still on low, add the egg whites in three parts, beating for just 20 seconds after each addition. You’ll see the batter become beautifully silky smooth – be careful not to overmix!
- Divide Batter: Evenly distribute your lovely cake batter among the three prepared pans.
- Bake: Pop them into the preheated oven for 20-22 minutes. The cakes are done when they’re a pale golden color, slightly pull away from the pan edges, and spring back when gently touched. A toothpick inserted in the center should come out clean.
- Cool: Let the cakes cool in their pans for 10 minutes, then carefully invert them onto a wire rack to cool completely. This is crucial before frosting!
For the Decadent White Chocolate Buttercream:
- Melt Chocolate: Place the finely chopped white chocolate in a microwave-safe bowl. Melt it slowly in 30-second bursts at 50% power, stirring well after each interval, until smooth. Set aside to cool completely.
- Cream Butter: In a large stand mixer bowl with the paddle attachment, beat the softened butter on medium speed for a few minutes until it’s wonderfully creamy.
- Add Powdered Sugar: With the mixer on its lowest speed, gradually add the powdered sugar. Once it’s incorporated, crank up the speed to high and beat for 2 minutes. Don’t forget to scrape down the sides of the bowl!
- Mix in Chocolate: Add the cooled, melted white chocolate and beat on medium speed for 2 minutes.
- Fluff it Up: Finally, pour in the heavy cream (or milk) and beat for 1 more minute until the buttercream is incredibly light and fluffy. Transfer about one-third of the frosting to a piping bag for easy assembly.
Assembling Your Beautiful Cake:
- First Layer: Place one cooled cake layer on your serving plate or cake stand. Pipe a neat ring of buttercream around the outer edge.
- Fill & Frost: Gently fill the inside of the buttercream ring with ¼ cup of raspberry preserves, then pipe a layer of buttercream on top of the preserves.
- Second Layer: Carefully place the next cake layer on top and press gently to sandwich them. Repeat the piping, filling with the remaining ¼ cup raspberry preserves, and frosting steps.
- Final Layer & Crumb Coat: Place the last cake layer on top. Use an offset spatula to spread a thin layer of buttercream over the top and sides of the entire cake – this is your “crumb coat” to seal in any loose crumbs. Chill the cake in the refrigerator for 30 minutes to firm up.
- Final Frosting: Once chilled, spread the remaining buttercream generously over the top and sides of the cake. Use a cake scraper or offset spatula to smooth it out for a stunning finish.
- Garnish & Serve: Adorn the outside edge of the cake with fresh raspberries and scatter those lovely white chocolate curls over the top.
- Enjoy! Slice, serve, and savor your homemade masterpiece! (For clean slices, dip a sharp knife in hot water and wipe it dry before each cut.)
Presenting and Serving Your White Chocolate Raspberry Delight!
Your magnificent White Chocolate Raspberry Delight! deserves a presentation as stellar as its taste! Beyond the suggested garnishes, here are a few ideas to make it truly shine:
- Elegant Drizzle: After applying the final frosting, gently warm a tablespoon or two of extra raspberry preserves or a little melted white chocolate and drizzle it artfully over the top of the cake before adding the fresh fruit and curls.
- Floral Flourish: Edible flowers like violas, pansies, or rose petals (pesticide-free, of course!) can add a touch of sophisticated charm and color, especially around the base or on top alongside the raspberries.
- “Naked” Cake Style: For a rustic-chic look, apply a very thin, almost translucent layer of buttercream to the sides of the cake, allowing the beautiful cake layers and raspberry filling to peek through. Then, focus your embellishments on the top.
- Individual Delights: Consider baking this recipe into cupcakes for individual servings. Just adjust baking time (around 18-22 minutes) and pipe buttercream and a dollop of preserves on top of each, finishing with a single fresh raspberry.
- Dessert Plating: When serving slices, accompany each piece with a small side of fresh raspberries or a tiny scoop of vanilla bean ice cream for an extra indulgent touch. A dusting of powdered sugar on the plate can also elevate the presentation.
Remember, the key to clean slices is a warm, dry knife! Impress your guests and yourself with this showstopping dessert!
Storage and Shelf Life for Your White Chocolate Raspberry Delight!
You’ve poured your heart into creating this incredible White Chocolate Raspberry Delight!, so let’s make sure it stays fresh and fabulous for as long as possible!
- Countertop Storage (Short-Term): If you plan to devour the cake within 1-2 days and your kitchen isn’t overly warm, you can store the frosted cake, covered loosely with a cake dome or plastic wrap, at cool room temperature. This often helps keep the cake moist.
- Refrigerator Storage (Longer Term): For anything beyond two days, or if your home is warm, refrigerate the cake. Ensure it’s well-covered to prevent it from drying out or absorbing odors from other foods. Stored properly in the fridge, your White Chocolate Raspberry Delight! will last for up to 5-7 days. Bring slices to room temperature for about 30 minutes before serving for the best flavor and texture.
- Freezing Cake Layers: The unfrosted cake layers freeze beautifully! Wrap each completely cooled layer tightly in plastic wrap, then again in aluminum foil. They can be frozen for up to 2-3 months. Thaw overnight in the refrigerator before frosting.
- Freezing Frosted Cake: For a longer-term solution, you can freeze the entire frosted cake! Place the cake (uncovered) in the freezer for about 30 minutes until the frosting is firm. Then, wrap it tightly in plastic wrap and then aluminum foil. It can be frozen for up to 1 month. Thaw in the refrigerator overnight before bringing to room temperature to serve.
Always ensure your cake is well-protected from air to prevent staleness and freezer burn.
FAQs About Your White Chocolate Raspberry Delight!
White Chocolate Raspberry Delight!
Equipment
- Stand Mixer
- 8-inch Round Cake Pans
- Parchment Paper
- Wire Rack
- Spatula
- Microwave-safe Bowl
- Piping bag
- Offset Spatula
- Cake Scraper
- Sharp Knife
Ingredients
Vanilla Cake
- 2 cups Granulated Sugar
- 2 3/4 cups Cake Flour spooned and leveled
- 2 1/2 teaspoons Baking Powder
- 1/2 teaspoon Salt
- 3/4 cup Unsalted Butter softened
- 1 cup Heavy Cream
- 1/2 cup Buttermilk
- 2 teaspoons Vanilla Extract
- 1 cup Egg Whites at room temperature
Filling
- 1/2 cup Raspberry Preserves divided
White Chocolate Buttercream Frosting
- 12 ounces White Chocolate finely chopped
- 2 cups Unsalted Butter softened
- 4 cups Powdered Sugar
- 1/4 cup Heavy Cream (or whole milk)
Garnish (Optional)
- 1 cup Fresh Raspberries
- White Chocolate Curls (from a bar)
Instructions
For the Simple Vanilla Cake:
1. Preheat & Prep Pans: Get your oven ready at 350°F (175°C). Lightly grease three 8-inch round cake pans and line the bottoms with parchment paper.- 2. Combine Dry Ingredients: In a large stand mixer bowl with the paddle attachment, gently mix the granulated sugar, flour, baking powder, and salt on low speed until just combined.
- 3. Add Butter: Add the softened butter to the dry mixture. Increase the mixer speed to medium and beat for about 3 minutes until the mixture looks like damp, coarse sand.
- 4. Wet Ingredients: Reduce the mixer speed to its lowest setting. Gradually pour in the heavy cream, buttermilk, and vanilla extract.
- 5. Mix Well: Increase the speed to medium and beat for 2 minutes. The batter will be delightfully thick!
- 6. Scrape & Whisk: Stop the mixer and use a spatula to thoroughly scrape down the sides and bottom of the bowl. Mix on medium for another 30 seconds.
- 7. Egg Whites: With the mixer still on low, add the egg whites in three parts, beating for just 20 seconds after each addition. You'll see the batter become beautifully silky smooth – be careful not to overmix!
- 8. Divide Batter: Evenly distribute your lovely cake batter among the three prepared pans.
- 9. Bake: Pop them into the preheated oven for 20-22 minutes. The cakes are done when they're a pale golden color, slightly pull away from the pan edges, and spring back when gently touched. A toothpick inserted in the center should come out clean.
- 10. Cool: Let the cakes cool in their pans for 10 minutes, then carefully invert them onto a wire rack to cool completely. This is crucial before frosting!
For the Decadent White Chocolate Buttercream:
1. Melt Chocolate: Place the finely chopped white chocolate in a microwave-safe bowl. Melt it slowly in 30-second bursts at 50% power, stirring well after each interval, until smooth. Set aside to cool completely.- 2. Cream Butter: In a large stand mixer bowl with the paddle attachment, beat the softened butter on medium speed for a few minutes until it’s wonderfully creamy.
- 3. Add Powdered Sugar: With the mixer on its lowest speed, gradually add the powdered sugar. Once it's incorporated, crank up the speed to high and beat for 2 minutes. Don't forget to scrape down the sides of the bowl!
- 4. Mix in Chocolate: Add the cooled, melted white chocolate and beat on medium speed for 2 minutes.
- 5. Fluff it Up: Finally, pour in the heavy cream (or milk) and beat for 1 more minute until the buttercream is incredibly light and fluffy. Transfer about one-third of the frosting to a piping bag for easy assembly.
Assembling Your Beautiful Cake:
1. First Layer: Place one cooled cake layer on your serving plate or cake stand. Pipe a neat ring of buttercream around the outer edge.- 2. Fill & Frost: Gently fill the inside of the buttercream ring with ¼ cup of raspberry preserves, then pipe a layer of buttercream on top of the preserves.
- 3. Second Layer: Carefully place the next cake layer on top and press gently to sandwich them. Repeat the piping, filling with the remaining ¼ cup raspberry preserves, and frosting steps.
- 4. Final Layer & Crumb Coat: Place the last cake layer on top. Use an offset spatula to spread a thin layer of buttercream over the top and sides of the entire cake – this is your 'crumb coat' to seal in any loose crumbs. Chill the cake in the refrigerator for 30 minutes to firm up.
- 5. Final Frosting: Once chilled, spread the remaining buttercream generously over the top and sides of the cake. Use a cake scraper or offset spatula to smooth it out for a stunning finish.
- 6. Garnish & Serve: Adorn the outside edge of the cake with fresh raspberries and scatter those lovely white chocolate curls over the top.
- 7. Enjoy! Slice, serve, and savor your homemade masterpiece! (For clean slices, dip a sharp knife in hot water and wipe it dry before each cut.)
Notes
Calories: 400
Total Carbohydrates: 55g
Net Carbohydrates: 53g
Fat: 20g
Protein: 4g
Fiber: 2g Enjoy this homemade masterpiece! For clean slices, dip a sharp knife in hot water and wipe it dry before each cut.