Ever dreamt of a cake so deeply chocolatey, so utterly decadent, yet surprisingly easy to master? Well, pinch yourself, because your dream is about to come true! Prepare to embark on a baking adventure that culminates in the creation of the most show-stopping, melt-in-your-mouth delight imaginable: our **Wholesome Double Chocolate Cake with Black Velvet Icing**. This isn’t just a dessert; it’s an experience, a celebration of all things rich, dark, and utterly irresistible. Forget complicated techniques and endless fuss – we’re bringing you pure, unadulterated joy in every single bite. Get ready to impress your taste buds and everyone lucky enough to share a slice!
Why You’ll Love This Recipe
There are countless reasons to adore this incredible **Wholesome Double Chocolate Cake with Black Velvet Icing**, but here are four compelling ones that will have you preheating your oven in no time:
- Unforgettable Flavor Depth: This isn’t just a chocolate cake; it’s a symphony of chocolate! With both semi-sweet chocolate and cocoa powder in the cake, plus more semi-sweet chocolate in the luscious icing, every mouthful is a rich, intense cocoa dream that truly satisfies.
- Surprisingly Simple to Make: Despite its gourmet appearance and incredible taste, this recipe is designed for bakers of all skill levels. With clear, step-by-step instructions, you’ll be amazed at how easily you can create such a spectacular dessert.
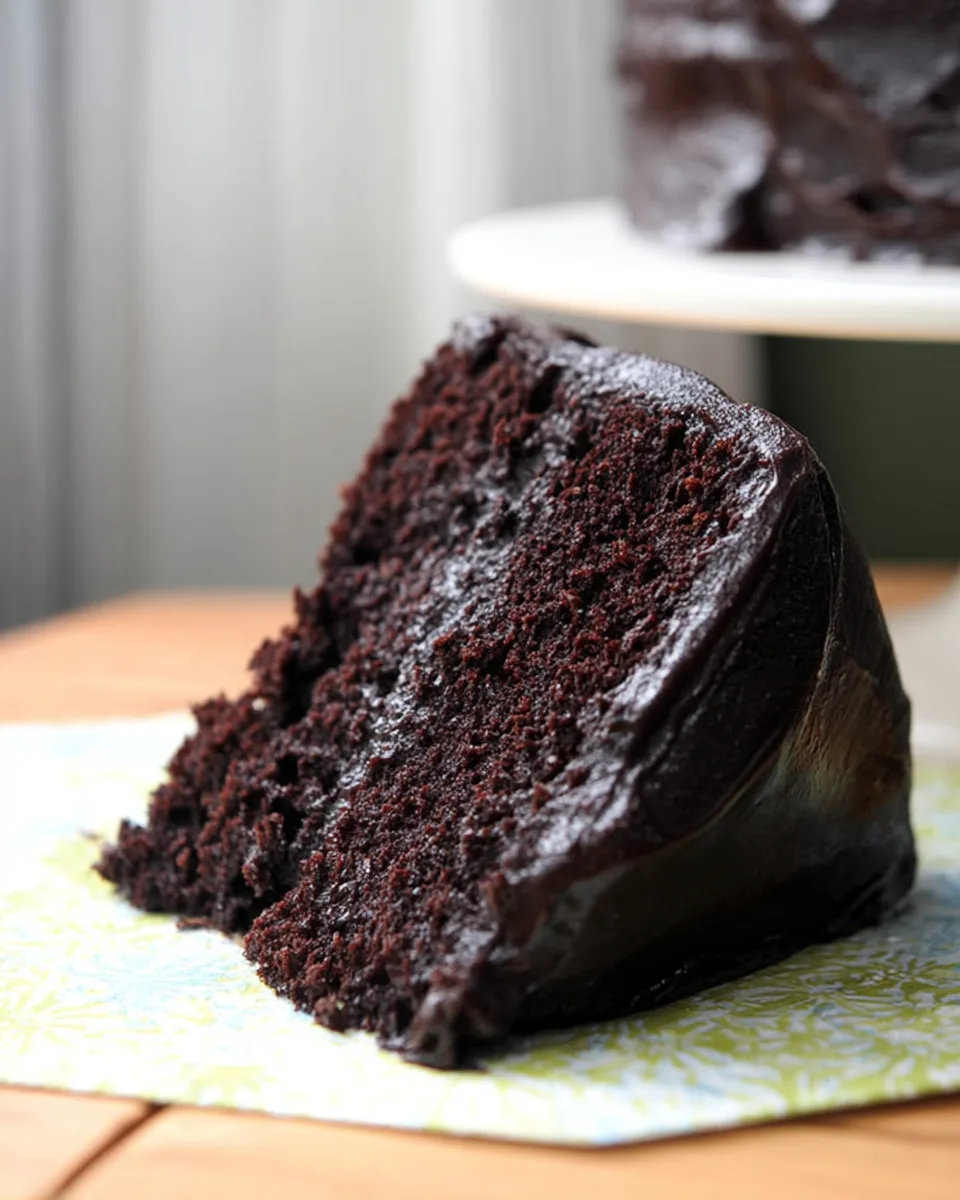
- Stunning, Elegant Presentation: The deep, dark hue of the Black Velvet Icing provides a dramatic contrast and a sophisticated finish, making your **Wholesome Double Chocolate Cake with Black Velvet Icing** look like it came straight from a high-end patisserie. It’s a true showstopper for any occasion!
- Pure, Comforting Indulgence: There’s something inherently comforting about a perfectly baked chocolate cake. This recipe delivers that cozy, nostalgic feeling, elevated with a luxurious twist, making it the ultimate treat for celebrations, quiet evenings, or simply because you deserve it.
Ingredients with measurements
For the Cake:
- 🍫 3 ounces fine-quality semi-sweet chocolate
- ☕ 1 1/2 cups hot brewed coffee
- 🍚 3 cups granulated sugar
- 🌾 2 1/2 cups all-purpose flour
- 🍫 1 1/2 cups unsweetened cocoa powder
- ✨ 2 teaspoons baking soda
- ✨ 3/4 teaspoon baking powder
- 🧂 1 1/4 teaspoons salt
- 🥚 3 large eggs
- 🌻 3/4 cup vegetable oil
- 🥛 1 1/2 cups well-shaken buttermilk
- 🌿 3/4 teaspoon vanilla extract
For the Black Velvet Icing:
- 🍫 8 ounces semi-sweet chocolate
- 🍚 Heaping 1/2 cup confectioners’ sugar
- 🥚 6 large eggs, well beaten
- 🧈 8 tablespoons unsalted butter, softened at room temperature
Detailed step by step on direction how to make the recipe
Easy Cake Baking:
- Prep Your Oven & Pans: Begin by preheating your oven to a gentle 300°F (150°C). Grab two 9 or 10-inch round cake pans (about 2 inches deep), lightly grease them with butter or nonstick spray, and then line the bottoms with parchment paper. This simple step ensures your cakes release beautifully and flawlessly!
- Melt Chocolate with Coffee: Finely chop the semi-sweet chocolate and place it in a heatproof bowl with the hot brewed coffee. Let this magical mixture rest for a few minutes, giving the heat a chance to work its magic. Stir occasionally until the chocolate is fully melted and the mixture is wonderfully smooth and glossy.
- Mix Dry Ingredients: In a large mixing bowl, gently whisk together the granulated sugar, all-purpose flour, unsweetened cocoa powder, baking soda, baking powder, and salt. Whisking helps to evenly distribute the leavening agents and keeps your cake light and airy.
- Combine Wet Ingredients: In a separate large bowl, use an electric mixer to beat the eggs until they become slightly thick and turn a pale lemon color (this takes about 3-5 minutes, creating a lovely aeration). Slowly mix in the vegetable oil, buttermilk, vanilla extract, and the cooled melted chocolate-coffee mixture, beating until everything is beautifully combined.
- Gentle Mixing: Now, it’s time to marry the mixtures! Add the dry ingredient mixture to the wet ingredients. Beat on medium speed just until everything is combined and smooth. Remember, the golden rule of baking: do not overmix, as this can develop the gluten too much and lead to a less tender cake.
- Bake to Perfection: Divide the silky batter evenly between your prepared cake pans. A crucial tip: do not fill the pans more than two-thirds full to prevent any overflow during baking. Bake in the center of your oven for 1 hour to 1 hour 10 minutes, or until a wooden skewer or tester inserted into the center comes out clean.
- Cool Completely: Patience is a virtue, especially in baking! Allow the cake layers to cool completely in their pans on wire racks. Once cool, carefully run a thin knife around the edges and invert the layers onto the racks, then gently peel off the parchment paper. For the best frosting experience, ensure your cakes are absolutely cold to the touch.
Simple Black Velvet Icing:
- Set Up Double Boiler: Create a double boiler by placing a medium, heatproof bowl (glass or stainless steel works best) over a pot with about an inch of simmering water. Make sure the bottom of the bowl doesn’t touch the water – you want steam, not direct heat. Keep the heat on medium-low.
- Melt Chocolate & Sugar: Add the semi-sweet chocolate to the bowl and let it gently melt, stirring occasionally. Once it’s smooth and glistening, stir in the heaping 1/2 cup of confectioners’ sugar until it’s well combined and utterly lump-free.
- Whisk in Eggs: This is where the “velvet” truly begins! Gradually add the well-beaten eggs to the chocolate mixture, whisking vigorously after each addition. A flat-bottomed whisk is a fantastic tool for this step, ensuring everything emulsifies beautifully.
- Thicken to Velvety Smoothness: Continue to cook the mixture over low to medium-low heat, stirring constantly with your whisk, until it thickens into a rich, glossy, and beautifully smooth consistency. This step is crucial for that luxurious, velvety texture.
- Enrich with Butter: Remove the bowl from the heat. Now, for the final touch of decadence! Stir in the softened unsalted butter, one tablespoon at a time, until it’s fully melted and perfectly incorporated into the smooth icing. Set aside to cool to room temperature, where it will further thicken to a perfect spreading consistency.
Detailed different ways you can present the recipe and how to serve it
Now that you’ve crafted your magnificent **Wholesome Double Chocolate Cake with Black Velvet Icing**, it’s time to unleash your inner artist and present it in a way that truly wows! Here are some ideas to elevate your serving game:
- Classic Two-Layer Tower: For a simpler yet equally impressive presentation, stick with the two generously frosted layers as baked. The height and rich icing will still make a statement.
- Grand Four-Layer Celebration: For a truly majestic and taller cake, carefully slice each cooled cake round horizontally using a long serrated knife to create four thinner layers. This creates more surface area for that incredible Black Velvet Icing, resulting in an even more decadent experience.
- The Naked Cake Trend: For a rustic-chic look, apply a thinner layer of icing to the sides, allowing some of the dark chocolate cake to peek through. This offers a modern, elegant aesthetic while still delivering on flavor.
- Garnishing Glory: Finish your masterpiece with a sprinkle of cocoa powder, a dusting of shaved dark chocolate, fresh raspberries or strawberries for a pop of color, or even a few edible gold flakes for ultimate luxury.
- Serving Suggestions: This **Wholesome Double Chocolate Cake with Black Velvet Icing** is best enjoyed at room temperature, allowing the flavors to truly shine and the icing to be wonderfully soft. Serve it as the star of your dessert table, alongside a scoop of vanilla bean ice cream, a dollop of fresh whipped cream, or a warm cup of coffee or espresso to cut through the richness. It’s also divine on its own, letting its intense chocolatey goodness speak for itself!
How you can store it and how long does it last
Once your delightful **Wholesome Double Chocolate Cake with Black Velvet Icing** has made its grand debut, you’ll want to ensure any leftovers stay just as scrumptious. For optimal freshness and flavor, cover the cake loosely (a cake dome works perfectly) and store it in the refrigerator. It will maintain its incredible taste and texture for up to 3 days. Before serving chilled leftovers, allow the cake to come back to room temperature for about 30-60 minutes. This softens the cake and the rich Black Velvet Icing, bringing back its original luxurious texture and enhancing its complex chocolate notes.
FAQs Sections
- Can I use a different type of chocolate for the cake or icing?
Yes, for the cake, semi-sweet chocolate is recommended for balance. For the icing, good quality semi-sweet chocolate is crucial for its rich flavor and smooth texture. You could use bittersweet if you prefer a less sweet profile, but adjust confectioners’ sugar in the icing to taste. - What if I don’t have buttermilk?
You can make a substitute! Add 1 tablespoon of lemon juice or white vinegar to a liquid measuring cup, then fill it to the 1 1/2 cup mark with whole milk. Stir gently and let it sit for 5-10 minutes until it slightly curdles. - My cake layers cracked when I inverted them. What went wrong?
This often happens if the cakes are not cooled completely before handling, or if they stuck to the pan. Ensure thorough greasing, parchment paper, and complete cooling on a wire rack before attempting to remove them from the pans. - Why is the oven temperature so low (300°F)?
Baking at a lower temperature for a longer time helps the cake bake more evenly, prevents a dry crust, and allows the deep chocolate flavors to develop without overbrowning or burning. It contributes to the “wholesome” texture! - Can I make the Black Velvet Icing ahead of time?
Yes, you can make the icing a day in advance. Store it covered in the refrigerator. When ready to use, let it come to room temperature and whisk vigorously to restore its smooth, spreadable consistency. You might need to gently warm it over a double boiler for a minute or two if it’s too firm. - How do I ensure my Black Velvet Icing is smooth and not grainy?
Ensure your confectioners’ sugar is lump-free (sift if necessary) and that you whisk constantly while cooking the egg and chocolate mixture over the double boiler. Proper melting and vigorous whisking are key to a truly velvety texture. - Can I halve this recipe for a smaller cake?
Yes, you can halve all ingredients and bake in two 8-inch round pans, adjusting baking time as needed (likely shorter, around 45-55 minutes). - What if my chocolate-coffee mixture doesn’t fully melt?
If it’s not perfectly smooth after resting, gently warm the bowl over a pot of simmering water (like a double boiler) for a minute or two, stirring constantly, until fully melted and combined. - Is the “Wholesome Double Chocolate Cake with Black Velvet Icing” suitable for freezing?
Yes, the cake layers can be baked, cooled completely, wrapped tightly in plastic wrap, and then in foil, and frozen for up to 1 month. Thaw at room temperature before frosting. The finished frosted cake can also be frozen, though the icing texture may change slightly upon thawing. - Can I add any mix-ins to the cake batter?
Absolutely! For an extra layer of decadence, you could gently fold in 1 cup of chocolate chips, chopped nuts, or even a hint of espresso powder with the dry ingredients for an even deeper chocolate flavor.
Wholesome Double Chocolate Cake with Black Velvet Icing
Equipment
- 9 or 10-inch round cake pans
- Parchment Paper
- Mixing Bowls
- Electric Mixer
- Wire racks
- Double boiler (or a medium, heatproof bowl over a pot with simmering water)
- Whisk (flat-bottomed is great)
- Offset Spatula
- Wooden skewer or tester
Ingredients
For the Cake
- 3 ounces fine-quality semi-sweet chocolate
- 1 1/2 cups hot brewed coffee
- 3 cups granulated sugar
- 2 1/2 cups all-purpose flour
- 1 1/2 cups unsweetened cocoa powder
- 2 teaspoons baking soda
- 3/4 teaspoon baking powder
- 1 1/4 teaspoons salt
- 3 large eggs
- 3/4 cup vegetable oil
- 1 1/2 cups well-shaken buttermilk
- 3/4 teaspoon vanilla extract
For the Black Velvet Icing
- 8 ounces semi-sweet chocolate
- Heaping 1/2 cup confectioners' sugar
- 6 large eggs well beaten
- 8 tablespoons unsalted butter softened at room temperature
Instructions
- Easy Cake Baking:
- 1. Prep Your Oven & Pans: Begin by preheating your oven to 300°F. Take two 9 or 10-inch round cake pans (2 inches deep), lightly grease them with butter or nonstick spray, and then line the bottoms with parchment paper. This simple step ensures your cakes release beautifully!
- 2. Melt Chocolate with Coffee: Finely chop the semi-sweet chocolate and place it in a bowl with the hot brewed coffee. Let this mixture rest for a few minutes, stirring occasionally, until the chocolate is fully melted and the mixture is wonderfully smooth.
- 3. Mix Dry Ingredients: In a large mixing bowl, gently whisk together the granulated sugar, all-purpose flour, unsweetened cocoa powder, baking soda, baking powder, and salt. Sifting or whisking helps keep your cake light and airy.
- 4. Combine Wet Ingredients: In a separate large bowl, use an electric mixer to beat the eggs until they become slightly thick and turn a pale lemon color (this takes about 3-5 minutes). Slowly mix in the vegetable oil, buttermilk, vanilla extract, and the cooled melted chocolate-coffee mixture, beating until everything is well combined.
- 5. Gentle Mixing: Now, add the dry ingredient mixture to the wet ingredients. Beat on medium speed just until everything is combined and smooth. Be careful not to overmix, as this can lead to a less tender cake.
- 6. Bake to Perfection: Divide the batter evenly between your prepared cake pans. A key tip: do not fill the pans more than two-thirds full to prevent any overflow during baking. Bake in the center of your oven for 1 hour to 1 hour 10 minutes, or until a wooden skewer or tester inserted into the center comes out clean.
- 7. Cool Completely: Allow the cake layers to cool completely in their pans on wire racks. Once cool, carefully run a thin knife around the edges and invert the layers onto the racks, then gently peel off the parchment paper. For the best frosting experience, ensure your cakes are absolutely cold.
- Simple Black Velvet Icing:
- 1. Set Up Double Boiler: Create a double boiler by placing a medium, heatproof bowl over a pot with about an inch of simmering water. Make sure the bottom of the bowl doesn't touch the water. Keep the heat on medium.
- 2. Melt Chocolate & Sugar: Add the semi-sweet chocolate to the bowl and let it melt. Once it's smooth, stir in the heaping 1/2 cup of confectioners' sugar until it's well combined and lump-free.
- 3. Whisk in Eggs: Gradually add the well-beaten eggs to the chocolate mixture, whisking vigorously after each addition. A flat-bottomed whisk is a great tool for this step!
- 4. Thicken to Velvety Smoothness: Continue to cook the mixture over low to medium-low heat, stirring constantly, until it thickens into a rich, glossy consistency. This process ensures a smooth, velvety icing.
- 5. Enrich with Butter: Remove the bowl from the heat. Stir in the softened unsalted butter, one tablespoon at a time, until it's fully melted and perfectly incorporated into the smooth icing. Set aside to cool to room temperature.
- Assemble Your Masterpiece:
- 1. Layering (Optional): For a more impressive and taller cake, you can carefully slice each cooled cake round horizontally to create four thinner layers.
- 2. Frosting: Spread a generous amount of the cooled black velvet icing evenly over your first cake layer. Place another cake layer on top, and repeat this process until all your layers are beautifully stacked.
- 3. Final Touch: Pour any remaining icing over the top layer and use an offset spatula to spread it smoothly over the top and delicately down the sides of the cake for that elegant, polished finish.
- 4. Serve & Store: This cake is truly a delightful treat! It's best enjoyed at room temperature to savor its full flavor. Any leftovers should be kept covered and chilled in the refrigerator for up to 3 days.
Notes
- Calories: Not provided in original recipe
- Total Carbs: Not provided in original recipe
- Net Carbs: Not provided in original recipe
- Fats: Not provided in original recipe
- Protein: Not provided in original recipe