Why You’ll Love These Red Velvet Valentine’s Love Rolls
Prepare to fall head over heels for these Red Velvet Valentine’s Love Rolls! They’re not just a treat; they’re a warm, sweet hug in edible form. Here are four irresistible reasons why they’ll become your new favorite:
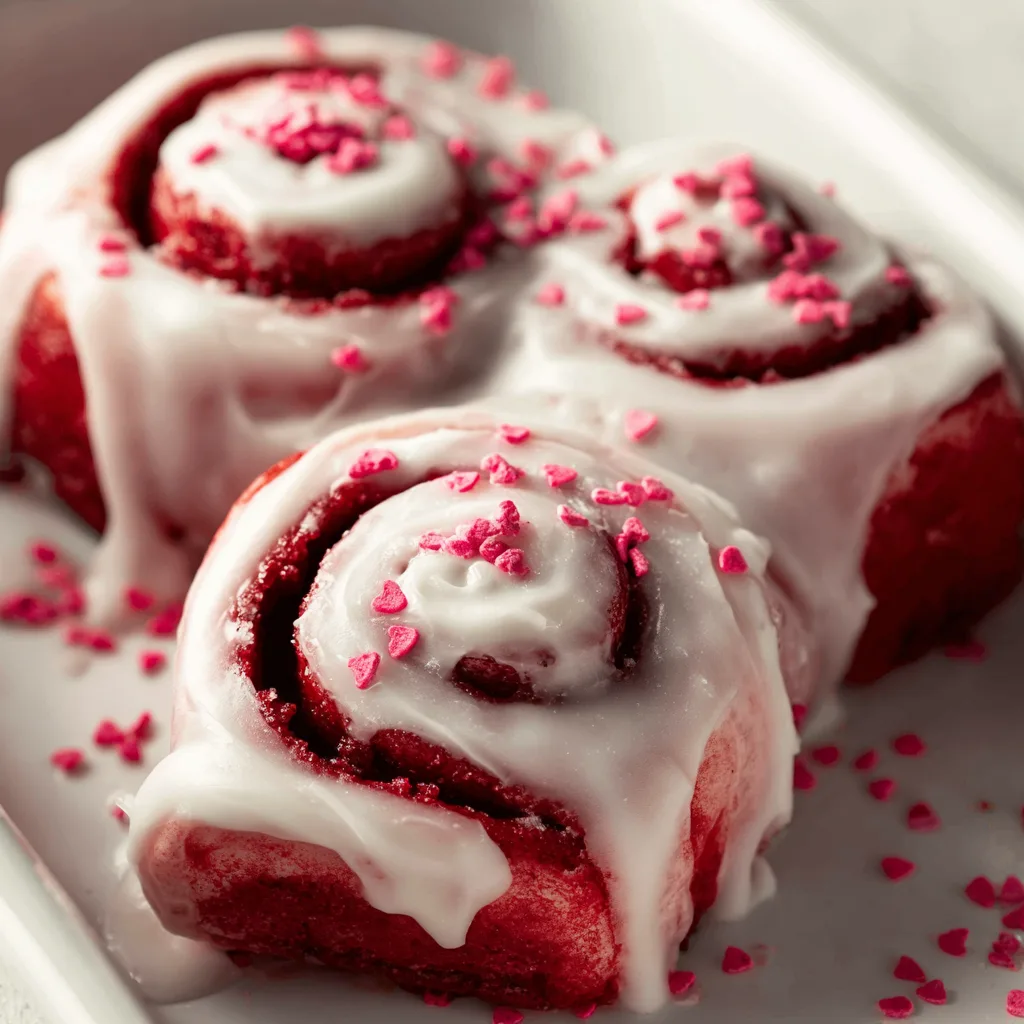
- Stunning Visual Appeal: That signature vibrant red hue, kissed with cocoa, makes these rolls an absolute showstopper. Perfect for Valentine’s Day, their color screams ‘love’ even before the first bite!
- Irresistible Flavor Fusion: Imagine the rich, subtle cocoa notes of red velvet mingling with the warm, comforting spice of cinnamon, all enveloped in a fluffy roll and crowned with a tangy cream cheese glaze. It’s a match made in dessert heaven!
- Perfect for Sharing & Gifting: What better way to express your affection than with homemade treats? These rolls are ideal for a romantic breakfast in bed, a thoughtful gift for friends, or a delightful centerpiece for your Valentine’s brunch.
- Surprisingly Simple to Master: Don’t let their elegant appearance fool you! This recipe breaks down the process into easy, manageable steps, making it accessible even for novice bakers. You’ll be whipping up these beauties with confidence!
Unroll the Love This Valentine’s Day! Introducing Red Velvet Valentine’s Love Rolls!
Forget the predictable box of chocolates or the wilted bouquet this Valentine’s Day! This year, let’s stir up some real romance, some genuine warmth, and a whole lot of deliciousness right in your kitchen. Imagine waking up to the sweet aroma of freshly baked cinnamon rolls, but with a passionate twist – a vibrant, velvety red hue that screams “I love you!” We’re talking about the ultimate declaration of affection: Red Velvet Valentine’s Love Rolls. These aren’t just any rolls; they’re a celebration of flavor, color, and heartfelt homemade goodness, guaranteed to melt hearts faster than Cupid’s arrow. Get ready to roll up your sleeves and sprinkle some magic into your special day with these unbelievably soft, wonderfully spiced, and perfectly glazed rolls. Let’s make this Valentine’s unforgettable, one delicious bite at a time!
Ingredients for Your Romantic Bake-Off
Gather your enchanting components to create these magical Red Velvet Valentine’s Love Rolls!
For the Dough:
- 🥛 1 cup warm milk
- 🔬 2 1/4 teaspoons active dry yeast (1 packet)
- 🍚 1/2 cup granulated sugar
- 🧈 1/4 cup melted unsalted butter
- 🥚 2 large eggs, room temperature
- 🌾 4 cups all-purpose flour
- 🧂 1 teaspoon salt
- 🍫 2 tablespoons cocoa powder
- ❤️ 2 teaspoons red food coloring (or more for desired color)
- 🍦 1 teaspoon vanilla extract (Added from step 3, ensures all ingredients are listed here)
For the Filling:
- 🤎 1 cup packed brown sugar
- 🍂 3 tablespoons ground cinnamon
- 🧈 1/4 cup softened unsalted butter
For the Cream Cheese Glaze:
- 🧀 4 ounces softened cream cheese
- 🧈 1/4 cup softened unsalted butter
- 🍦 1 1/2 cups powdered sugar
- 🍃 1 teaspoon vanilla extract
- 🥛 2-3 tablespoons milk (adjust for your preferred consistency)
- 💖 Heart sprinkles for decoration
Your Step-by-Step Guide to Red Velvet Valentine’s Love Rolls Perfection
Follow these simple steps to craft your delicious Red Velvet Valentine’s Love Rolls:
Whip up the Dough with Ease:
- In a big bowl, gently combine the warm milk, yeast, and a tiny pinch of sugar. Let it rest for 5-10 minutes until it gets nice and foamy, showing the yeast is ready to work its magic!
- In a separate bowl, simply mix your flour, sugar, cocoa powder, and salt.
- Add the melted butter, eggs, red food coloring, and vanilla extract to your yeast mixture.
- Slowly, little by little, add the dry ingredients to the wet mixture, mixing until a soft, lovely dough forms.
- On a lightly floured surface, knead this beautiful dough for about 5-7 minutes until it’s smooth and wonderfully elastic.
- Pop the dough into a lightly greased bowl, cover it, and let it rise in a warm, cozy spot for 1-2 hours, or until it has happily doubled in size.
Prepare the Flavorful Filling:
- In a small bowl, just mix together the softened butter, brown sugar, and cinnamon until it’s perfectly combined into a delicious spread.
Assemble Your Heartfelt Rolls:
- Once your dough has risen, gently deflate it and roll it out on a lightly floured surface into a rectangle, roughly 15×9 inches.
- Spread your delicious filling evenly all over the dough, right to the edges.
- Starting from one of the long edges, roll the dough up tightly into a neat log shape.
- With a sharp knife or even unflavored dental floss, carefully slice the log into 12 equal, charming pieces and arrange them in a greased 9×13 inch baking dish.
- Cover them again and let them rise for another 30-45 minutes until they’ve puffed up beautifully.
Bake to Golden Perfection:
- Preheat your oven to a warm 350°F (175°C).
- Bake the rolls for 25-30 minutes until they’re golden brown and cooked through. Let them cool just a little before glazing.
Craft the Creamy Glaze:
- In a medium bowl, beat the softened cream cheese and butter together until perfectly smooth and lump-free.
- Gradually mix in the powdered sugar and vanilla extract, beating until it’s a dreamy, creamy texture.
- Add milk one tablespoon at a time until your glaze reaches your desired pourable consistency – smooth and ready to spread!
Glaze and Decorate with Love:
- Generously spread the delightful cream cheese glaze over your warm rolls.
- Finish with a sprinkle of heart sprinkles for that extra festive Valentine’s touch!
- Serve immediately and enjoy these delightful homemade treats, perfect for sharing your love!
Presenting and Serving Your Red Velvet Valentine’s Love Rolls with Panache!
You’ve poured your heart into creating these Red Velvet Valentine’s Love Rolls, now let’s make their presentation just as memorable! These rolls are beautiful on their own, but a little extra flair can turn them into a true masterpiece:
- Classic Dish Presentation: Keep it simple and elegant! Serve the entire pan of warm, glazed rolls directly from the oven for a rustic, comforting feel. Guests can pull apart their own roll, which adds to the communal joy.
- Individual Love Bites: For a more refined touch, carefully lift individual rolls onto small, charming dessert plates. A little drizzle of extra glaze on the plate and a scatter of a few more heart sprinkles will make each serving feel special.
- Gift of Love Boxes: Package 1-2 rolls in cute, bakery-style boxes, tied with a ribbon. These make fantastic edible gifts for neighbors, friends, or co-workers. Add a small, handwritten note to make it extra personal.
- Brunch Centerpiece: Arrange the rolls beautifully on a large serving platter, perhaps garnished with fresh berries (raspberries or strawberries complement the red hue perfectly!) or a sprig of fresh mint. They’ll be the star of any Valentine’s or special occasion brunch.
- Coffee & Romance: Pair these indulgent rolls with a steaming cup of coffee, a frothy latte, or a rich hot chocolate for the ultimate cozy moment. Imagine a romantic breakfast in bed with these rolls and your favorite brew!
- Dessert Delight: While perfect for breakfast, don’t underestimate their power as a dessert! Serve them slightly warm after dinner with a scoop of vanilla bean ice cream for an extra decadent treat.
Storing Your Red Velvet Valentine’s Love Rolls: Keeping the Love Fresh!
Want to savor the deliciousness of your Red Velvet Valentine’s Love Rolls for a little longer? Here’s how to properly store them to maintain their freshness and flavor:
- At Room Temperature (Glazed): If you plan to enjoy them within 1-2 days, store the glazed rolls in an airtight container at room temperature. The glaze will set a bit, but the rolls will remain soft. Ensure they are completely cool before covering to prevent condensation, which can make them soggy.
- In the Refrigerator (Glazed): Due to the cream cheese in the glaze, refrigeration is recommended if you plan to keep them longer than 2 days. Store them in an airtight container in the fridge for up to 5 days. Reheat gently in the microwave for 15-30 seconds per roll to bring back their softness.
- Freezing Baked Rolls (Unglazed): For longer storage (up to 1 month), bake the rolls and let them cool completely without glazing. Wrap individual rolls tightly in plastic wrap, then place them in a freezer-safe bag or container. When ready to serve, thaw at room temperature, then warm in the oven (300°F/150°C for 10-15 minutes) and then apply the freshly made glaze.
- Freezing Baked Rolls (Glazed): You can freeze glazed rolls, but the glaze might become a bit watery or sticky upon thawing. It’s generally best to glaze them fresh. If you must freeze glazed, wrap tightly and thaw in the fridge, then microwave briefly.
- Freezing Unbaked Rolls: This is a fantastic make-ahead option! After slicing the rolls and arranging them in the baking dish, cover tightly with plastic wrap and then foil. Freeze for up to 2 weeks. When ready to bake, transfer to the refrigerator overnight to thaw. In the morning, let them rise in a warm spot for 1-2 hours before baking as directed.
Always ensure your rolls are in an airtight container to prevent them from drying out, keeping that lovely soft texture intact!
FAQs About Your Red Velvet Valentine’s Love Rolls
Got questions about baking these delightful Red Velvet Valentine’s Love Rolls? We’ve got answers!
- Q: Can I use instant yeast instead of active dry yeast?
A: Yes, you can! Instant yeast doesn’t require proofing. You can mix it directly with the dry ingredients, then add the wet ingredients. However, if you’re unsure your yeast is fresh, proofing it in warm milk first (as with active dry) is a good test. - Q: My dough isn’t rising. What went wrong?
A: There are a few common culprits: your milk might have been too hot (killing the yeast) or too cold (not activating it), your yeast might be old or expired, or your rising spot might not be warm enough. Ensure your milk is between 105-115°F (40-46°C). - Q: Can I prepare these rolls the night before?
A: Absolutely! After arranging the sliced rolls in the baking dish, cover them tightly with plastic wrap and refrigerate overnight (up to 12-18 hours). The next morning, take them out and let them come to room temperature and rise in a warm spot for 1-2 hours before baking. - Q: Why is my dough tough or dry?
A: This often happens from adding too much flour or over-kneading. Add flour gradually and stop when the dough is smooth and elastic, not stiff. Kneading for 5-7 minutes is usually sufficient; over-kneading can develop too much gluten. - Q: Can I reduce the amount of red food coloring?
A: Yes, you can! The amount in the recipe provides a vibrant red. You can start with 1 teaspoon and add more gradually until you achieve your desired shade. For a more subtle color, you can even omit it, though they won’t have the classic red velvet look. - Q: Can I make these without cocoa powder?
A: You can, but they won’t truly be “red velvet,” which gets its subtle flavor and color depth from cocoa. They would essentially be cinnamon rolls with a red hue. The cocoa adds a unique richness that complements the red food coloring. - Q: What if I don’t have a 9×13 inch baking dish?
A: You can use two 8×8 inch square pans or a similar-sized round pan. Just ensure the rolls fit snugly but have a little room to expand. You might need to adjust baking time slightly. - Q: Can I use different fillings for these rolls?
A: While the brown sugar and cinnamon filling is classic, feel free to experiment! A cream cheese or white chocolate spread, or even a berry compote, could be delicious. Just ensure it’s not too wet, which could make the dough soggy. - Q: How do I know when the rolls are perfectly baked?
A: The rolls should be golden brown on top and cooked through. You can gently lift one to check the bottom for browning. An internal temperature of about 200-205°F (93-96°C) is ideal, if you have a thermometer. - Q: Are these Red Velvet Valentine’s Love Rolls suitable for kids?
A: Absolutely! Kids generally adore sweet, soft rolls, and the vibrant red color is especially appealing. Just be mindful of any food coloring sensitivities if that’s a concern for your family.
“`
Red Velvet Valentine's Love Rolls 💖
Equipment
- Large mixing bowl
- Small Mixing Bowl
- 9x13 inch Baking Dish
- Sharp Knife
Ingredients
Dough
- 1 cup milk warm
- 2 1/4 teaspoons active dry yeast (1 packet)
- 1/2 cup granulated sugar
- 1/4 cup unsalted butter melted
- 2 large eggs room temperature
- 4 cups all-purpose flour
- 1 teaspoon salt
- 2 tablespoons cocoa powder
- 2 teaspoons red food coloring (or more for desired color)
Filling
- 1 cup brown sugar packed
- 3 tablespoons ground cinnamon
- 1/4 cup unsalted butter softened
Cream Cheese Glaze
- 4 ounces cream cheese softened
- 1/4 cup unsalted butter softened
- 1 1/2 cups powdered sugar
- 1 teaspoon vanilla extract
- 2-3 tablespoons milk (adjust for your preferred consistency)
- Heart sprinkles for decoration
Instructions
- In a big bowl, gently combine the warm milk, yeast, and a tiny pinch of sugar. Let it rest for 5-10 minutes until it gets nice and foamy, showing the yeast is ready to work its magic!
- In a separate bowl, simply mix your flour, sugar, cocoa powder, and salt.
- Add the melted butter, eggs, red food coloring, and vanilla extract to your yeast mixture.
- Slowly, little by little, add the dry ingredients to the wet mixture, mixing until a soft, lovely dough forms.
- On a lightly floured surface, knead this beautiful dough for about 5-7 minutes until it's smooth and wonderfully elastic.
- Pop the dough into a lightly greased bowl, cover it, and let it rise in a warm, cozy spot for 1-2 hours, or until it has happily doubled in size.
- In a small bowl, just mix together the softened butter, brown sugar, and cinnamon until it's perfectly combined into a delicious spread.
- Once your dough has risen, gently deflate it and roll it out on a lightly floured surface into a rectangle, roughly 15x9 inches.
- Spread your delicious filling evenly all over the dough, right to the edges.
- Starting from one of the long edges, roll the dough up tightly into a neat log shape.
- With a sharp knife or even unflavored dental floss, carefully slice the log into 12 equal, charming pieces and arrange them in a greased 9x13 inch baking dish.
- Cover them again and let them rise for another 30-45 minutes until they've puffed up beautifully.
- Preheat your oven to a warm 350°F (175°C).
- Bake the rolls for 25-30 minutes until they're golden brown and cooked through. Let them cool just a little before glazing.
- In a medium bowl, beat the softened cream cheese and butter together until perfectly smooth and lump-free.
- Gradually mix in the powdered sugar and vanilla extract, beating until it's a dreamy, creamy texture.
- Add milk one tablespoon at a time until your glaze reaches your desired pourable consistency – smooth and ready to spread!
- Generously spread the delightful cream cheese glaze over your warm rolls.
- Finish with a sprinkle of heart sprinkles for that extra festive Valentine's touch!
- Serve immediately and enjoy these delightful homemade treats, perfect for sharing your love!
Notes
Calories: 467
Total Carbs: 73g
Net Carbs: 70g
Fats: 17g
Protein: 7g These Red Velvet Valentine's Love Rolls are a delightful homemade treat, perfect for spreading joy and love!