
🍎📚 Let’s be real: school mornings are a circus. You’ve got backpacks, permission slips, and a tiny human who suddenly hates every food they loved yesterday. Enter the Back-to-School Crunchwrap Hack – the lunchbox hero that’s part taco, part puzzle, and 100% delicious. It’s the healthy lunchbox hack you didn’t know you needed. One fold, four quarters, and boom – a crispy, cheesy, veggie-packed wrap that actually stays sealed. Even picky eaters give it two thumbs up. Ready to hack lunchtime? Let’s build one. 🌮🔥
Why You’ll Love This Recipe
Ingredients
Makes 6 wraps | All measurements are in the recipe – grab ‘em and go!
- 1 lb lean ground beef (or ground turkey)
- 6 large (8-inch) flour tortillas
- ½ cup nacho cheese sauce
- 1 cup shredded lettuce
- 1 medium tomato, diced
- ½ cup crushed tortilla chips
- ¼ cup sour cream (Greek yogurt works too)
- 1 cup shredded Mexican cheese blend
- 1 tbsp olive oil (for cooking)
- 1 tbsp butter or oil (for crisping)
- 1 packet taco seasoning + ¼ cup water
How to Make the Perfect Crunchwrap
The folding trick is the real magic. Follow these steps and you’ll never go back to a sad sandwich.
- Cook the beef – Heat olive oil in a large skillet over medium heat. Add ground beef, cook until browned. Drain excess fat, then stir in taco seasoning and water. Simmer for 3 minutes, then set aside.
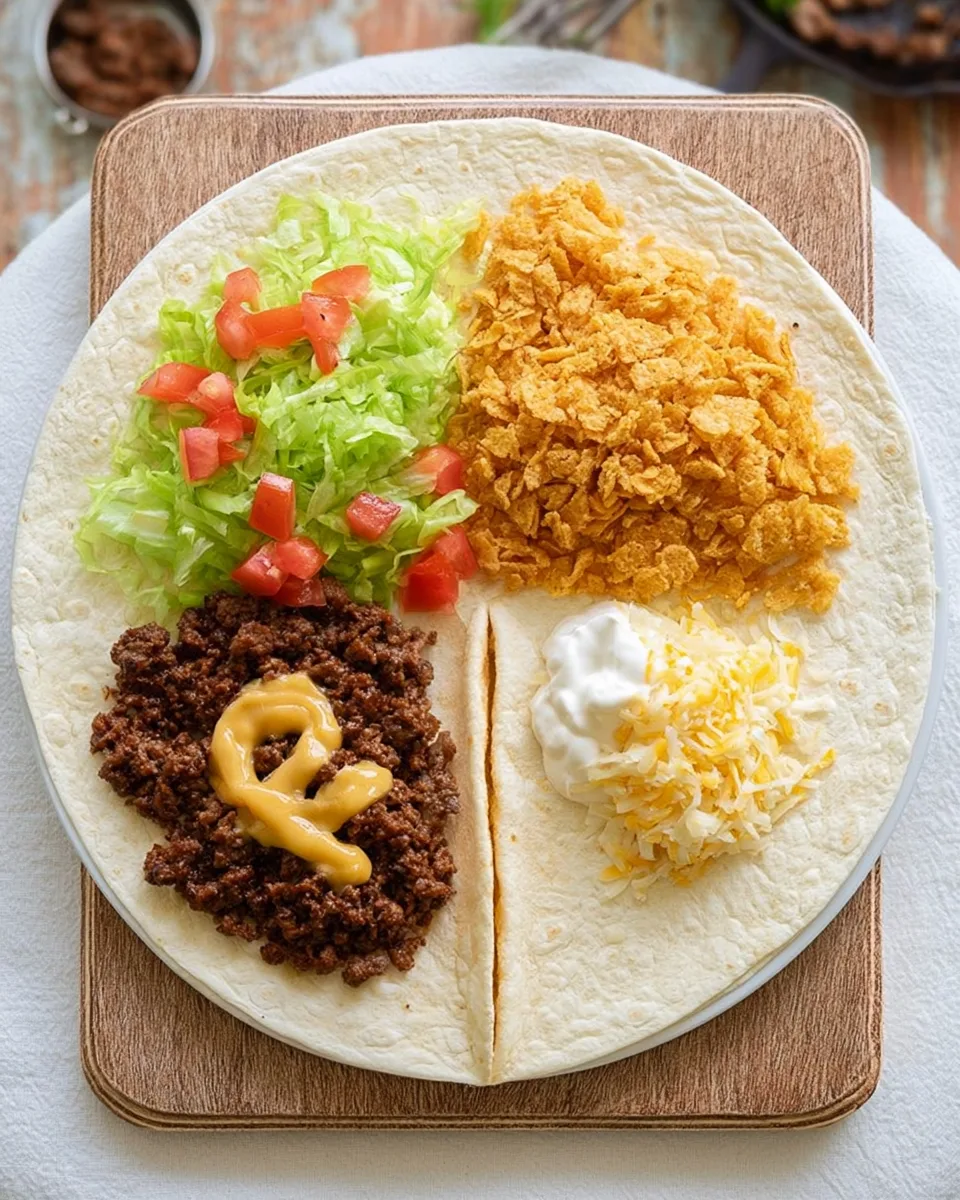
- Prep the tortilla – Lay one tortilla flat. Make a single cut from the bottom edge straight up to the center (like a pizza slice cut – trust the process).
- Fill the quarters – Bottom-left: nacho cheese + seasoned beef. Top-left: shredded lettuce + diced tomatoes. Top-right: crushed tortilla chips. Bottom-right: sour cream + shredded cheese.
- Fold it like a pro – Fold bottom-left quarter up over top-left. Then fold those two sections over to the right (covering chips). Finally, fold all three sections down over the bottom-right quarter. You’ll have a tidy, sealed pocket.
- Crisp it up – Melt butter or oil in a clean non-stick skillet over medium heat. Place wrap seam-side down, cook 1–2 minutes per side until golden and crispy.
- Repeat & serve – Repeat for remaining tortillas. Slice in half and pack in a lunch box – or eat it immediately because you deserve it.
Ways to Serve & Present
The Crunchwrap Hack is ridiculously versatile. Here’s how to switch it up:
Lunchbox style
Slice in half, pack with apple slices & a fun note.
Game day snack
Cut into triangles, serve with salsa & guac.
Low-carb bowl
Skip the tortilla, layer fillings in a bowl with extra lettuce.
Veggie version
Swap beef for black beans + corn, use vegan cheese.
For a cute lunchbox presentation, wrap in parchment paper and tie with kitchen twine. Kids love the “present” effect. Add a side of cherry tomatoes or baby carrots to round it out.
Storage & Shelf Life
These Crunchwraps are make-ahead gold. Here’s how to store them so they stay crispy and fresh:
- Fridge: Store assembled uncooked wraps in an airtight container for up to 2 days. Cook just before packing to keep that crunch.
- Cooked wraps: Keep in the fridge for up to 3 days. Reheat in a dry skillet (not microwave) for best texture – about 1 minute per side.
- Freezer: Flash-freeze uncooked wraps on a baking sheet, then transfer to a freezer bag. Freeze for up to 1 month. Cook from frozen, adding 2–3 minutes per side.
- Pro tip: Keep sour cream and lettuce separate if prepping more than a day ahead – add them fresh in the morning for maximum crunch.
Back-to-School Crunchwrap FAQ
✨ Back-to-School Crunchwrap Hack: The healthy lunchbox hack that actually gets eaten. Make it tonight, thank yourself tomorrow. ✨
“`
Back-to-School Crunchwrap Hack
Equipment
- Large skillet
- Non-stick Pan
Ingredients
Filling
- 1 pound lean ground beef or ground turkey
- 1 packet taco seasoning
- 1/4 cup water
- 1 tbsp olive oil
Assembly
- 6 large (8-inch) flour tortillas
- 1/2 cup nacho cheese sauce
- 1 cup shredded lettuce
- 1 medium tomato diced
- 1/2 cup crushed tortilla chips
- 1/4 cup sour cream Greek yogurt works too
- 1 cup shredded Mexican cheese blend
- 1 tbsp butter or oil for crisping
Instructions
- Heat olive oil in a large skillet over medium heat. Add ground beef and cook until browned. Drain excess fat, then stir in taco seasoning and water. Simmer for 3 minutes. Set aside.
- Lay one tortilla flat. Make a single cut from the bottom edge to the center.
- In the bottom-left quarter, add nacho cheese and seasoned beef. In the top-left, add lettuce and tomatoes. In the top-right, add crushed chips. In the bottom-right, add sour cream and shredded cheese.
- Fold the bottom-left quarter up, then fold over to the right, then fold down to create a sealed pocket.
- Melt butter in a skillet over medium heat. Place wrap seam-side down and cook 1–2 minutes per side until golden and crispy.
Notes
Calories: 425 | Total Carbs: 28g | Net Carbs: 25g | Fats: 24g | Protein: 22g Healthy Twist: Use low-fat cheese, Greek yogurt instead of sour cream, and whole wheat tortillas. Bake at 375°F for 10 minutes instead of pan-frying for an even lighter option.