Keto Philly Cheesesteak Roll-Ups: The Ultimate Low-Carb Delight
Why You’ll Love This Recipe
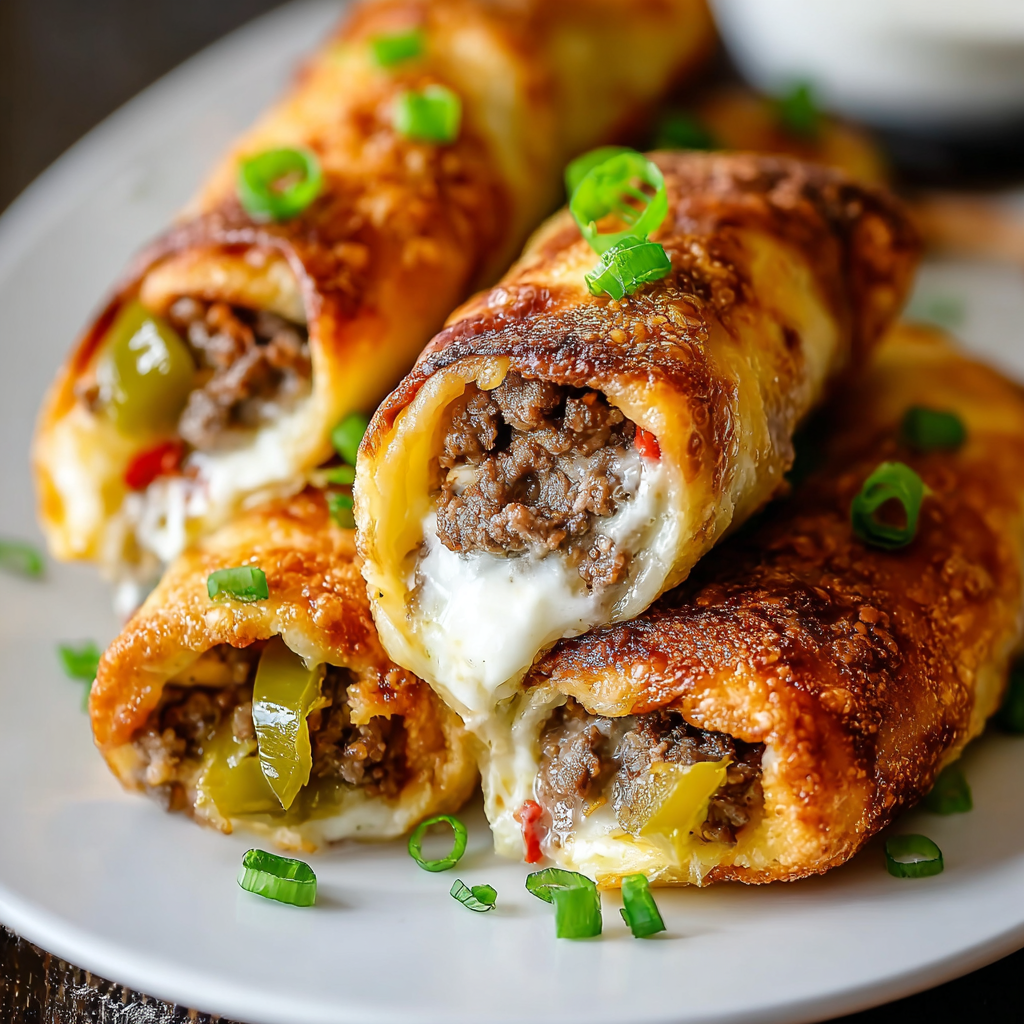
- Deliciously Savory & Cheesy: Imagine tender ground beef, melted Monterey Jack cheese, and soft cream cheese all wrapped into a crispy, cheesy shell—this recipe hits all the flavor notes you crave.
- Low-Carb & Keto-Friendly: With only 4g net carbs per serving, these roll-ups are perfect for maintaining ketosis without sacrificing flavor or satisfaction.
- Quick & Easy to Make: In just 25 minutes, you can whip up these savory roll-ups, making them ideal for busy weeknights or last-minute gatherings.
- Versatile & Fun to Serve: Whether as a snack, appetizer, or main course, these roll-ups are adaptable and guaranteed to impress your family and friends.
Introduction: Make Your Taste Buds Dance with Keto Philly Cheesesteak Roll-Ups!
Are you craving a hearty, cheesy, meaty treat that won’t derail your keto goals? Say hello to Keto Philly Cheesesteak Roll-Ups—the perfect fusion of classic Philly cheesesteak flavors wrapped in a crispy, cheesy shell that’s as fun to eat as it is delicious! These roll-ups are like a flavor-packed party in your mouth, combining tender ground beef, colorful peppers, and melty cheeses into a portable, low-carb package. Whether you’re looking for a quick snack, a satisfying dinner, or a crowd-pleasing appetizer, these roll-ups are your new best friend. So, roll up your sleeves and get ready to indulge in a cheesy, savory adventure that’s keto-approved and irresistibly tasty!
Ingredients with Measurements
- 2 cups Monterey Jack cheese (shredded)
- 16 ounces ground beef (80/20 blend)
- 1/2 medium onion, sliced thin
- 1 bell pepper, sliced (any color)
- 1 teaspoon Worcestershire sauce
- 4 ounces cream cheese, softened
- Salt & black pepper, to taste
Step-by-Step Instructions: How to Make Keto Philly Cheesesteak Roll-Ups
Step 1: Prepare Your Ingredients
Start by slicing your onion and bell pepper into thin strips—think of them as the colorful ribbons that will add crunch and sweetness to your filling. Divide the shredded Monterey Jack cheese into 8 equal parts; this will be used to create the crispy cheese shells. Cube the softened cream cheese into small chunks to facilitate melting later on.
Step 2: Cook the Beef and Vegetables
Heat a skillet over medium-high heat. Add the ground beef and cook for about 3-4 minutes until browned, breaking it apart with a spatula. Toss in the sliced onions and peppers, cooking for an additional 7-10 minutes until they soften and develop a slight caramelization. Drain any excess fat to keep things tidy and prevent sogginess.
Step 3: Add Flavor & Creaminess
Stir in the Worcestershire sauce, then add the cubed cream cheese, salt, and black pepper. Keep stirring until the cream cheese melts completely, creating a rich, cheesy filling that’s bursting with flavor. Remove from heat and set aside.
Step 4: Prepare the Cheese Shells
Preheat your oven to 350°F (175°C). Line a baking sheet with parchment paper. Using a spoon, spread 8 portions of shredded Monterey Jack cheese into 4-inch circles on the parchment. Bake for 8-10 minutes until the edges turn golden and crispy. Let the cheese circles cool slightly—they will be firm enough to handle but still pliable.
Step 5: Assemble & Roll
Once the cheese circles are cool enough to handle, place about 2 tablespoons of the beef and veggie filling on one edge of each. Gently roll the cheese around the filling, sealing the seam side down to keep everything together. Allow the roll-ups to cool completely so they set their shape.
Creative Presentation & Serving Ideas
- As a Handheld Snack: Serve these roll-ups as finger foods at parties or game nights. Arrange them on a platter with some dipping sauces like keto-friendly ranch or spicy mustard.
- As a Main Course: Pair with a side salad or roasted vegetables for a complete low-carb meal. You can also serve them with a side of cauliflower rice for added bulk.
- Stuffed & Garnished: For a fancy touch, top the roll-ups with chopped fresh herbs like parsley or chives. Drizzle with a little melted cheese or a keto-friendly sauce for extra flavor.
- Mini Sandwiches: Slice the roll-ups into smaller pieces and serve as sliders for a fun twist.
How to Store & How Long They Last
Store any leftovers in an airtight container in the refrigerator for up to 3 days. To reheat, simply microwave for 30-60 seconds or warm in a preheated oven at 350°F until heated through. For best results, reheat gently to maintain the crispy cheese shell and prevent melting or sogginess.
FAQs About Keto Philly Cheesesteak Roll-Ups
- Can I use different cheeses? Absolutely! Cheddar, mozzarella, or a blend of your favorite keto-friendly cheeses work well.
- Are these suitable for meal prep? Yes! Prepare the cheese shells and filling ahead of time, then assemble and reheat when ready to serve.
- Can I make these vegetarian? Yes, substitute the ground beef with sautéed mushrooms, tofu, or plant-based crumbles for a vegetarian version.
- How many carbs are in each roll-up? Each serving contains approximately 8g total carbs and 4g net carbs.
- Can I freeze these? It’s best to freeze the assembled roll-ups before baking. Wrap tightly and store for up to 1 month. Reheat thoroughly before serving.
- What if I don’t have parchment paper? You can lightly grease a baking sheet or use silicone baking mats as an alternative.
- Are these spicy? Not inherently, but you can add hot sauce or jalapeños to the filling for a spicy kick.
- Can I make these ahead of time? Yes, assemble the roll-ups and refrigerate for up to 24 hours before baking and serving.
- What side dishes go well with these? Keto-friendly options include cauliflower rice, roasted broccoli, or a fresh green salad.
- Are these suitable for kids? Yes! They’re cheesy, flavorful, and fun to eat—perfect for family dinners or parties.
Now that you have the full scoop on making and enjoying Keto Philly Cheesesteak Roll-Ups, it’s time to get cooking! These low-carb, cheesy delights are sure to become a staple in your keto recipe arsenal. Happy rolling!
Keto Philly Cheesesteak Roll-Ups
Equipment
- Baking Sheet
- Parchment Paper
- Skillet
Ingredients
- 2 cups Monterey Jack cheese shredded
- 16 ounces Ground beef 80/20 blend
- 0.5 medium Medium onion sliced thin
- 1 whole Bell pepper sliced, any color
- 1 teaspoon Worcestershire sauce
- 4 ounces Cream cheese softened
- Salt & black pepper to taste
Instructions
- Prepare the ingredients by slicing the onion and bell pepper into thin strips. Divide the shredded Monterey Jack into 8 equal parts and cube the cream cheese for easy melting.
- Heat a skillet over medium-high heat, add ground beef, and cook for 3-4 minutes until browned. Incorporate the sliced onions and peppers, cooking for 7-10 minutes until soft. Drain excess fat, then stir in Worcestershire sauce, cubed cream cheese, salt, and pepper until the cheese melts. Remove from heat.
- Preheat your oven to 350°F (175°C) and line a baking sheet with parchment paper. Spread 8 portions of shredded cheese into 4-inch circles on the paper. Bake for 8-10 minutes until golden around the edges.
- Allow the cheese circles to cool slightly, then place about 2 tablespoons of filling on one edge of each. Gently roll into logs, seam side down, and let them cool completely to set their shape.