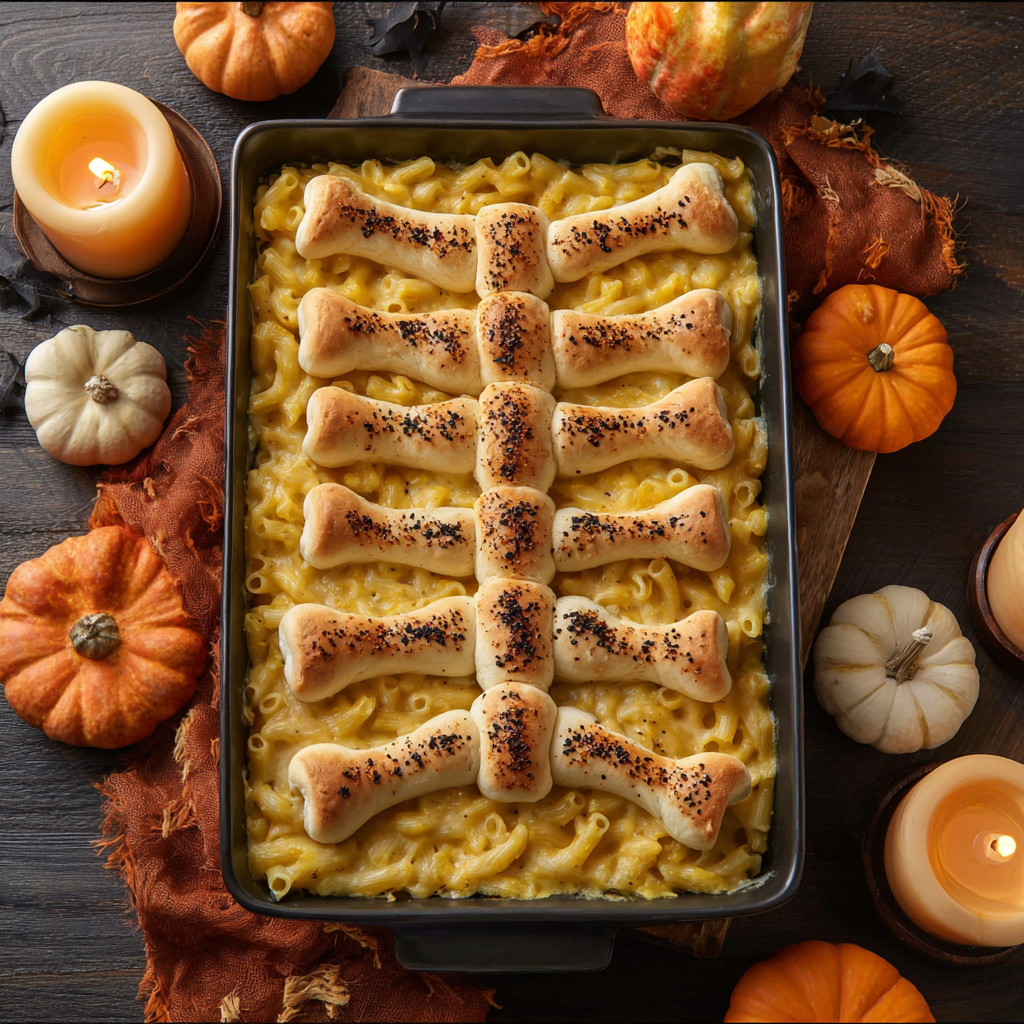
Are you ready to transform your dinner table into a scene of delicious, wholesome, and delightfully spooky fun? Forget the same old weeknight meals. We’re about to introduce you to a culinary creation that’s as charmingly quirky as it is incredibly tasty: Rib Cage Mac & Cheese! Imagine a golden, creamy bed of classic comfort, topped with perfectly baked, bone-shaped crescents. It’s a whimsical twist that’s guaranteed to get smiles, especially from the little ghouls and goblins in your life. This isn’t just mac and cheese; it’s an edible work of art that makes healthy eating a playful adventure. Get ready to stir up some magic in your kitchen!
Why You’ll Love This Rib Cage Mac & Cheese Recipe
- It’s “Bone-Afide” Fun! Who knew dinner could be this exciting? The unique rib cage design isn’t just a gimmick; it turns a simple meal into an interactive, imaginative experience. Perfect for themed parties, Halloween, or just a Tuesday night when you need a giggle.
- A Healthier Comfort Food Twist: We’ve taken a classic, hearty dish and added a creative element that encourages healthier eating habits. Plus, using whole milk and quality cheese provides essential nutrients, making this comfort food you can feel good about serving.
- Kid-Friendly & Engaging: This recipe is a fantastic way to involve children in the kitchen. They’ll love shaping the “bones” and watching their edible masterpiece come to life in the oven. It’s a guaranteed way to get even the pickiest eaters to gobble up their dinner!
- Surprisingly Simple & Quick: Despite its impressive appearance, this Rib Cage Mac & Cheese is a breeze to make! With just 15 minutes of prep and 25 minutes of cook time, you can have a show-stopping meal on the table in under an hour. It’s the ultimate recipe for busy parents and creative cooks alike.
Ingredients for Your Rib Cage Mac & Cheese
- 🧀 6 cups cooked macaroni pasta
- 🧈 3 tbsp butter
- 🌾 3 tbsp all-purpose flour
- 🥛 3 cups whole milk
- 🧀 3 cups shredded cheddar (or cheddar/jack mix)
- 🧄 1/2 tsp garlic powder
- 🧂 Salt and pepper to taste
- 🥐 1 can refrigerated crescent roll dough (seamless preferred)
- 🥚 Optional: 1 beaten egg (for egg wash)
- 🌱 Optional: black sesame seeds or smoked paprika for decoration
Detailed Step-by-Step Directions for Rib Cage Mac & Cheese
Let’s get cooking! This Rib Cage Mac & Cheese comes together faster than you can say “bone appetite!”
- Preheat & Prepare: First things first, fire up your oven to a cozy 375°F (190°C). While it’s warming up, give a 9×13-inch baking dish a light greasing – a little butter or cooking spray will do the trick.
- Whip Up the Wicked Good Cheese Sauce: In a large saucepan, melt your butter over medium heat. Once it’s shimmering, whisk in the flour and cook for about 1 minute, stirring constantly, to create a smooth roux. Now, gradually pour in the milk, whisking continuously to avoid lumps. Bring it to a gentle simmer, letting it thicken beautifully. Reduce the heat, then stir in your shredded cheese, garlic powder, salt, and pepper. Keep stirring until that cheese is gloriously melted and your sauce is velvety smooth.
- Combine & Pour: Add your cooked macaroni pasta directly into the irresistible cheese sauce. Give it a good stir until every noodle is coated in cheesy goodness. Then, pour this delightful mix into your prepared baking dish, spreading it out evenly.
- Craft Your Crescents (The “Ribs”): Carefully unroll your crescent dough onto a lightly floured surface. If your dough has perforations, gently press the seams together to create a solid sheet. Now, channel your inner sculptor! Use a knife or pizza cutter to slice the dough into 8-10 strips, each about 1 inch wide.
- Shape Those Bones: Take each strip and gently shape it into an arch, resembling a rib bone. For a realistic touch, taper the ends slightly and make some “middle ribs” a bit larger and the “end ribs” smaller. Have fun with it!
- Assemble the Rib Cage: Artfully arrange your crescent “ribs” over the mac and cheese, spacing them about 1 inch apart. Gently press the edges of each crescent into the mac and cheese to help them stay put. If you’re using an egg wash, brush the tops of your “ribs” now for extra golden shine.
- Decorate (Optional, but Fun!): For that ultimate bone-like appearance, sprinkle with black sesame seeds (they look like bone specks!), a dusting of smoked paprika for a rustic touch, or even a tiny bit of edible charcoal powder if you’re feeling extra dramatic.
- Bake to Perfection: Pop the dish into your preheated oven and bake uncovered for 20–25 minutes. You’re looking for beautifully golden-brown crescent ribs and bubbly, warm mac and cheese.
- Cool & Serve: Once out of the oven, let your masterpiece cool for 5–10 minutes. This allows the mac and cheese to set slightly and prevents burned tongues. Then, dig in and enjoy your spectacularly fun Rib Cage Mac & Cheese!
Creative Presentation and Serving Ideas for Rib Cage Mac & Cheese
This Rib Cage Mac & Cheese is a showstopper on its own, but with a few creative touches, you can elevate its presentation from fun to absolutely unforgettable!
- Individual Portions, Big Impact: Instead of one large dish, try baking your mac and cheese in individual oven-safe ramekins. Top each with one or two crescent “ribs” for a personalized, adorable presentation that’s perfect for parties.
- Graveyard Greens: Serve your “Rib Cage Mac & Cheese” alongside a simple green salad. You can get playful with the salad by using dark leafy greens and adding some “tombstone” croutons (cut bread into rectangles and toast) or “worm” cucumber ribbons.
- Spooky Sides: For a Halloween twist, pair it with “mummy” hot dogs (hot dogs wrapped in crescent strips), “witch finger” pretzels, or even a side of “blood” tomato soup for dipping.
- Dipping Sauces: Offer small bowls of various dipping sauces for the crescent ribs – maybe a spicy sriracha mayo for the adults or a sweet honey mustard for the kids.
- Herbaceous Garnish: A sprinkle of fresh chopped parsley or chives after baking can add a vibrant pop of color, making the dish look even more appealing.
- Thematic Plating: If serving on individual plates, place a generous scoop of the mac and cheese, then carefully arrange a few “ribs” on top or beside it. Add a side of steamed green beans or broccoli, which can playfully resemble “grass” or “shrubs” around the rib cage.
Storage and Longevity of Your Rib Cage Mac & Cheese
Got leftovers of your delicious Rib Cage Mac & Cheese? No problem! Here’s how to store it to keep the fun going:
- Refrigeration: Allow the mac and cheese to cool completely before transferring it to an airtight container. Store it in the refrigerator for up to 3-4 days. The crescent “ribs” might lose a bit of their crispness, but they’ll still be tasty.
- Reheating: For best results, reheat individual portions in the microwave until warmed through. You can also reheat larger portions in the oven at 300°F (150°C) until hot, covering with foil to prevent the crescents from drying out too much. A splash of milk can help revive the creaminess of the mac and cheese if it seems a bit dry.
- Freezing (Mac & Cheese Only): While the mac and cheese itself freezes well (up to 2-3 months in an airtight container), we generally don’t recommend freezing the assembled dish with the crescent ribs. The dough can become soggy and lose its texture upon thawing and reheating. If you want to freeze, consider making a batch of just the mac and cheese, and add fresh crescent ribs when you’re ready to bake and serve. Thaw frozen mac and cheese in the refrigerator overnight before reheating.
Rib Cage Mac & Cheese: Your FAQs Answered!
- Is this Rib Cage Mac & Cheese truly “healthy”? It’s a healthier *twist* on classic comfort food, focusing on fun and engagement to encourage eating. While it still contains dairy and carbs, it’s prepared with wholesome ingredients and can be part of a balanced meal.
- Can I use different types of cheese? Absolutely! A mix of Gruyère, Monterey Jack, or even a smoky Gouda can add wonderful depth to your Rib Cage Mac & Cheese.
- What if I can’t find seamless crescent roll dough? No worries! If your dough is perforated, just unroll it and firmly press the perforations together with your fingers to create a solid sheet before cutting the strips.
- Can I make this recipe gluten-free? Yes! Use gluten-free macaroni pasta and a gluten-free all-purpose flour for the roux. For the crescent rolls, you would need to find a gluten-free puff pastry or crescent dough alternative.
- My kids are picky. Will they really eat this? The fun, visual appeal of the “ribs” often sparks curiosity and makes kids more willing to try it. Getting them involved in shaping the bones helps too!
- Can I prepare any part of this ahead of time? You can make the cheese sauce and cook the pasta a day in advance and store them separately in the fridge. Assemble and bake just before serving for the freshest results.
- How do I make the “ribs” look more realistic? Taper the ends of your dough strips to be thinner than the middle. You can also slightly curve some strips more than others for variety.
- Can I add vegetables to the mac and cheese? Definitely! Stir in some finely chopped cooked broccoli, peas, or diced carrots with the pasta for added nutrition and color.
- What if the crescent rolls brown too quickly? If your “ribs” are getting too dark before the mac and cheese is fully heated, loosely tent the baking dish with aluminum foil.
- Is this suitable for a party or potluck? Yes! This Rib Cage Mac & Cheese is a fantastic dish for parties or potlucks. Its unique appearance makes it a memorable conversation starter, and it’s always a crowd-pleaser!
“`
Rib Cage Mac & Cheese
Equipment
- 9×13 inch Baking Dish
- Large saucepan
Ingredients
For the Mac & Cheese
- 6 cups cooked macaroni pasta
- 3 tbsp butter
- 3 tbsp all-purpose flour
- 3 cups whole milk
- 3 cups shredded cheddar or cheddar/jack mix
- 0.5 tsp garlic powder
- Salt and pepper to taste
For the Rib Bones
- 1 can refrigerated crescent roll dough seamless preferred
- 1 beaten egg Optional, for egg wash
- black sesame seeds or smoked paprika Optional, for decoration
Instructions
- Preheat your oven to 375°F and lightly grease a 9×13-inch baking dish.
- Prepare the cheese sauce: melt butter in a large saucepan, whisk in flour, cook for 1 minute. Gradually add milk, simmer until thickened. Stir in cheese, garlic powder, salt, and pepper until smooth.
- Mix the cooked pasta with the cheese sauce, then pour into the prepared dish, smoothing the surface.
- Unroll the crescent dough onto a floured surface, cut into 8-10 strips about 1 inch wide. If perforated, press seams together first.
- Shape each strip into an arch resembling a rib bone, tapering ends for realism. Larger middle ribs, smaller ends.
- Arrange crescent “ribs” evenly over the mac and cheese, about 1 inch apart, pressing edges into the dish. Brush with beaten egg if desired.
- Sprinkle with black sesame seeds, paprika, or edible charcoal for a bone-like appearance.
- Bake uncovered for 20–25 minutes until golden and cooked through.
- Allow to cool 5–10 minutes before serving.