Tired of the same old soggy cereal or bland toast for breakfast? Imagine biting into a symphony of flavors and textures that wakes up your taste buds and brightens your morning, no matter the season. If you’re craving something extraordinary, something that screams “good vibes” from the first crunch, then get ready to meet your new breakfast obsession: the Summer Sunshine Breakfast Crunchwrap! This isn’t just a meal; it’s a culinary hug wrapped in a golden tortilla, packed with savory goodness, and kissed with a zesty secret sauce. Forget complicated culinary endeavors; this recipe brings all the excitement of a gourmet brunch right to your kitchen, in a fraction of the time. Get ready to transform your mornings from mundane to magnificent with every delightful bite!
Why You’ll Love This Recipe
The Summer Sunshine Breakfast Crunchwrap isn’t just another recipe; it’s an experience designed to make your mornings brighter and more delicious. Here are four irresistible reasons why this will become your go-to breakfast:
- A Flavor Fiesta in Every Bite: Prepare your palate for an explosion! From the tangy kick of the zesty Sriracha sauce to the smoky crunch of bacon, the fluffy eggs, and the satisfying crispiness of hash browns, every layer in this crunchwrap contributes to a harmonious blend of tastes and textures. It’s sweet, savory, a little spicy, and utterly addictive!
- Your Healthier Morning Hero: Who said delicious can’t be wholesome? We’ve swapped in light mayonnaise, sugar-free ketchup, lean bacon (or turkey bacon), whole-wheat tortillas, and air-fried hash browns to make your Summer Sunshine Breakfast Crunchwrap a guilt-free indulgence. You get all the flavor without compromising your wellness goals, making it a smart start to any day.
- Wickedly Quick & Easy: Don’t let its impressive appearance fool you – this crunchwrap is a breeze to whip up! With a prep time of just 10 minutes and a cook time of 3 minutes per crunchwrap, you can have a gourmet-level breakfast on your table in under 15 minutes. It’s perfect for busy weekdays or a leisurely weekend brunch where you want maximum flavor with minimum fuss.
- Endlessly Customizable Fun: One of the best parts about the Summer Sunshine Breakfast Crunchwrap is its versatility. Craving more veggies? Add spinach or bell peppers. Want a different cheese? Go for pepper jack! Feeling adventurous? Try avocado slices or black beans. This recipe is a fantastic canvas for your culinary creativity, ensuring every crunchwrap is perfectly tailored to your cravings.
Ingredients with Measurements
Gather your sunshine-infused ingredients and let’s get cooking! The beauty of the Summer Sunshine Breakfast Crunchwrap lies in its simple yet powerful components:
- 🥑 ¼ cup light mayonnaise
- 🍅 1 tablespoon sugar-free ketchup
- 🌶️ ½ tablespoon Sriracha sauce (or your favorite hot sauce, adjust to your spice preference)
- 🧄 ¼ teaspoon garlic powder
- 🧂 A pinch of salt and black pepper
- 🥓 4 lean bacon slices (or turkey bacon for a healthier twist)
- 🥔 2 crispy hash brown patties (air-fried or baked for less oil, aim for maximum crunch!)
- 🥚 3 large eggs (or egg whites for lower fat/cholesterol)
- 🌮 2 large whole-wheat flour tortillas (burrito size, for sturdy wrapping)
- 🧀 ½ cup low-fat shredded cheddar cheese (or Monterey Jack for a creamier melt)
- 🍅 Diced tomatoes (optional, for a burst of fresh juiciness)
- 🧅 Diced onions (optional, for extra aromatic flavor)
- 🌿 Fresh cilantro, chopped (optional, for a hint of refreshing herb)
Detailed Step-by-Step Directions on How to Make the Recipe
Creating your perfect Summer Sunshine Breakfast Crunchwrap is an exciting and straightforward journey. Follow these easy steps to bring this masterpiece to life:
- Whip up the Zesty Sauce: In a small bowl, combine the light mayonnaise, sugar-free ketchup, Sriracha, garlic powder, a pinch of salt, and a dash of black pepper. Whisk everything until it’s smooth and beautifully blended. This secret sauce is the heart of your crunchwrap’s vibrant flavor, so set it aside.
- Crisp the Fillings: Cook your bacon slices in a skillet until they are wonderfully crispy. Once done, transfer them to a plate lined with paper towels to drain any excess fat. In the same skillet (or a clean one if preferred), cook your hash brown patties until they achieve a glorious golden-brown color and irresistible crunch. Set both crispy delights aside.
- Scramble the Eggs: Grab a separate non-stick skillet and gently scramble your eggs (or egg whites) over medium heat. Stir them occasionally until they are light, fluffy, and perfectly cooked through. Season with a quick dash of salt and pepper to taste, then set them aside.
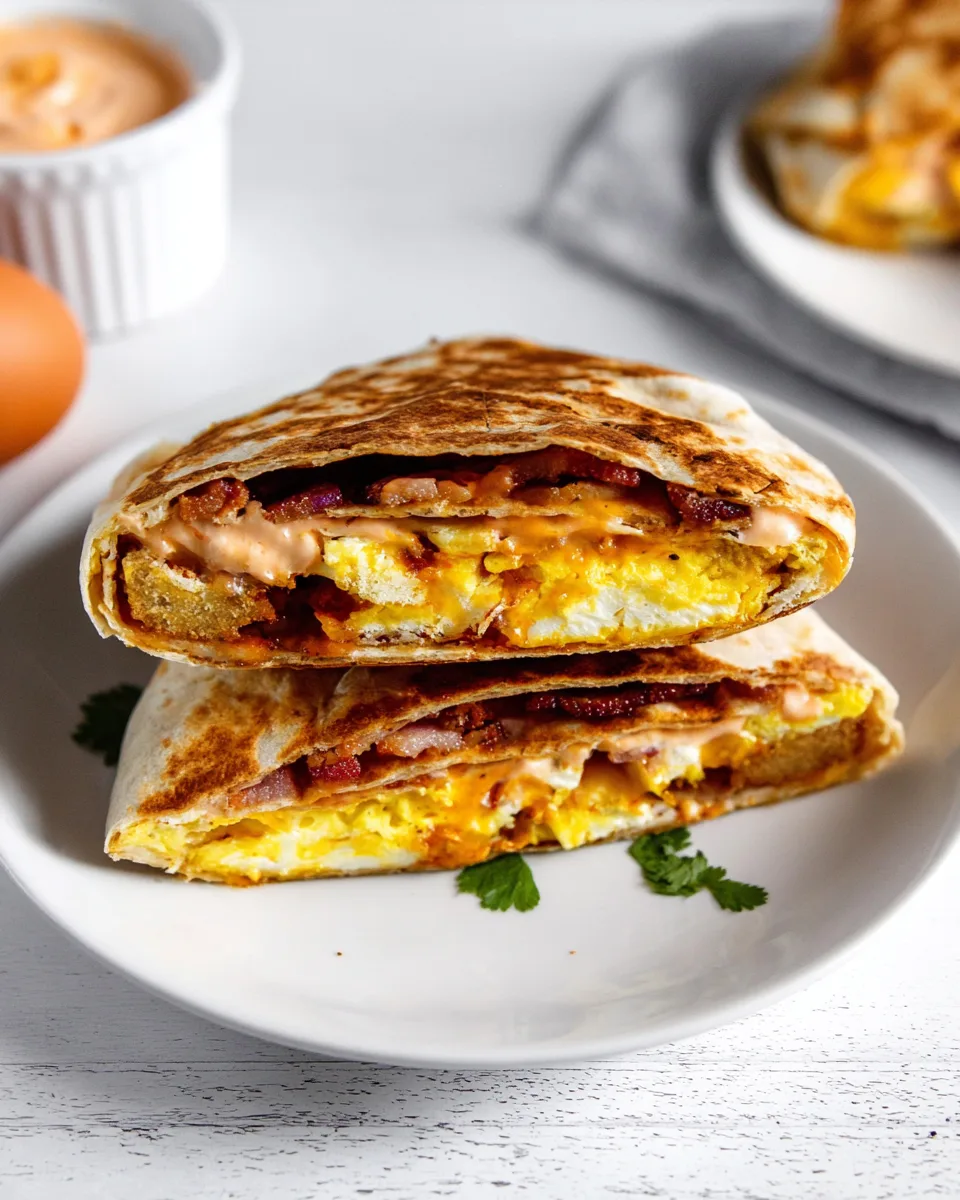
- Build Your Crunchwrap: Lay one large whole-wheat tortilla flat on a clean, dry surface. Take a tablespoon of your zesty sauce and spread it generously into the very center of the tortilla.
- Layer the Goodness: Now for the fun part! Artfully stack one slice of crispy bacon, a portion of your fluffy scrambled eggs, one golden hash brown patty, and a sprinkle of low-fat shredded cheese right on top of the sauce. If you’re using them, now’s the time to add your fresh diced tomatoes, onions, and cilantro for an extra pop of flavor and nutrients!
- Fold it Up: This is where the crunchwrap gets its iconic shape! Carefully begin folding the edges of the tortilla inwards over the filling. Work your way around the circle, creating neat, overlapping folds until you form a hexagonal package that completely encloses the filling. Press down gently to secure.
- Toast to Perfection: Heat a large skillet or griddle over medium-high heat. Give it a light spray with non-stick cooking spray. Carefully place your folded crunchwrap, seam-side down, onto the hot surface. Cook for approximately 3-4 minutes, or until the bottom is beautifully golden brown and deliciously crispy.
- Flip and Finish: With a gentle hand (and a spatula!), carefully flip the crunchwrap over. Cook for another 3-4 minutes on the second side until it too is golden and crisp. Repeat the entire building and toasting process for your second Summer Sunshine Breakfast Crunchwrap.
- Serve and Savor: Remove your perfectly toasted crunchwraps from the skillet. Let them cool slightly for a minute or two to avoid burning your tongue and allow the cheese to set. Then, slice them in half or quarters. Serve immediately and savor every glorious, crunchy, flavorful bite! Don’t forget to offer extra zesty sauce for dipping!
Detailed Different Ways You Can Present the Recipe and How to Serve It
The Summer Sunshine Breakfast Crunchwrap is a visual delight as much as it is a culinary one! Presenting it beautifully enhances the eating experience. Here are some fun and appealing ways to serve your creation:
- The Classic Cut: After resting for a minute or two, slice your crunchwrap in half diagonally, or into quarters like a pizza. This reveals the beautiful layers inside and makes it easy to handle. Arrange the halves on a plate, perhaps slightly fanned out, to showcase the colorful fillings.
- Sauce on the Side: Always offer a small ramekin or bowl of extra zesty sauce for dipping. This allows everyone to customize their flavor intensity and adds an interactive element to the meal. A drizzle of hot sauce or a dollop of guacamole could also be offered.
- Brunch Board Bonanza: For a weekend brunch, create a stunning spread! Place your sliced crunchwraps on a large wooden board alongside fresh fruit (berries, melon, orange slices), a small bowl of Greek yogurt, and maybe some sliced avocado. This makes for a vibrant and inviting presentation.
- Sidekick Salad: Pair your savory crunchwrap with a simple, refreshing side salad. A light spring mix with a citrus vinaigrette or a fresh cucumber and tomato salad would provide a lovely contrast and add more greens to your meal.
- Mini Crunchwrap Bites: For appetizers or a party spread, you can make smaller versions! Use smaller street taco-sized tortillas, or cut larger tortillas into rounds, and build individual mini crunchwraps. Cut these into bite-sized pieces for easy grabbing. They make fantastic finger foods for any gathering.
- Coffee & Juice Companions: Serve your Summer Sunshine Breakfast Crunchwrap with a steaming cup of coffee, a refreshing glass of orange juice, or a smoothie for a complete and satisfying breakfast experience. The drink complements the crunchwrap perfectly, whether you’re starting your day or enjoying a leisurely meal.
How You Can Store It and How Long Does It Last
While the Summer Sunshine Breakfast Crunchwrap is best enjoyed fresh off the skillet when it’s at its crispiest, you can certainly store leftovers for another delightful meal! Here’s how to do it effectively:
- Refrigeration: If you have any crunchwraps left, allow them to cool completely to room temperature. This is crucial to prevent condensation, which can make them soggy. Once cool, wrap each crunchwrap individually in plastic wrap or aluminum foil, then place them in an airtight container. Store them in the refrigerator for up to 2-3 days.
- Reheating for Optimal Crispness:
- Skillet Method (Recommended): This is the best way to regain that satisfying crunch! Heat a non-stick skillet over medium heat (no oil needed if it’s already non-stick, or a tiny spray of cooking oil). Place the refrigerated crunchwrap directly in the skillet and cook for 3-5 minutes per side, or until heated through and crispy again.
- Air Fryer Method: For quick crisping, preheat your air fryer to 350°F (175°C). Place the crunchwrap in the basket (you might need to do one at a time) and air fry for 5-7 minutes, flipping halfway, until hot and crispy.
- Oven Method: Preheat your oven to 375°F (190°C). Place the crunchwrap on a baking sheet and bake for 10-15 minutes, flipping halfway, until heated through and the tortilla is crisp.
- Microwave (Least Recommended for Crispiness): While you can microwave it for 60-90 seconds until hot, be aware that the tortilla will likely lose its crispiness and become soft. This method is best if you’re solely focused on reheating quickly.
- Freezing (Use with Caution): While technically possible, freezing the Summer Sunshine Breakfast Crunchwrap is not ideal due to the hash brown patty, which can become mushy when thawed and reheated. The overall texture will be significantly compromised. If you must freeze, wrap individually in foil, then place in a freezer-safe bag for up to 1 month. Reheat from frozen in an oven or air fryer for longer (20-30 minutes), aiming to crisp it up as much as possible.
FAQs Sections
1. Can I make the Summer Sunshine Breakfast Crunchwrap vegetarian?
Absolutely! To make it vegetarian, simply omit the bacon. You can replace it with sautéed mushrooms, bell peppers, spinach, or even a veggie sausage patty for extra protein and flavor. The crunchwrap will still be incredibly delicious and satisfying.
2. What if I don’t have Sriracha sauce?
No problem! You can use any hot sauce you prefer, such as Tabasco, Frank’s RedHot, or a dash of cayenne pepper for heat. Adjust the amount to your spice preference. If you don’t like spice, you can simply omit the hot sauce from the zesty blend.
3. Can I use regular flour tortillas instead of whole-wheat?
Yes, you can. Regular flour tortillas will work just fine. Whole-wheat tortillas offer a slightly healthier option with more fiber, but the recipe is flexible enough for you to use your preferred type of burrito-sized tortilla.
4. How can I make my crunchwrap spicier or milder?
To make it spicier, increase the amount of Sriracha (or other hot sauce) in the zesty sauce. You can also add a pinch of red pepper flakes to your eggs or sprinkle some sliced jalapeños into the crunchwrap. For a milder version, simply reduce or completely omit the Sriracha from the sauce.
5. Can I prep some ingredients ahead of time?
Yes, absolutely! You can cook the bacon and hash browns ahead of time and store them in the fridge. The zesty sauce can also be made a day or two in advance and kept refrigerated. This makes assembling your Summer Sunshine Breakfast Crunchwrap even quicker on busy mornings.
6. What other types of cheese work well in this crunchwrap?
Besides cheddar and Monterey Jack, pepper jack cheese will add a nice kick, Swiss cheese offers a nutty flavor, or a Mexican blend would melt beautifully. Feel free to experiment with your favorite melty cheese to customize the flavor.
7. Is the Summer Sunshine Breakfast Crunchwrap suitable for meal prep?
Yes, to an extent! You can prep the individual components (cooked bacon, hash browns, scrambled eggs, and sauce) at the beginning of the week. Store them separately in airtight containers. Then, simply assemble and toast a fresh crunchwrap each morning for optimal crispiness.
8. How do I prevent my crunchwrap from getting soggy?
The key is to toast it thoroughly on both sides until golden and crispy. Also, if you’re adding very juicy ingredients like fresh tomatoes, you might want to pat them dry slightly before adding them. If storing leftovers, ensure they cool completely before wrapping and refrigerating.
9. Can I bake the crunchwrap instead of pan-frying it?
Yes! To bake, preheat your oven to 400°F (200°C). Place the assembled crunchwraps on a baking sheet (seam-side down) and bake for about 15-20 minutes, flipping halfway through, until golden brown and crispy. This method is great if you’re making a larger batch.
10. What’s the best way to cut the Summer Sunshine Breakfast Crunchwrap?
After letting it cool slightly for a minute or two (to prevent the filling from spilling), use a sharp serrated knife to cut it diagonally in half, or into quarters like a pizza. This allows for easy handling and showcases the delicious layers inside.
Summer Sunshine Breakfast Crunchwrap ☀️
Equipment
- Small Bowl
- Skillet
- Non-Stick Skillet
- Paper Towels
Ingredients
Zesty Sauce
- 1/4 cup light mayonnaise
- 1 tablespoon sugar-free ketchup
- 1/2 tablespoon Sriracha sauce (or your favorite hot sauce)
- 1/4 teaspoon garlic powder
- pinch salt
- pinch black pepper
Crunchwrap Fillings
- 4 slices lean bacon (or turkey bacon for a healthier twist)
- 2 crispy hash brown patties (air-fried or baked for less oil)
- 3 large eggs (or egg whites for lower fat/cholesterol)
- 2 large whole-wheat flour tortillas (burrito size)
- 1/2 cup low-fat shredded cheddar cheese (or Monterey Jack)
- Diced tomatoes (optional, for freshness)
- Diced onions (optional, for extra flavor)
- Fresh cilantro, chopped (optional, for a hint of herb)
Instructions
- 1. Whip up the Zesty Sauce: In a small bowl, whisk together the light mayonnaise, sugar-free ketchup, Sriracha, garlic powder, salt, and pepper until smooth. Set it aside for later.
- 2. Crisp the Fillings: Cook the bacon until delightfully crispy, then pat it dry on paper towels to remove any excess fat. In the same skillet (or a clean one), cook the hash brown patties until golden and crunchy. Set both aside.
- 3. Scramble the Eggs: In a separate non-stick skillet, gently scramble your eggs (or egg whites) until they're light and fluffy. Season with a dash of salt and pepper.
- 4. Build Your Crunchwrap: Lay a whole-wheat tortilla flat on a clean surface. Spoon a tablespoon of your zesty sauce into the center.
- 5. Layer the Goodness: Stack one slice of crispy bacon, a portion of fluffy scrambled eggs, a golden hash brown patty, and a sprinkle of low-fat shredded cheese. If you like, add some fresh diced tomatoes, onions, and cilantro for extra flavor and nutrients!
- 6. Fold it Up: Carefully fold the edges of the tortilla inwards over the filling, working your way around to create a neat hexagonal package with overlapping folds.
- 7. Toast to Perfection: Heat a large skillet or griddle over medium-high heat and give it a quick spray with non-stick spray. Place the crunchwrap, folded-side down, onto the hot surface. Cook for about 3-4 minutes until the bottom is beautifully golden and crispy.
- 8. Flip and Finish: Gently flip the crunchwrap and cook for another 3-4 minutes until the other side is also golden and crisp. Repeat with your second crunchwrap.
- 9. Serve and Savor: Remove from the skillet, let cool slightly, then slice in half or quarters. Enjoy your easy, healthy, and delicious homemade breakfast crunchwrap with extra sauce for dipping!