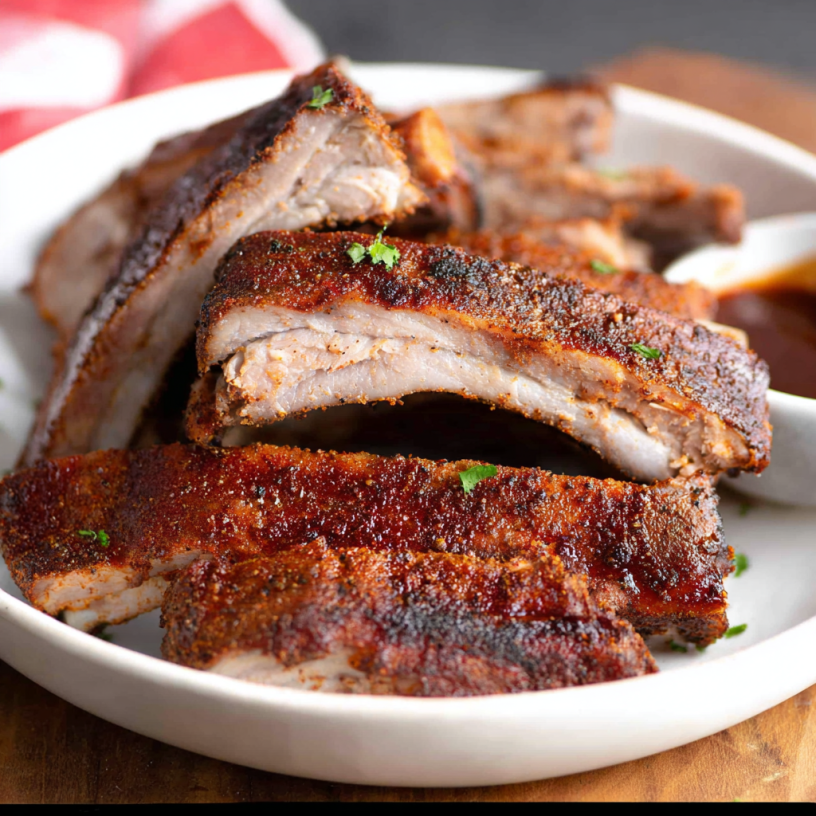
Ever find yourself dreaming of tender, smoky ribs, but think they’re too much work for a weeknight? Or maybe you’re on a low-carb journey and miss that quintessential BBQ flavor? Well, get ready to have your mind (and taste buds!) blown, because we’re diving headfirst into the world of incredibly flavorful, fall-off-the-bone **Dry Rub Ribs** that are shockingly easy to make at home. Forget sticky messes and complicated smokers; this recipe delivers restaurant-quality results right from your oven, finished with a quick sear for that perfect crisp. Prepare for a culinary adventure that’s as delicious as it is simple!
Why You’ll Love These Dry Rub Ribs
There are countless reasons to adore this incredible recipe, but here are four top contenders that will have you preheating your oven in no time:
- Explosion of Flavor: Our meticulously crafted dry rub combines classic spices with a fiery kick, penetrating deep into the meat to create layers of savory, slightly spicy, and utterly addictive flavor without a drop of sugar.
- Fall-Off-The-Bone Tenderness: The magic of slow baking, tightly covered with foil and a little water, creates a steamy environment that transforms tough ribs into meltingly tender perfection. They’ll practically slide off the bone!
- Keto & Low-Carb Friendly: This recipe is a dream come true for anyone following a low-carb or ketogenic lifestyle. Enjoy rich, satisfying BBQ flavors without the hidden sugars often found in store-bought sauces.
- Surprisingly Easy to Make: Don’t let the impressive results fool you – these ribs are incredibly straightforward. Most of the “work” is done by your oven, leaving you free to relax while dinner practically cooks itself.
Ingredients for Your Perfect Dry Rub Ribs
Gather these simple ingredients to create your masterpiece:
- 🧂 1 tablespoon kosher salt
- 🌶️ 1 tablespoon chili powder
- 🌶️ 1 tablespoon paprika
- 🧄 1 teaspoon garlic powder
- 🧅 1 teaspoon onion powder
- 🌿 1 teaspoon dried oregano
- ⚫ 1 teaspoon black pepper
- 🔥 1/4 teaspoon chipotle or cayenne powder (adjust to your heat preference!)
- 🐷 1 rack pork spare ribs (approx. 2.5-3 lbs)
- 💧 1 cup water
- 🥫 Sugar-Free BBQ Sauce, for serving (optional)
Detailed Directions: Crafting Your Dry Rub Ribs
- Get Ready & Preheat: Kick things off by preheating your oven to a robust 425°F (220°C). This initial high heat will help get the cooking process going quickly.
- Mix Your Magic Rub: In a small bowl or a shaker with a tight lid, combine all your dry rub spices: the kosher salt, chili powder, paprika, garlic powder, onion powder, dried oregano, black pepper, and your chosen chipotle or cayenne powder. Whisk or shake them until they are thoroughly blended. This aromatic mix is the heart of your delicious **Dry Rub Ribs**!
- Season Like a Pro: Pat your pork spare ribs dry with paper towels – this helps the rub adhere better. Now, generously sprinkle and rub the spice mixture all over both sides of the rack. Don’t be shy; ensure every nook and cranny is coated for maximum flavor penetration.
- Bake Until Melt-in-Your-Mouth Tender: Place the seasoned ribs in a large roasting pan. If your rack is too long, feel free to cut it in half to fit comfortably. Pour 1 cup of water into the bottom of the pan. This is key for creating steam, which leads to incredibly moist and tender ribs. Cover the pan very, very tightly with aluminum foil. No peeking! Bake for approximately 1 hour and 30 minutes, or until the meat is unbelievably tender and almost ready to fall right off the bone. Keep an eye on the water level towards the end; if it looks like it’s evaporating completely, add a splash more to prevent anything from burning.
- Finish with a Sizzling Sear: Once your ribs are gloriously tender, carefully remove them from the oven. Preheat your grill to high heat or set your oven broiler to high. Gently transfer the ribs to the hot grill grates or a broiler-safe pan. Cook for about 4 minutes per side, just until they develop a beautiful golden-brown crust and slight crispiness. This step adds texture and deepens the flavor. Watch them like a hawk to prevent any charring!
- Slice, Serve & Savor: If you’re using it, now is the perfect time to brush your cooked ribs with some sugar-free BBQ sauce – either just before or after grilling. Let the ribs rest for a few minutes, then slice them between the bones and serve immediately. Prepare for rave reviews!
Presenting & Serving Your Delicious Dry Rub Ribs
These **Dry Rub Ribs** are a showstopper on their own, but how you present and serve them can elevate the meal even further:
- Classic BBQ Platter: Serve whole or cut into two-bone portions alongside classic low-carb sides like a crunchy coleslaw (sugar-free dressing, of course!), a vibrant green side salad, or some roasted asparagus or broccoli. A dollop of cauliflower mash makes a fantastic stand-in for mashed potatoes.
- Appetizer Riblets: For a party or appetizer spread, slice the cooked ribs into individual riblets. Arrange them attractively on a platter with small bowls of sugar-free BBQ sauce for dipping.
- “Ribwich” Lettuce Wraps: For a super light and fun meal, pull the meat off the bones and serve it in large lettuce cups (like butter lettuce or romaine) with a sprinkle of fresh cilantro and a squeeze of lime.
- Garnish with Freshness: A sprinkle of fresh chopped parsley or cilantro not only adds a pop of color but also a fresh herbaceous note that complements the rich ribs beautifully. Lemon or lime wedges on the side offer a bright, acidic counterpoint.
Storage & Longevity for Your Dry Rub Ribs
Got leftovers? Lucky you! These **Dry Rub Ribs** are just as delicious the next day. Here’s how to store them:
- Refrigeration: Allow the ribs to cool completely to room temperature (this is crucial to prevent condensation and bacterial growth). Store them in an airtight container or wrap them tightly in aluminum foil in the refrigerator for up to 3-4 days.
- Freezing: For longer storage, wrap individual portions or the entire rack tightly in aluminum foil, then place them in a freezer-safe bag or container. They will last beautifully in the freezer for 2-3 months. Thaw overnight in the refrigerator before reheating.
- Reheating: To reheat, the best method is usually in the oven. Place the ribs in a baking dish with a splash of water or broth, cover tightly with foil, and bake at 300°F (150°C) until heated through (about 20-30 minutes). You can also briefly re-sear them on the grill or under the broiler for crispiness after reheating.
FAQs About Dry Rub Ribs
Here are some frequently asked questions to help you master these delicious **Dry Rub Ribs**:
- What type of ribs are best for this recipe?
This recipe uses pork spare ribs, which are meatier and richer. You can also use baby back ribs, but they are smaller and will likely cook a bit faster, so adjust your baking time accordingly (check for tenderness around 1 hour 15 minutes).
- Do I need to remove the membrane from the ribs?
Yes, absolutely! There’s a thin, tough membrane on the bone-side of the ribs. Removing it ensures a more tender bite and allows the rub’s flavors to penetrate better. To remove, simply slide a knife under a corner of the membrane, grip it with a paper towel, and pull it off.
- Can I make the dry rub ahead of time?
Definitely! You can mix the dry rub ingredients and store them in an airtight container for several weeks. This makes prep even faster on cooking day.
- Can I customize the dry rub spices?
Of course! The beauty of a dry rub is its versatility. Feel free to add a pinch of cumin for earthiness, some mustard powder for tang, or even a touch of smoked paprika for an extra layer of smoky flavor.
- What if I don’t have a grill for the searing step?
No grill? No problem! The broiler works perfectly. Just place the ribs on a broiler-safe pan and keep a very close eye on them, flipping once, as broilers can brown things quickly.
- How do I know when the ribs are truly “fall-off-the-bone” tender?
A good test is to gently twist a bone. If it wiggles loosely or starts to separate from the meat easily, they’re done. The meat should also have pulled back from the ends of the bones.
- Why do I add water to the pan during baking?
The water creates steam inside the tightly covered pan. This moist heat helps to break down the tough connective tissues in the ribs, resulting in incredibly tender, succulent meat without drying it out.
- Can I use a smoker for these ribs instead of the oven?
Yes, you can adapt this recipe for a smoker! Follow the same rub process, then smoke the ribs at around 225-250°F (107-121°C) for several hours until tender. You might still want to wrap them in foil for part of the cooking (the “Texas Crutch”) to ensure maximum tenderness.
- Are these ribs very spicy?
The 1/4 teaspoon of chipotle or cayenne powder provides a pleasant background warmth rather than an overpowering heat. If you prefer more spice, increase the amount to 1/2 teaspoon or more. For less heat, you can omit it entirely.
- Can I use this dry rub on other meats?
Absolutely! This versatile dry rub is fantastic on pork shoulder, chicken thighs or breasts, or even beef short ribs (though cooking times will vary significantly for different cuts).
Dry Rub Ribs 🍖
Equipment
- Roasting Pan
- Aluminum Foil
- Grill or Broiler
Ingredients
Dry Rub
- 1 tablespoon kosher salt
- 1 tablespoon chili powder
- 1 tablespoon paprika
- 1 teaspoon garlic powder
- 1 teaspoon onion powder
- 1 teaspoon dried oregano
- 1 teaspoon black pepper
- 1/4 teaspoon chipotle or cayenne powder
Other Ingredients
- 1 rack pork spare ribs (approx. 2.5-3 lbs)
- 1 cup water
- Sugar-Free BBQ Sauce for serving (optional)
Instructions
- Get Ready: Preheat your oven to a hot 425°F (220°C).
- Mix Your Rub: In a small bowl or shaker, combine all the dry rub spices (salt, chili powder, paprika, garlic powder, onion powder, oregano, black pepper, and chipotle/cayenne powder) until well mixed. This blend is full of flavor!
- Season the Ribs: Generously rub the spice mixture all over both sides of the pork spare ribs. Make sure they're fully coated for maximum taste.
- Bake Until Tender: Place the seasoned ribs in a large roasting pan (you might need to cut them in half to fit). Pour 1 cup of water into the pan, then cover it very tightly with aluminum foil. Bake for about 1 hour and 30 minutes, or until the meat is incredibly tender and nearly falling off the bone. Keep an eye on the water level; add a little more if it gets too low to prevent burning.
- Finish with a Sear: Once tender, carefully remove the ribs from the oven. Preheat your grill or broiler. Carefully transfer the ribs and cook for about 4 minutes per side, just until they're beautifully browned and slightly crispy. Watch them closely to prevent burning!
- Serve & Enjoy: If you like, brush your cooked ribs with some sugar-free BBQ sauce before or after grilling. These delicious ribs are now ready to be savored!