Indulge in Pure Bliss: Your New Favorite Chocolate Cake with Strawberry Filling Awaits!
Prepare your taste buds, because you’re about to embark on a delectable journey to create the ultimate dessert experience: a magnificent Chocolate Cake with Strawberry Filling! Forget those store-bought imitations; this homemade masterpiece is an irresistible symphony of deep, dark chocolate layers and a luscious, vibrant roasted strawberry filling, all enrobed in a dreamy chocolate cream cheese frosting. Whether you’re a seasoned baker or just dipping your toes into the world of homemade treats, this recipe is designed to be straightforward, fun, and utterly rewarding. Get ready to impress your friends, delight your family, and perhaps, just perhaps, keep a slice (or two!) all to yourself. Let’s bake some magic!
Why You’ll Love This Chocolate Cake with Strawberry Filling Recipe
- Unforgettable Flavor Combination: The rich, moist Dutch-processed chocolate cake pairs perfectly with the sweet-tart brightness of roasted strawberries and the tangy smoothness of chocolate cream cheese frosting. It’s a flavor profile that truly sings!
- Impressively Easy to Make: Despite its show-stopping appearance, this recipe breaks down into simple, manageable steps. From blooming the cocoa to setting up your filling, you’ll find each stage approachable and fun, leading to a professional-looking result without the fuss.
- Crowd-Pleasing Perfection: This isn’t just a cake; it’s an experience! Perfect for birthdays, holidays, or just because, this Chocolate Cake with Strawberry Filling is guaranteed to be the star of any dessert table and will have everyone asking for the recipe.
- Fresh and Wholesome Ingredients: Using fresh strawberries and baking from scratch means you know exactly what goes into your dessert. The roasted strawberry filling truly elevates the natural fruit flavor, making it incredibly fresh and delicious.
Ingredients for Your Decadent Chocolate Cake with Strawberry Filling
For the Rich Chocolate Cake Layers:
- 1 ⅔ cups all-purpose flour, spooned and leveled
- ⅓ cup + 3 tablespoons Dutch processed cocoa powder
- 1 cup granulated sugar
- 2 teaspoons espresso powder
- 1 teaspoon baking powder
- 1 teaspoon baking soda
- 1 teaspoon kosher salt
- ⅔ cup canola oil (or other flavorless oil)
- 3 large eggs, at room temperature
- ¼ cup firmly packed light brown sugar
- ⅓ cup buttermilk, at room temperature
- 4 tablespoons full-fat Greek yogurt or sour cream
- 1 tablespoon vanilla extract
- ⅔ cup very hot water (nearly boiling)
For the Luscious Roasted Strawberry Filling:
- 8 oz fresh strawberries, hulled and quartered
- 2 tablespoons granulated sugar
- 2 teaspoons lemon juice
- Pinch of salt
For the Smooth Chocolate Cream Cheese Frosting:
- 8 oz chopped dark chocolate (between 50 and 60% cacao)
- 8 oz (1 block) cream cheese, softened at room temperature
- ⅓ cup heavy cream
- 2 cups powdered sugar
- 1 tablespoon vanilla extract
Detailed Step-by-Step Directions for Your Dream Cake
Making the Moist Chocolate Cake Layers:
- Prepare Your Pans & Oven: Preheat your oven to 350°F (175°C). Lightly butter and coat two 8-inch round cake pans with cocoa powder, or use a baking release spray.
- Combine Dry Ingredients: In a large mixing bowl, whisk together the all-purpose flour, both granulated and brown sugars, Dutch processed cocoa powder, baking powder, baking soda, espresso powder, and kosher salt. Set aside.
- Mix Wet Ingredients: In another large bowl, whisk together the vanilla extract, eggs, Greek yogurt (or sour cream), buttermilk, and canola oil until well combined.
- Bloom the Cocoa & Combine: Pour the very hot water into your dry ingredient bowl and mix until just combined. Now, add the wet ingredient mixture to the dry mixture and gently mix until all ingredients are fully incorporated and smooth. Do not overmix!
- Bake Beautiful Layers: Divide the cake batter evenly between your two prepared cake pans (about 515 grams each). Bake for 35-40 minutes, or until the cake layers spring back when lightly touched in the center.
- Cool Completely: Let the cakes cool in their pans for about 10 minutes before carefully transferring them to a wire rack to cool completely.
Crafting the Sweet Roasted Strawberry Filling:
- Preheat for Berries & Toss: Adjust your oven to 375°F (190°C). In a bowl, gently toss the fresh strawberries with granulated sugar, lemon juice, and a pinch of salt.
- Roast to Perfection: Spread the berry mixture onto an aluminum or metal baking pan. Roast for about 20 minutes, flipping halfway through, until wonderfully soft and syrupy.
- Chill Out: Transfer the warm strawberries to a heatproof bowl and allow them to cool completely in the refrigerator.
Whipping Up the Dreamy Chocolate Cream Cheese Frosting & Cake Assembly:
- Create a Double Boiler: Place a medium heatproof bowl over a pot with gently simmering water (ensure the bowl doesn’t touch the water). Pour heavy cream and chopped dark chocolate into the bowl.
- Melt & Blend: Whisk the chocolate and cream occasionally as they melt into a smooth, glossy mixture. Remove the bowl from the pot.
- Combine Flavors: Transfer the melted chocolate mixture to your stand mixer bowl (with paddle attachment). Add room temperature cream cheese and vanilla extract. Mix for about 1 minute.
- Achieve Smoothness: Beat in the powdered sugar until your frosting is thick, smooth, and pudding-like. Transfer to a piping bag with a round tip.
- Anchor the Base Layer: Pipe or spread a dollop of frosting onto your cake plate to act as “glue.” Set the first cooled cake layer on top.
- Frost & Create a Border: Pipe about a third of the frosting on top of this bottom layer and spread evenly. Pipe a thick border of frosting around the edge to contain the filling.
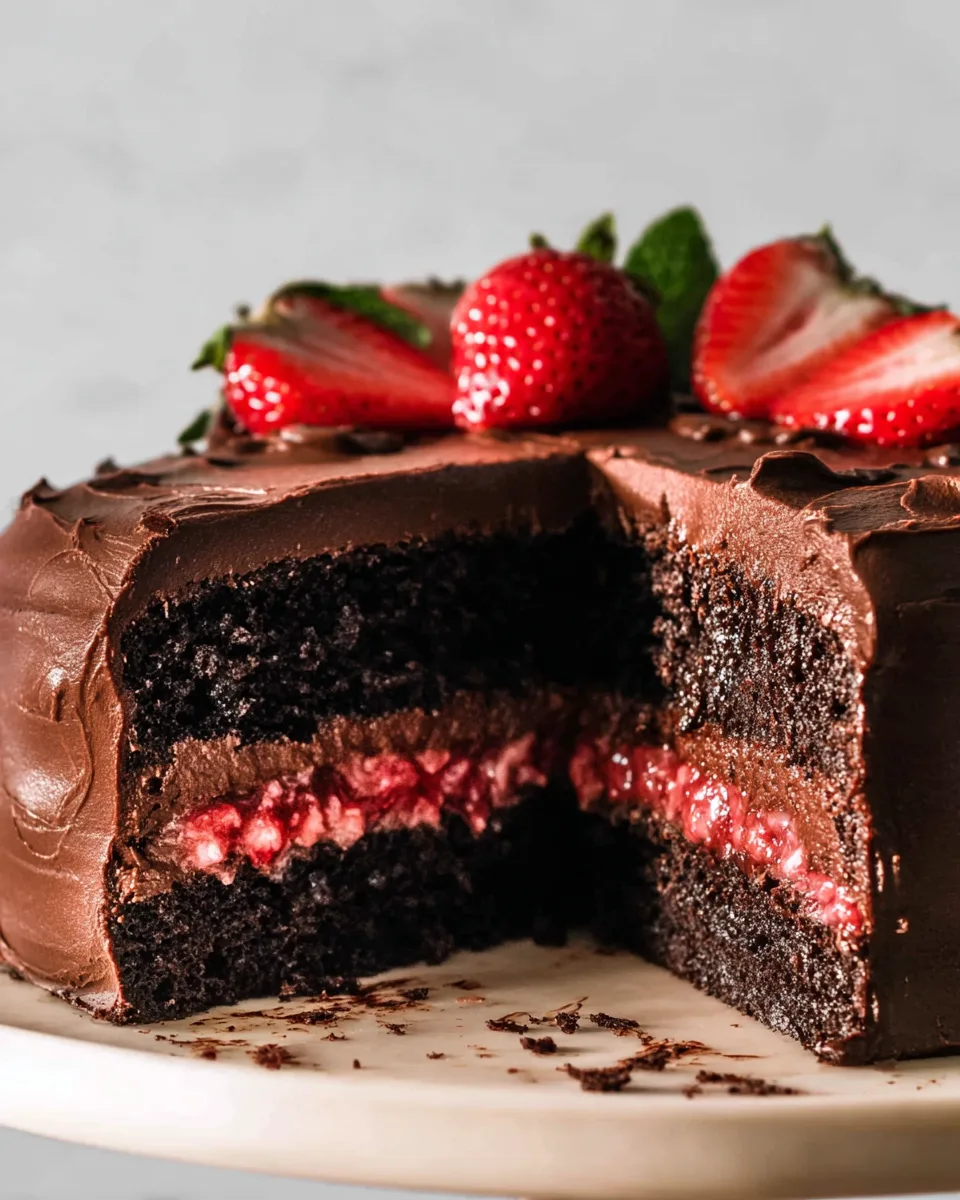
- Fill with Berries: Spoon all of your cooled roasted strawberry filling inside the frosting border, ensuring the border is tall enough.
- Stack & Frost the Cake: Gently place the second cooled cake layer on top. Pipe a thick layer of frosting all around the sides and top of the cake, starting from the base.
- Smooth It Out: Use a cake spatula to gently smooth the frosting on top. Alternate with a cake scraper against the sides to smooth out any imperfections.
- Decorate (Optional): Use any remaining frosting with an open star tip for decorative touches. For a beautiful finish, top your Chocolate Cake with Strawberry Filling with fresh sliced strawberries if desired!
Presenting and Serving Your Gorgeous Chocolate Cake with Strawberry Filling
This Chocolate Cake with Strawberry Filling is a showstopper on its own, but a little extra flourish can make it truly unforgettable! For an elegant presentation, place the finished cake on a pristine white cake stand. Garnish the top with fresh, vibrant whole strawberries or finely sliced ones arranged artfully in a rosette pattern. A dusting of powdered sugar (just a light sprinkle!) can add a sophisticated touch, contrasting beautifully with the dark chocolate. For individual servings, cut generous slices and serve them on small dessert plates, perhaps with a sprig of fresh mint or a dollop of whipped cream on the side. This cake is perfect for celebrations, afternoon tea, or as a decadent after-dinner treat. Consider serving it with a warm cup of coffee or a chilled glass of sparkling wine to elevate the experience!
Storage Tips for Your Delicious Chocolate Cake with Strawberry Filling
To keep your beautiful Chocolate Cake with Strawberry Filling fresh and delicious, proper storage is key! Since it features a cream cheese frosting and a fruit filling, it’s best stored in the refrigerator. Transfer any leftover cake slices or the entire remaining cake to an airtight cake carrier or a container with a tight-fitting lid. This will prevent it from drying out and absorbing other odors from your fridge. Stored correctly, your cake will maintain its delightful flavor and texture for up to 3-4 days. For longer storage, individual slices can be wrapped tightly in plastic wrap and then aluminum foil and frozen for up to 1 month. Thaw in the refrigerator overnight before serving.
FAQs About This Chocolate Cake with Strawberry Filling Recipe
- Can I use frozen strawberries for the filling?
Yes, you can! Thaw them completely and drain any excess liquid before tossing them with sugar and lemon juice. The roasting time might need a slight adjustment. - What if I don’t have espresso powder?
Espresso powder enhances the chocolate flavor without making the cake taste like coffee. If you don’t have it, you can omit it, but the chocolate flavor won’t be as deep. - Can I make this cake in different sized pans?
Yes, but baking times will vary. For three 6-inch pans, reduce baking time to 25-30 minutes. For a 9×13 inch pan, bake for 45-55 minutes. - Why is the hot water crucial for the chocolate cake layers?
Hot water “blooms” the cocoa powder, bringing out a richer, more intense chocolate flavor and creating a wonderfully moist crumb. - My frosting looks lumpy after adding cream cheese. What went wrong?
Ensure your cream cheese is truly at room temperature. If it’s too cold, it won’t blend smoothly. Continue mixing; sometimes it just needs a little more time to incorporate fully. - Can I make the cake layers or filling ahead of time?
Absolutely! The cake layers can be baked a day in advance, cooled, wrapped in plastic wrap, and stored at room temperature. The roasted strawberry filling can be made 1-2 days ahead and kept in an airtight container in the refrigerator. - How do I prevent my cake layers from sticking to the pans?
Always butter and flour (or cocoa powder in this case) your pans thoroughly. Using parchment paper rounds on the bottom and baking release spray can also provide extra insurance. - What kind of dark chocolate should I use for the frosting?
Choose a good quality dark chocolate between 50-60% cacao. Higher percentages can make the frosting too bitter, while lower percentages might make it too sweet. - Can I use a different type of oil?
Yes, any neutral-flavored oil like vegetable oil or grapeseed oil will work well as a substitute for canola oil. - What if my frosting is too thin or too thick?
If too thin, add more powdered sugar, a tablespoon at a time, until desired consistency. If too thick, add heavy cream, a teaspoon at a time, until it smooths out.
Chocolate Cake with Strawberry Filling 🍰
Equipment
- 8-inch Round Cake Pans
- Wire Rack
- Stand Mixer
- Piping bag
- Cake Spatula
- Cake Scraper
- Double Boiler
Ingredients
For the Rich Chocolate Cake Layers
- 1 ⅔ cups all-purpose flour spooned and leveled
- ⅓ cup + 3 tablespoons Dutch processed cocoa powder
- 1 cup granulated sugar
- 2 teaspoons espresso powder
- 1 teaspoon baking powder
- 1 teaspoon baking soda
- 1 teaspoon kosher salt
- ⅔ cup canola oil or other flavorless oil
- 3 large eggs at room temperature
- ¼ cup firmly packed light brown sugar
- ⅓ cup buttermilk at room temperature
- 4 tablespoons full-fat Greek yogurt or sour cream
- 1 tablespoon vanilla extract
- ⅔ cup very hot water nearly boiling
For the Luscious Roasted Strawberry Filling
- 8 oz fresh strawberries hulled and quartered
- 2 tablespoons granulated sugar
- 2 teaspoons lemon juice
- Pinch salt
For the Smooth Chocolate Cream Cheese Frosting
- 8 oz chopped dark chocolate between 50 and 60% cacao
- 8 oz cream cheese 1 block, softened at room temperature
- ⅓ cup heavy cream
- 2 cups powdered sugar
- 1 tablespoon vanilla extract
Instructions
- Making the Moist Chocolate Cake Layers:
- 1. Prepare Your Pans & Oven: Start by preheating your oven to 350°F (175°C). Lightly butter and coat two 8-inch round cake pans with cocoa powder, or use a baking release spray. For extra-even layers, you can use damp cake strips around your pans.
- 2. Combine Dry Ingredients: In a large mixing bowl, whisk together the all-purpose flour, both granulated and brown sugars, Dutch processed cocoa powder, baking powder, baking soda, espresso powder, and kosher salt. Set this mixture aside.
- 3. Mix Wet Ingredients: In another large bowl, whisk together the vanilla extract, eggs, Greek yogurt (or sour cream), buttermilk, and canola oil until they are well combined.
- 4. Bloom the Cocoa & Combine: Pour the very hot water into your dry ingredient bowl and mix until everything is just combined – this special step helps to deepen the chocolate flavor! Now, add the wet ingredient mixture to the dry mixture and gently mix until all ingredients are fully incorporated and smooth. Be careful not to overmix!
- 5. Bake Beautiful Layers: Divide the cake batter evenly between your two prepared cake pans (aim for about 515 grams in each pan if you're using a kitchen scale for precision). Bake for 35-40 minutes, or until the cake layers spring back when lightly touched in the center.
- 6. Cool Completely: Let the cakes cool in their pans for about 10 minutes before carefully transferring them to a wire rack to cool down completely. This is crucial before moving on to frosting!
- Crafting the Sweet Roasted Strawberry Filling:
- 1. Preheat for Berries & Toss: Adjust your oven temperature to 375°F (190°C). In a bowl, gently toss the fresh strawberries with granulated sugar, lemon juice, and a pinch of salt. This simple step truly enhances their natural sweetness and juiciness.
- 2. Roast to Perfection: Spread the berry mixture out onto an aluminum or metal baking pan. Roast for about 20 minutes, remembering to flip the berries halfway through, until they are wonderfully soft and have a lovely syrupy consistency.
- 3. Chill Out: Once roasted, transfer the warm strawberries to a heatproof bowl and allow them to cool completely in the refrigerator. This concentrated fruit flavor is absolutely worth the wait!
- Whipping Up the Dreamy Chocolate Cream Cheese Frosting & Cake Assembly:
- 1. Create a Double Boiler: Set up a double boiler by placing a medium heatproof bowl over a pot with a few inches of gently simmering water (ensure the bowl doesn't touch the water). Pour your heavy cream and chopped dark chocolate into the heatproof bowl.
- 2. Melt & Blend: Whisk the chocolate and cream occasionally as the gentle steam melts them into a smooth, glossy mixture. Once smooth, carefully remove the bowl from the pot (it will be hot!).
- 3. Combine Flavors: Transfer the melted chocolate mixture into the bowl of your stand mixer (fitted with the paddle attachment) or a large mixing bowl. Add the room temperature cream cheese and vanilla extract. Mix everything together for about 1 minute. Don't worry if it looks a little lumpy at first!
- 4. Achieve Smoothness: Lastly, beat in the powdered sugar until your frosting transforms into a wonderfully thick and smooth, pudding-like texture. Transfer this delicious frosting into a piping bag fitted with a round tip.
- 5. Anchor the Base Layer: Pipe or spread a dollop of your chocolate frosting onto your chosen cake plate or stand. This acts as "glue" to hold your first cooled cake layer in place. Set the first cake layer on top.
- 6. Frost & Create a Border: Pipe about a third of the frosting on top of this bottom layer and spread it evenly with a cake spatula or large metal spoon. Now, pipe a thick border of frosting around the edge of the layer. This clever border is essential for containing your delicious strawberry filling!
- 7. Fill with Berries: Spoon all of your cooled roasted strawberry filling inside the frosting border. Make sure your border is tall enough to prevent any juicy berries from escaping!
- 8. Stack & Frost the Cake: Gently place the second cooled cake layer on top of the first. Then, starting from the base of the cake and working your way up to the top, pipe a thick layer of frosting all around the sides and top of the cake.
- 9. Smooth It Out: Use a cake spatula to gently smooth out the frosting on the top of the cake. Alternate using your spatula and a cake scraper against the sides to gently smooth out any bubbles or imperfections in the frosting for a lovely finish. Don't stress too much – homemade is always charming!
- 10. Decorate (Optional): If you have any frosting remaining, use an open star tip on a piping bag to add any decorative touches you like. For a beautiful and healthy final flourish, top your cake with fresh sliced strawberries if desired!