Get ready to unleash your inner dessert superhero, because we’re about to dive into a no-bake wonder that’s so easy, so creamy, and so utterly delicious, it feels like cheating! Imagine the perfect marriage of rich chocolate cookies and luxurious whipped cream, magically transforming into a slice of heaven with zero oven time. This isn’t just a dessert; it’s a chill-out masterpiece, a go-to showstopper, and your new favorite way to conquer cravings. Prepare to impress everyone (including yourself) with a treat that redefines effortless indulgence. Welcome to the world of the Cookies and Cream Icebox Dream Cake – where dreams are truly made of cookies and cream!
Why You’ll Love This Recipe
This isn’t just another dessert; it’s an experience! Here are four compelling reasons why the Cookies and Cream Icebox Dream Cake will quickly become your culinary crush:
- No-Bake Brilliance: Ditch the oven and the stress! This recipe requires absolutely no baking, making it perfect for hot summer days, busy schedules, or when you just want a spectacular dessert without the fuss. It’s pure magic that happens in your fridge!
- Irresistible Flavor Combo: Who can resist the classic allure of cookies and cream? This cake takes that beloved flavor profile and elevates it into a sophisticated yet comforting treat. Each bite delivers that perfect harmony of crunchy cookie and luscious cream, softened to perfection.
- Effortlessly Impressive: Despite its simple construction, this icebox cake looks incredibly elegant and tastes like something from a gourmet bakery. It’s the ideal dessert for potlucks, parties, or a special family dinner, guaranteed to elicit “oohs” and “aahs” with minimal effort on your part.
- Minimal Ingredients, Maximum Impact: You only need a handful of readily available ingredients to create this show-stopping dessert. It’s amazing how a few simple components can come together to create such a profound and satisfying sweet experience, proving that sometimes, less truly is more.
Ingredients with Measurements
Gather your sweet arsenal! You won’t believe how few ingredients stand between you and this creamy, dreamy dessert. Here’s what you’ll need to whip up your very own Cookies and Cream Icebox Dream Cake:
- 🥛 3 cups (750 mL) heavy whipping cream: The heart of our luscious cream layers, providing rich texture and volume.
- 🍚 ⅓ cup (75 mL) powdered sugar: To sweeten our whipped cream to perfection, giving it that delicate balance.
- 🌿 1 teaspoon (5 mL) vanilla extract: A touch of warmth and aromatic sweetness that enhances all the other flavors.
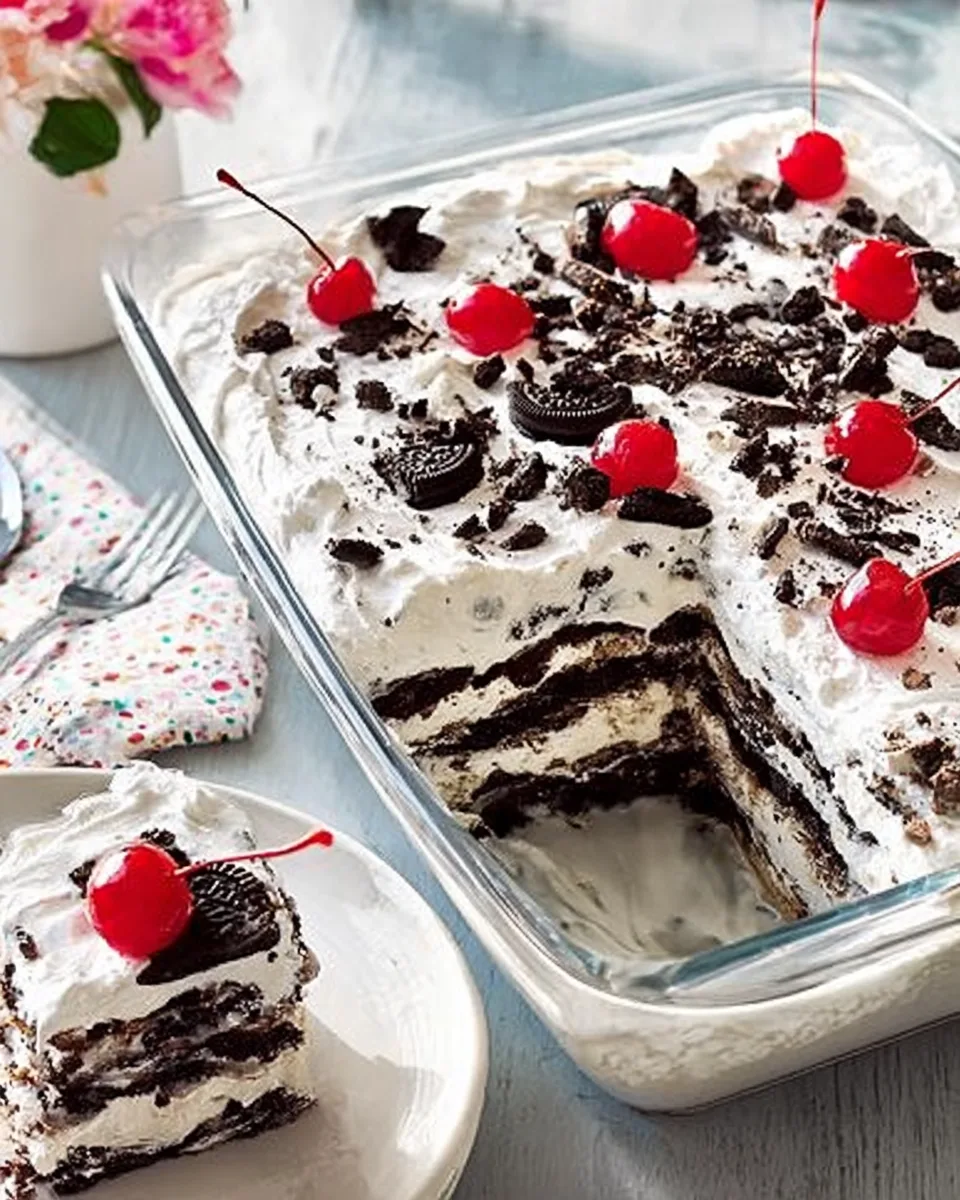
- 🍪 66 creme-filled chocolate sandwich cookies: The star of the show! These cookies will soften beautifully, creating a cake-like texture. Grab a few extra for that dazzling garnish!
- 🍒 12 maraschino cherries, drained: For a pop of color and a hint of fruity sweetness, making our cake look as good as it tastes.
Detailed Step-by-Step Directions How to Make the Recipe
Ready to transform simple ingredients into a show-stopping Cookies and Cream Icebox Dream Cake? Follow these easy steps, and you’ll be on your way to dessert glory:
- Whip Up the Dream Cream: In the bowl of a stand mixer (or using a hand mixer), combine your heavy whipping cream, powdered sugar, and vanilla extract. Attach the whisk and whip on high speed. Watch the magic happen! In about 3 minutes, your mixture will transform into thick, glorious whipped cream with beautiful stiff peaks. This means when you lift the whisk, the peaks hold their shape firmly.
- First Cookie Layer Foundation: Grab your rectangular dish (a 9×13 inch pan works wonderfully). Carefully arrange 33 of your creme-filled chocolate sandwich cookies in a single, neat layer at the bottom. Don’t worry if there are small gaps; they’ll get filled with cream!
- Creamy Cloud Number One: Gently take half of your freshly whipped cream mixture and spread it evenly over the layer of cookies. Be delicate but firm, ensuring every cookie gets a generous blanket of creamy goodness.
- The Grand Repeat Performance: It’s time to build upwards! Place the remaining 33 cookies on top of your first whipped cream layer. Once they’re nestled in, cover them completely and luxuriously with the rest of your whipped cream mixture, smoothing the top for a pristine finish.
- The Chill Factor: This is where patience is a virtue! Pop your masterpiece into the refrigerator. It needs at least 4 hours to chill, but for truly magnificent results where the cookies soften into a tender, cake-like consistency, leaving it overnight is the absolute best.
- Adorn and Serve: Once perfectly chilled and set, it’s time for the grand reveal! Before serving, artfully decorate the top of your Cookies and Cream Icebox Dream Cake. Scatter the drained maraschino cherries for a vibrant contrast, and add those extra chocolate sandwich cookies – crush some for texture, leave some whole for impact, or even halve them. Slice into generous portions and enjoy your dreamy creation!
Detailed Different Ways You Can Present the Recipe and How to Serve It
Your Cookies and Cream Icebox Dream Cake is a star, and every star deserves a fabulous entrance! Here are some creative ways to present and serve your dessert:
- Classic Slices: The simplest and often most satisfying way is to cut generous squares directly from your rectangular dish. Use a warm knife for cleaner cuts if desired. Each slice will beautifully showcase the distinct layers of cookies and cream.
- Elegant Dusting: Before adding cherries, give the top a light dusting of cocoa powder or extra powdered sugar for an elegant, professional touch.
- Chocolate Drizzle: Elevate the chocolate factor! Warm up some chocolate fudge sauce or ganache and artfully drizzle it over the top of the cake just before serving. A zig-zag pattern or a random swirl adds visual appeal and extra flavor.
- Cookie Extravaganza: Go beyond just a few extra cookies. Crush a handful of cookies and sprinkle them generously over the entire top for maximum “cookies and cream” impact. You can also place whole mini chocolate sandwich cookies around the edges.
- Fruity Flair: While maraschino cherries offer a pop of red, consider fresh berries! Sliced strawberries, raspberries, or blueberries can add a fresh, tart counterpoint and vibrant color, especially for summer gatherings.
- Individual Servings: For a more refined presentation at a dinner party, you could assemble smaller versions in individual ramekins or clear dessert cups. Layer crushed cookies and cream for a charming personal treat.
- Minty Freshness: A few fresh mint leaves placed strategically can add a touch of green and a refreshing aroma that complements the rich dessert.
How You Can Store It and How Long Does It Last
You’ve put effort into creating your magnificent Cookies and Cream Icebox Dream Cake, so let’s make sure it stays fresh and delicious! Proper storage is key for this no-bake wonder:
- Refrigeration is Essential: Because this cake is primarily made of dairy-based whipped cream and relies on chilling to set, it must be stored in the refrigerator at all times.
- Airtight is Best: To prevent the cake from absorbing odors from other foods in your fridge and to keep the cream from drying out, cover the dish tightly. You can use plastic wrap pressed directly onto the surface, or transfer individual slices to an airtight container.
- Shelf Life: Stored correctly in the refrigerator, your Cookies and Cream Icebox Dream Cake will remain wonderfully fresh and delicious for 3-4 days. Beyond that, the cookies might start to become too mushy, and the cream’s texture could diminish.
- Can You Freeze It? While technically possible, freezing is generally not recommended for icebox cakes made with fresh whipped cream. The texture of the whipped cream can become grainy or watery upon thawing, and the cookies might become excessively soggy. It’s best enjoyed fresh from the fridge!
- Prep Ahead Tips: This cake is a dream for making ahead! Since it requires a minimum of 4 hours to chill (and ideally overnight), it’s perfect to assemble the day before your event. This ensures it’s perfectly set and allows the flavors to meld beautifully. Just hold off on the final garnishes until just before serving.
FAQs Sections
Got questions about your Cookies and Cream Icebox Dream Cake? We’ve got answers!
1. Can I use different types of cookies for this recipe?
Absolutely! While the classic creme-filled chocolate sandwich cookies are iconic, you can experiment. Graham crackers are a common icebox cake base, or try other sturdy cookies like shortbread or even chocolate chip cookies for a different flavor profile. The key is a cookie that will soften nicely when absorbing moisture from the cream.
2. How do I know when my whipped cream has “stiff peaks”?
Stiff peaks mean that when you lift the whisk out of the cream, the peaks stand up straight and hold their shape without drooping. If they flop over, keep whipping! Be careful not to over-whip, as it can turn into butter.
3. My whipped cream isn’t getting thick! What went wrong?
Several factors can affect whipping cream. Ensure your cream is very cold (straight from the fridge) and has a high fat content (heavy whipping cream, not light cream). Also, make sure your bowl and whisk are clean and free of any grease. Sometimes, chilling your bowl and whisk for 10-15 minutes before whipping can help.
4. Why do the cookies need to soften, and what does it do for the cake?
The magic of an icebox cake is in the softening of the cookies. As they sit in the refrigerator, they absorb moisture from the whipped cream, transforming from crisp biscuits into a tender, cake-like texture. This creates the illusion of a baked cake, but with no oven required!
5. Can I make this cake in individual servings?
Yes, you can! Layer crushed cookies and whipped cream in clear parfait glasses, small Mason jars, or ramekins for charming individual portions. Adjust the chilling time slightly as smaller portions might set faster, but still aim for at least 2-3 hours.
6. Can I add other flavorings or mix-ins to the whipped cream?
Definitely! Get creative. A tablespoon of instant coffee granules (dissolved in a tiny bit of hot water) for a mocha twist, a zest of orange or lemon, or even a splash of liqueur (like Kahlua or Irish cream) could be fantastic additions to your whipped cream for adult versions.
7. Is it possible to make a gluten-free version of this cake?
Yes, it is! Simply substitute the regular creme-filled chocolate sandwich cookies with a gluten-free version. Many brands now offer delicious gluten-free alternatives that would work perfectly in this recipe.
8. What kind of rectangular dish is best to use?
A standard 9×13 inch (23×33 cm) baking dish or casserole dish works perfectly. Glass or ceramic dishes are ideal as they allow you to see the beautiful layers if it’s a clear dish, and they transfer well from fridge to table.
9. How many cookies are typically in a standard package of chocolate sandwich cookies?
A standard family-size package of creme-filled chocolate sandwich cookies usually contains around 35-40 cookies. For this recipe requiring 66 cookies (plus extras for topping), you’ll likely need two standard packages to be safe.
10. Can I prepare this cake further in advance than just overnight?
While it tastes best within 1-2 days of chilling, you can certainly assemble the cake up to 2 days in advance. The cookies will become softer with more time, which some people prefer. Just remember to add your final garnishes (cherries, extra cookies) right before serving for the freshest look.
Cookies and Cream Icebox Dream Cake
Equipment
- Stand Mixer
- Rectangular Dish
Ingredients
- 3 cups heavy whipping cream
- 1/3 cup powdered sugar
- 1 tsp vanilla extract
- 66 creme-filled chocolate sandwich cookies plus a few extra for topping
- 12 maraschino cherries drained
Instructions
- In a stand mixer fitted with a whisk attachment, combine the heavy whipping cream, powdered sugar, and vanilla extract. Whip on high speed for about 3 minutes, or until the mixture becomes thick and forms stiff peaks.
- Arrange 33 of the chocolate sandwich cookies in a single layer at the bottom of a rectangular dish.
- Carefully spread half of the whipped cream mixture evenly over the cookie layer.
- Repeat the layers: place the remaining 33 cookies on top of the whipped cream, then cover with the rest of the whipped cream mixture.
- Refrigerate the cake for at least 4 hours, or ideally overnight, to allow it to set and the cookies to soften.
- Before serving, decorate the top with the drained maraschino cherries and a few extra chocolate sandwich cookies, perhaps crushed or whole.
Notes
Calories: 520
Total Carbs: 55 g
Net Carbs: 53 g
Fats: 34 g
Protein: 4 g