Why You’ll Love These Easy Homemade Chocolate Mint Patties
Get ready to fall head over heels for the simplest, most satisfying sweet treat you’ll make all year! These Easy Homemade Chocolate Mint Patties are not just a recipe; they’re a revelation. Here are four irresistible reasons why they’ll become your new go-to:
- Effortlessly Delicious & No-Bake Bliss: Forget turning on the oven! This recipe is entirely no-bake, meaning less time slaving over a hot stove and more time enjoying the fruits of your (minimal) labor. It’s perfect for beginner bakers or anyone looking for a quick dessert fix.
- Iconic Flavor Combination: There’s a reason mint and chocolate are a match made in culinary heaven. The cool, refreshing burst of mint perfectly complements the rich, decadent chocolate coating. Each bite is a harmonious symphony of flavors that will delight your taste buds.
- Customizable Fun for Everyone: Want a brighter green? Add more food coloring! Prefer dark chocolate? Go for it! This recipe is incredibly versatile, allowing you to tailor it to your exact preferences. It’s a fantastic project to get the whole family involved in, from mixing to dipping.
- Perfect for Gifting & Entertaining: Imagine gifting a box of these beautiful, homemade mint patties! They look impressive but are unbelievably simple to make. They’re also ideal for holiday platters, party favors, or just a sophisticated treat to serve with coffee. Prepare to receive endless compliments!
Unleash Your Inner Chocolatier with Easy Homemade Chocolate Mint Patties!
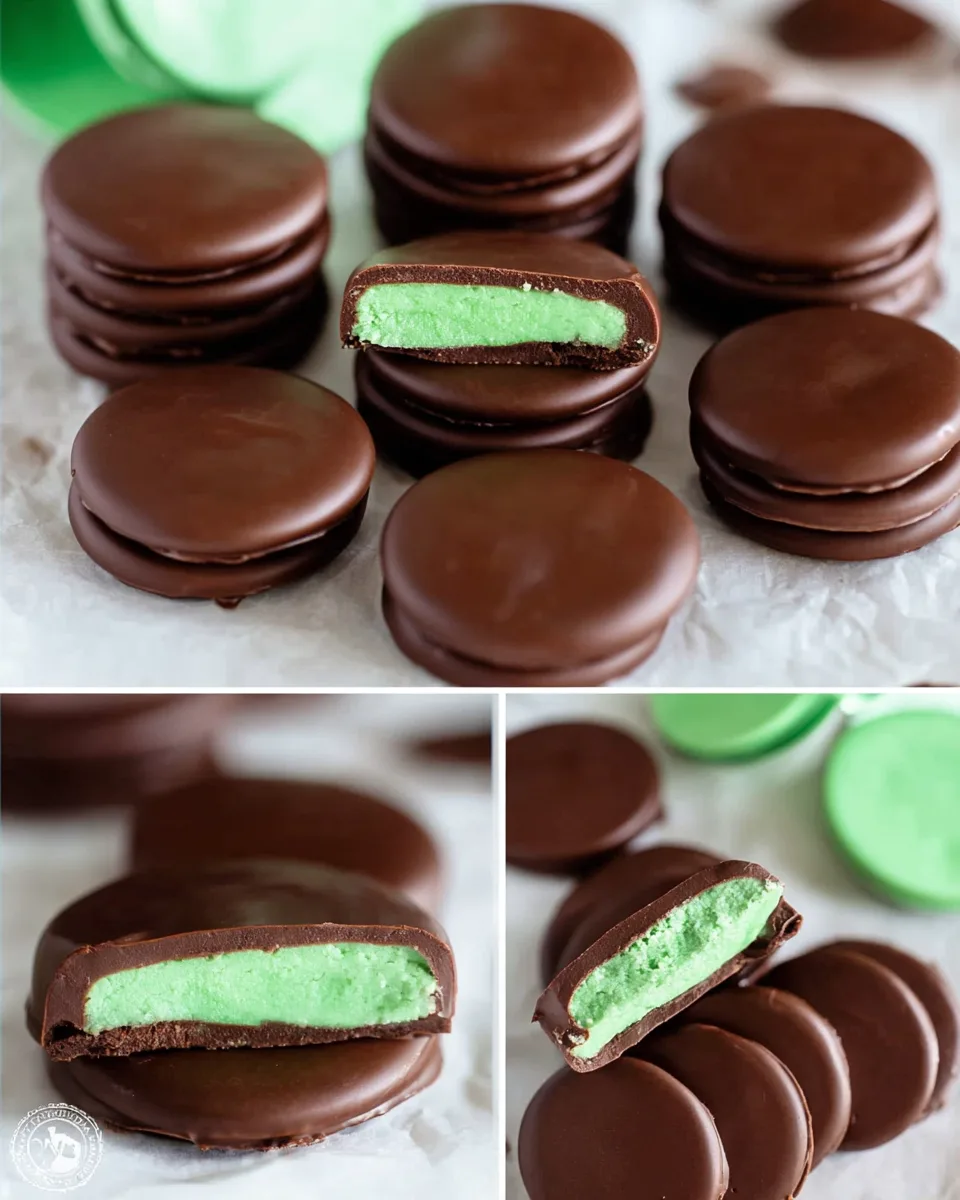
Are you tired of store-bought sweets that just don’t hit the spot? Do you dream of that perfect balance of cool, refreshing mint and rich, velvety chocolate? Well, get ready to make those dreams a delicious reality! We’re about to dive into the wonderful world of Easy Homemade Chocolate Mint Patties – a delightful, no-bake confection that will make you feel like a master candymaker, even if your previous culinary adventures mostly involved ordering takeout.
Forget complicated techniques and endless ingredient lists. This recipe is designed for pure joy and minimal fuss. Imagine biting into a crisp chocolate shell, revealing a smooth, intensely minty center that melts in your mouth. Whether it’s a sudden craving, a thoughtful homemade gift, or a show-stopping addition to your dessert table, these patties are guaranteed to be a hit. So, tie on that apron (or don’t, it’s that easy!), gather your ingredients, and let’s create some minty chocolate magic!
Gather Your Goodies: Ingredients for Easy Homemade Chocolate Mint Patties
Ready to whip up some minty marvels? Here’s everything you’ll need for your batch of Easy Homemade Chocolate Mint Patties. We’ve laid it all out clearly, so you can gather your ingredients with ease and get straight to the fun part!
- 🍯 ⅓ cup light corn syrup
- 🧈 5 tablespoons softened unsalted butter
- 🍃 1 ½ teaspoons refreshing mint extract (or peppermint for a brighter flavor)
- 🧂 ½ teaspoon salt
- 💚 A few drops of green gel food coloring (optional, for that classic look!)
- 🍚 4 to 5 cups powdered sugar (confectioners’ sugar)
- 🍫 10 ounces quality chocolate candy coating (for a healthier option, use dark chocolate chips with 2-3 teaspoons coconut oil)
Step-by-Step Sweetness: How to Make Easy Homemade Chocolate Mint Patties
Let’s get crafting! Follow these simple, detailed steps to create your own batch of delicious Easy Homemade Chocolate Mint Patties. You’ll be amazed at how quickly these come together!
- In a medium mixing bowl, gently combine the light corn syrup, softened butter, invigorating mint extract, and a pinch of salt. If you’re using food coloring, stir in a few drops until you reach your desired vibrant green hue. Mix well until all ingredients are beautifully blended.
- Gradually add the powdered sugar, one cup at a time, mixing thoroughly after each addition. Continue until the mixture becomes too stiff to stir comfortably with a spoon.
- Now, it’s time to get hands-on! Knead in more powdered sugar until the dough is smooth, pliable, and no longer sticky. For perfectly uniform patties, roll the mixture evenly (about ¼ inch thick) between two sheets of parchment paper. Place the rolled dough into the refrigerator for 1 to 1.5 hours, allowing it to firm up nicely.
- Once firm, use a small round cookie cutter to create your individual mint patties. You can gather and re-roll any remaining dough scraps to make even more delicious treats!
- Melt your chosen chocolate coating (or the dark chocolate with coconut oil alternative) according to the package directions. Ensure it’s smooth and ready for dipping.
- Using a fork or a candy dipping tool, carefully dip each chilled mint patty into the melted chocolate. Gently tap off any excess chocolate to ensure a thin, even coating.
- Place the coated patties back onto parchment or wax paper to set. Let them harden completely at room temperature, or pop them in the fridge briefly for a quicker set. Once firm, store them in an airtight container for a cool, refreshing treat whenever a craving strikes!
Presenting Perfection: Creative Ways to Serve Your Easy Homemade Chocolate Mint Patties
You’ve mastered the art of making Easy Homemade Chocolate Mint Patties, now let’s talk about making them shine! These little beauties are versatile and can be presented in countless delightful ways to impress your guests or simply add a touch of elegance to your everyday.
- Elegant Dessert Platters: Arrange them artfully on a white platter alongside other small treats like truffles or mini cookies. A sprinkle of edible gold dust or a few fresh mint leaves can elevate the presentation.
- Thoughtful Homemade Gifts: Package your patties in cute tins, cellophane bags tied with ribbon, or small decorative boxes. They make fantastic holiday gifts, party favors, or a sweet thank-you gesture for friends and family.
- Crumbled Toppings: Get creative! Crumble a few patties over vanilla ice cream, hot fudge sundaes, or blend them into a creamy milkshake for an extra mint-chocolate kick.
- Coffee & Tea Companions: Serve one or two alongside a warm cup of coffee or a soothing mug of hot tea for a sophisticated and refreshing afternoon treat.
- Holiday Charm: Use different cookie cutter shapes for festive occasions! Think mini hearts for Valentine’s Day, shamrocks for St. Patrick’s Day, or tiny stars and trees for Christmas. You can even drizzle contrasting white chocolate over the finished dark chocolate coating for an extra flourish!
- Miniature Masterpieces: For a more gourmet look, try making smaller patties and serving them as petite fours at a fancy gathering.
No matter how you choose to present them, these patties are sure to be a delightful hit!
Storing Your Sweet Success: Keeping Easy Homemade Chocolate Mint Patties Fresh
You’ve crafted a batch of these incredible Easy Homemade Chocolate Mint Patties – now how do you ensure they stay fresh and delicious for as long as possible? Proper storage is key to preserving their texture and flavor.
- Airtight is Right: Always store your finished patties in an airtight container. This prevents them from drying out and absorbing any unwanted odors from your fridge.
- Room Temperature or Refrigerator? For short-term storage (1-2 days) and if your home isn’t too warm, they can be kept at cool room temperature. However, for best results and to prevent the chocolate coating from softening, it’s highly recommended to store them in the refrigerator. The cool temperature helps maintain the chocolate’s snap and keeps the mint center firm.
- How Long Do They Last? When stored in an airtight container in the refrigerator, your Easy Homemade Chocolate Mint Patties will stay wonderfully fresh for up to 2-3 weeks. If kept at cool room temperature, they are best enjoyed within 5-7 days.
- Freezing for Future Cravings: Yes, you can freeze them! Place the completely set patties in a single layer on a baking sheet lined with parchment paper and freeze until solid (about 1-2 hours). Then, transfer them to a freezer-safe airtight container or bag, separating layers with parchment paper. They can be frozen for up to 2-3 months. Thaw them in the refrigerator or at room temperature for about 30 minutes before enjoying.
With these storage tips, you can always have a refreshing, minty treat ready for whenever a craving strikes!
FAQs About Easy Homemade Chocolate Mint Patties
Got questions about whipping up your perfect batch of Easy Homemade Chocolate Mint Patties? We’ve got answers! Here are some common queries to help you on your delicious journey.
- Can I use a different extract instead of mint?
Absolutely! Feel free to experiment with other flavors like almond, coconut, raspberry, or even orange extract for a different twist. Just remember to adjust the food coloring if you want a visual match! - My dough is too sticky/too dry – what went wrong?
If your dough is too sticky, gradually knead in more powdered sugar until it reaches a smooth, pliable consistency. If it’s too dry and crumbly, add a tiny bit more corn syrup or melted butter, a few drops at a time, until it comes together. Humidity can affect the dough, so adjust as needed. - Is green food coloring necessary?
Not at all! The green food coloring is purely for aesthetic appeal to give it that classic mint patty look. Your patties will taste just as delicious without it. - What’s the best type of chocolate coating to use?
For the easiest dipping and smoothest finish, a good quality chocolate candy coating (often labeled as melting wafers or compound chocolate) is ideal as it sets quickly and doesn’t require tempering. If using chocolate chips, adding 2-3 teaspoons of coconut oil (as suggested) will help it melt smoothly and set without blooming. - Can I make these ahead of time for a party?
Definitely! These patties are perfect for making in advance. You can prepare them up to 2-3 weeks ahead and store them in an airtight container in the refrigerator. - Are these Easy Homemade Chocolate Mint Patties gluten-free or dairy-free?
The recipe is naturally gluten-free! For a dairy-free version, you would need to use a dairy-free butter alternative and ensure your chocolate coating is also dairy-free. - How do I get a smooth, even chocolate coating?
Ensure your chocolate is melted smoothly and not too thick. Dip the chilled patty quickly, lift it with a fork, and gently tap the fork against the side of the bowl to let excess chocolate drip off. Work quickly as the cold patty will help the chocolate set faster. - What if I don’t have a small round cookie cutter?
No problem! You can use the rim of a small shot glass or even hand-roll small balls and then gently flatten them into disks. They might not be perfectly uniform, but they’ll still be delicious! - Can I use regular granulated sugar instead of powdered sugar?
No, powdered sugar (confectioners’ sugar) is essential for this recipe. Its finely milled texture gives the patties their smooth, melt-in-your-mouth consistency. Granulated sugar would result in a gritty texture. - What’s the difference between mint extract and peppermint extract?
Peppermint extract often has a sharper, cooler, more intense flavor. Mint extract can sometimes be a blend or have a slightly milder, sweeter, or more herbaceous taste depending on the brand. For a classic, bright mint chocolate flavor, peppermint is often preferred, but either works wonderfully.
Easy Homemade Chocolate Mint Patties
Equipment
- Medium Mixing Bowl
- Parchment Paper
- Rolling Pin
- Small Round Cookie Cutter
- Fork or candy dipping tool
Ingredients
- 1/3 cup light corn syrup
- 5 tablespoons softened unsalted butter
- 1.5 teaspoons mint extract refreshing (or peppermint for a brighter flavor)
- 1/2 teaspoon salt
- green gel food coloring A few drops (optional, for that classic look!)
- 4 to 5 cups powdered sugar (confectioners' sugar)
- 10 ounces chocolate candy coating quality (for a healthier option, use dark chocolate chips with 2-3 teaspoons coconut oil)
Instructions
- In a medium mixing bowl, gently combine the light corn syrup, softened butter, invigorating mint extract, and a pinch of salt. If you're using food coloring, stir in a few drops until you reach your desired vibrant green hue. Mix well until all ingredients are beautifully blended.
- Gradually add the powdered sugar, one cup at a time, mixing thoroughly after each addition. Continue until the mixture becomes too stiff to stir comfortably with a spoon.
- Now, it's time to get hands-on! Knead in more powdered sugar until the dough is smooth, pliable, and no longer sticky. For perfectly uniform patties, roll the mixture evenly (about ¼ inch thick) between two sheets of parchment paper. Place the rolled dough into the refrigerator for 1 to 1.5 hours, allowing it to firm up nicely.
- Once firm, use a small round cookie cutter to create your individual mint patties. You can gather and re-roll any remaining dough scraps to make even more delicious treats!
- Melt your chosen chocolate coating (or the dark chocolate with coconut oil alternative) according to the package directions. Ensure it's smooth and ready for dipping.
- Using a fork or a candy dipping tool, carefully dip each chilled mint patty into the melted chocolate. Gently tap off any excess chocolate to ensure a thin, even coating.
- Place the coated patties back onto parchment or wax paper to set. Let them harden completely at room temperature, or pop them in the fridge briefly for a quicker set. Once firm, store them in an airtight container for a cool, refreshing treat whenever a craving strikes!
Notes
Nutrition Information (per serving):
- Calories: 72 kcal
- Total Carbs: 13g
- Net Carbs: 13g
- Fats: 2g
- Protein: 0.01g