Are you ready for a dessert that’s not just a treat for your taste buds but also a little kinder to your waistline? Forget the dilemma of choosing between deliciousness and your health goals. We’re about to introduce you to a dessert marvel that masterfully blends rich chocolate, vibrant cherries, and a creamy, crunchy base into one glorious, guilt-minimizing package. Say hello to the show-stopping Chocolate Cherry Lush!
This isn’t just a recipe; it’s an experience. Each layer of this no-bake wonder is a carefully crafted symphony of textures and flavors designed to delight without the heavy aftermath. Perfect for gatherings, family dinners, or simply a well-deserved personal indulgence, our Chocolate Cherry Lush promises pure bliss in every bite. Get ready to impress your friends and family with this stunning, surprisingly simple creation!
Why You’ll Love This Chocolate Cherry Lush Recipe
There are countless reasons why our Chocolate Cherry Lush is destined to become your new favorite dessert. Here are just four compelling reasons to whip up a batch today:
- Guilt-Free Indulgence: We’ve consciously swapped in lighter ingredients like skim milk, light cream cheese, and sugar-free pudding mix, alongside healthy fats from nuts, allowing you to savor every spoonful without derailing your wellness journey. It’s a decadent treat that feels surprisingly light!
- Effortlessly Elegant: Don’t let its stunning layered appearance fool you; this dessert is incredibly easy to assemble. With minimal baking and mostly no-bake layers, you’ll achieve a professionally presented dessert with basic kitchen skills. It truly is a showstopper without the stress!
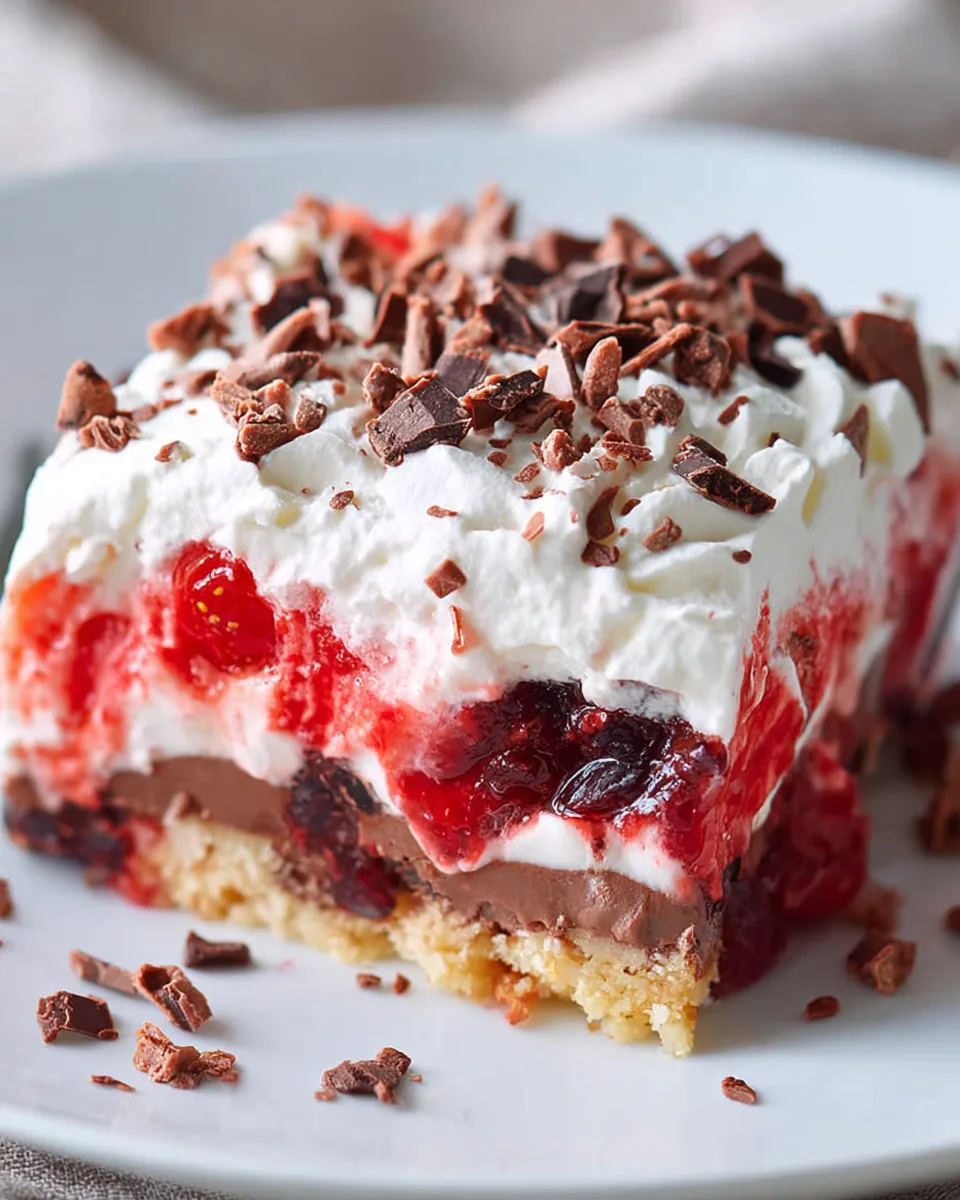
- A Symphony of Flavors & Textures: From the crunchy, nutty crust to the bright, fruity cherry layer, the smooth creamy center, and the rich chocolate pudding, topped with airy Cool Whip, every bite of this Chocolate Cherry Lush offers an exciting journey for your palate.
- Perfect for Any Occasion: Whether it’s a casual weeknight treat, a festive holiday gathering, or a potluck show-stopper, this layered dessert is always a crowd-pleaser. Its make-ahead nature also makes it ideal for entertaining, freeing you up to enjoy your guests.
Ingredients for Your Chocolate Cherry Lush
Gather your components for this magnificent layered dessert. We’ve chosen ingredients to make this Chocolate Cherry Lush as delightful and health-conscious as possible.
- For the Crunchy Base:
- 1 cup all-purpose flour
- ½ cup crushed nuts (pecans or almonds work wonderfully for healthy fats!)
- ¼ cup granulated sugar (feel free to slightly reduce for less sweetness)
- 8 tablespoons salted butter, melted
- For the Fruity Layer:
- 1 can (21 ounces) cherry pie filling (opt for reduced-sugar if you like)
- For the Creamy Center:
- 8 ounces light cream cheese, softened
- 1 cup powdered sugar (can be reduced or swapped for a sugar-free alternative)
- 1 cup light Cool Whip (from an 8 oz container)
- For the Chocolate Indulgence:
- 2 packages (total 6.8 ounces) sugar-free chocolate instant pudding mix
- 3 cups cold skim milk (or your preferred milk alternative for a lighter option)
- For the Pretty Topping:
- Remaining light Cool Whip from the 8 oz container
- ½ cup dark chocolate shavings or sugar-free chocolate jimmies (optional)
Detailed Directions: How to Make Your Chocolate Cherry Lush
Ready to bring this layered masterpiece to life? Follow these simple, step-by-step instructions to create your irresistible Chocolate Cherry Lush!
- Craft the Healthy Crust: Start by preheating your oven to 375°F (190°C). In a medium-sized mixing bowl, combine the all-purpose flour, your chosen crushed nuts, granulated sugar, and the melted salted butter. Mix everything until it forms a crumbly yet cohesive mixture. Press this delightful blend evenly into the bottom of a 9×13 inch baking dish. Pop it into the preheated oven for just 10 minutes, or until it achieves a beautiful light golden hue. Once baked, set it aside and let it cool completely – patience is key here!
- Add the Bright Cherries: Once your baked crust has fully cooled (this is crucial to prevent melting of subsequent layers), carefully and evenly spread the entire can of cherry pie filling over the crust. Ensure it reaches all corners for an even distribution of fruity goodness.
- Whip Up the Creamy Layer: Grab a clean mixing bowl. Add the softened light cream cheese and beat it with an electric mixer until it’s wonderfully smooth and fluffy, without any lumps. Gently fold in 1 cup of light Cool Whip, then gradually incorporate the powdered sugar, mixing until everything is perfectly combined, light, and airy. Now, carefully spread this luscious creamy mixture over the vibrant cherry layer.
- Prepare the Rich Pudding: In a separate bowl, it’s time for the chocolate magic! Whisk together the two packages of sugar-free chocolate instant pudding mix with 3 cups of cold skim milk. Continue whisking for about 2 minutes, or until the pudding begins to thicken significantly. Don’t let it get too firm, just thick enough to spread easily. Gently spread this rich chocolatey goodness over the cream cheese layer, smoothing it out.
- Finish with a Flourish: To complete your masterpiece, dollop and spread the remaining light Cool Whip from the 8 oz container over the chocolate pudding layer. For that extra touch of elegance and a delightful textural contrast, sprinkle with dark chocolate shavings or sugar-free chocolate jimmies, if desired. This makes your Chocolate Cherry Lush truly sparkle!
- Chill and Enjoy: This is arguably the hardest part – waiting! Refrigerate your beautiful Chocolate Cherry Lush for at least 2-3 hours. For the best results, allowing it to chill overnight will ensure all the layers set perfectly, making for cleaner slices and an even more satisfying dessert. Once thoroughly chilled, slice into generous portions and prepare for compliments!
Presenting and Serving Your Chocolate Cherry Lush
A beautifully made Chocolate Cherry Lush deserves an equally beautiful presentation! Here are some creative ways to serve and present this delightful dessert:
- Classic Slices: The most straightforward way is to slice the chilled lush into neat squares or rectangles. For cleaner cuts, dip your knife in hot water and wipe it clean between each slice. This creates a stunning visual of all the vibrant layers.
- Individual Cups: For a more elegant, portion-controlled option, consider assembling the lush in individual clear glasses or ramekins. Layer the crushed crust, cherry filling, cream cheese mixture, pudding, and Cool Whip directly into the cups. This is perfect for parties and allows guests to grab their own without fuss.
- Garnish Galore: Beyond the optional chocolate shavings or jimmies, elevate your presentation with a fresh cherry (pitted) on top of each slice, or a sprig of fresh mint for a pop of color. A drizzle of sugar-free chocolate syrup or a light dusting of cocoa powder can also add a professional touch.
- Plating Perfection: When serving slices, place them on a dessert plate with a small dollop of extra Cool Whip on the side, or a few additional fresh cherries. A small wafer cookie could also add an extra crunch element.
- Buffet Star: If serving at a buffet, present the entire 9×13 inch dish, already sliced, allowing guests to serve themselves. Make sure to have a good spatula nearby! Its vibrant colors make it a natural centerpiece.
Storing Your Chocolate Cherry Lush: How Long Does It Last?
Proper storage ensures your delicious Chocolate Cherry Lush remains fresh and delightful for as long as possible. Given its creamy layers, refrigeration is absolutely essential.
- Refrigeration is Key: Always store your Chocolate Cherry Lush in the refrigerator. This not only keeps it fresh but also maintains the integrity and firmness of all the layers.
- Airtight is Best: To prevent it from absorbing any unwanted odors from your fridge and to keep the top Cool Whip layer from drying out, cover the baking dish tightly with plastic wrap or aluminum foil. If you’ve transferred slices to a container, ensure it’s an airtight one.
- Shelf Life: When stored correctly in the refrigerator, your Chocolate Cherry Lush will remain fresh and delicious for about 3 to 4 days. Beyond that, the texture of the crust might soften too much, and the cream cheese layer could begin to lose its optimal freshness.
- Freezing? Not Recommended: While some layered desserts can be frozen, this particular recipe, due to the Cool Whip and cream cheese layers, doesn’t freeze and thaw particularly well. The texture can become watery or grainy upon defrosting. It’s best enjoyed fresh from the fridge!
- Make-Ahead Marvel: This dessert is a fantastic make-ahead option. Preparing it the day before you plan to serve it allows all the flavors to meld beautifully and the layers to set perfectly, resulting in an even more delicious and easy serving experience.
FAQs About Your Chocolate Cherry Lush
Got questions about making or modifying your Chocolate Cherry Lush? We’ve got answers!
- Can I make this Chocolate Cherry Lush entirely sugar-free?
Yes! This recipe already uses sugar-free pudding and reduced-sugar pie filling is suggested. To make it fully sugar-free, use a sugar substitute for the granulated sugar in the crust and a sugar-free alternative for the powdered sugar in the creamy layer. - Can I use a different fruit pie filling?
Absolutely! While cherry is classic, feel free to experiment with blueberry, raspberry, or even strawberry pie filling for a different twist on your lush. - What if I don’t have instant pudding mix?
This recipe relies on instant pudding for its quick setting properties. Traditional cooked pudding will not set firm enough for these layers. Ensure you’re using instant pudding mix. - Can I use homemade whipped cream instead of Cool Whip?
You can, but be aware that homemade whipped cream is less stable than Cool Whip and may not hold its shape as well over time. If using, make sure it’s very stiffly whipped. - How do I get clean slices of Chocolate Cherry Lush?
Ensure the dessert is thoroughly chilled (preferably overnight). Use a sharp knife dipped in hot water and wiped clean between each slice. This helps prevent sticking and creates clean, defined layers. - Is this dessert suitable for a gluten-free diet?
As written, no, due to the all-purpose flour. However, you can make a gluten-free version by using a gluten-free all-purpose flour blend for the crust. - Can I use different nuts for the crust?
Certainly! While pecans or almonds are recommended, walnuts, cashews, or even a mix of your favorite nuts would work wonderfully to add a unique flavor and crunch to the crust. - What kind of baking dish is best for this recipe?
A standard 9×13 inch glass or ceramic baking dish works perfectly. The size is ideal for the specified ingredient quantities and creates nice, deep layers. - Can I make this Chocolate Cherry Lush ahead of time for a party?
Absolutely! This is a fantastic make-ahead dessert. Preparing it the day before allows all the layers to set beautifully and flavors to meld, making it even more delicious and stress-free for entertaining. - Why do I need to cool the crust completely?
Cooling the crust completely prevents the cherry pie filling and subsequent creamy layers from melting or softening prematurely. A warm crust would turn the delicious layers into a soupy mess!
“`
Chocolate Cherry Lush 🍒
Equipment
- 9x13 inch Baking Dish
- Mixing Bowl
- Whisk
Ingredients
For the Crunchy Base
- 1 cup all-purpose flour
- ½ cup crushed nuts pecans or almonds work wonderfully for healthy fats!
- ¼ cup granulated sugar feel free to slightly reduce for less sweetness
- 8 tablespoons salted butter melted
For the Fruity Layer
- 1 can cherry pie filling 21 ounces, opt for reduced-sugar if you like
For the Creamy Center
- 8 ounces light cream cheese softened
- 1 cup powdered sugar can be reduced or swapped for a sugar-free alternative
- 1 cup light Cool Whip from an 8 oz container
For the Chocolate Indulgence
- 2 packages sugar-free chocolate instant pudding mix total 6.8 ounces
- 3 cups cold skim milk or your preferred milk alternative for a lighter option
For the Pretty Topping
- Remaining light Cool Whip from the 8 oz container
- ½ cup dark chocolate shavings or sugar-free chocolate jimmies optional
Instructions
- Craft the Healthy Crust: Preheat your oven to 375°F (190°C). In a medium bowl, combine the flour, crushed nuts, granulated sugar, and melted butter. Press this mixture evenly into the bottom of a 9x13 inch baking dish. Bake for just 10 minutes until lightly golden, then set aside to cool completely.
- Add the Bright Cherries: Once your crust is cool, gently and evenly spread the entire can of cherry pie filling over it.
- Whip Up the Creamy Layer: In a mixing bowl, beat the softened light cream cheese until it's smooth and fluffy. Carefully fold in 1 cup of light Cool Whip, then gradually add the powdered sugar, mixing until everything is perfectly combined and light. Spread this creamy mixture over the cherry layer.
- Prepare the Rich Pudding: In a separate bowl, whisk together the sugar-free chocolate instant pudding mix with 3 cups of cold skim milk. Mix for about 2 minutes, or until the pudding starts to thicken. Spread this chocolatey goodness over the cream cheese layer.
- Finish with a Flourish: Top the fourth layer with the remaining light Cool Whip. For a touch of elegance and extra flavor, sprinkle with dark chocolate shavings or sugar-free chocolate jimmies if desired.
- Chill and Enjoy: Refrigerate your beautiful Chocolate Cherry Lush for at least 2-3 hours (or even better, overnight) to allow all the layers to set perfectly. Slice and serve!
Notes
- Calories: 155 kcal
- Total Carbs: 20g
- Net Carbs: 19g
- Fats: 8g
- Protein: 2g