
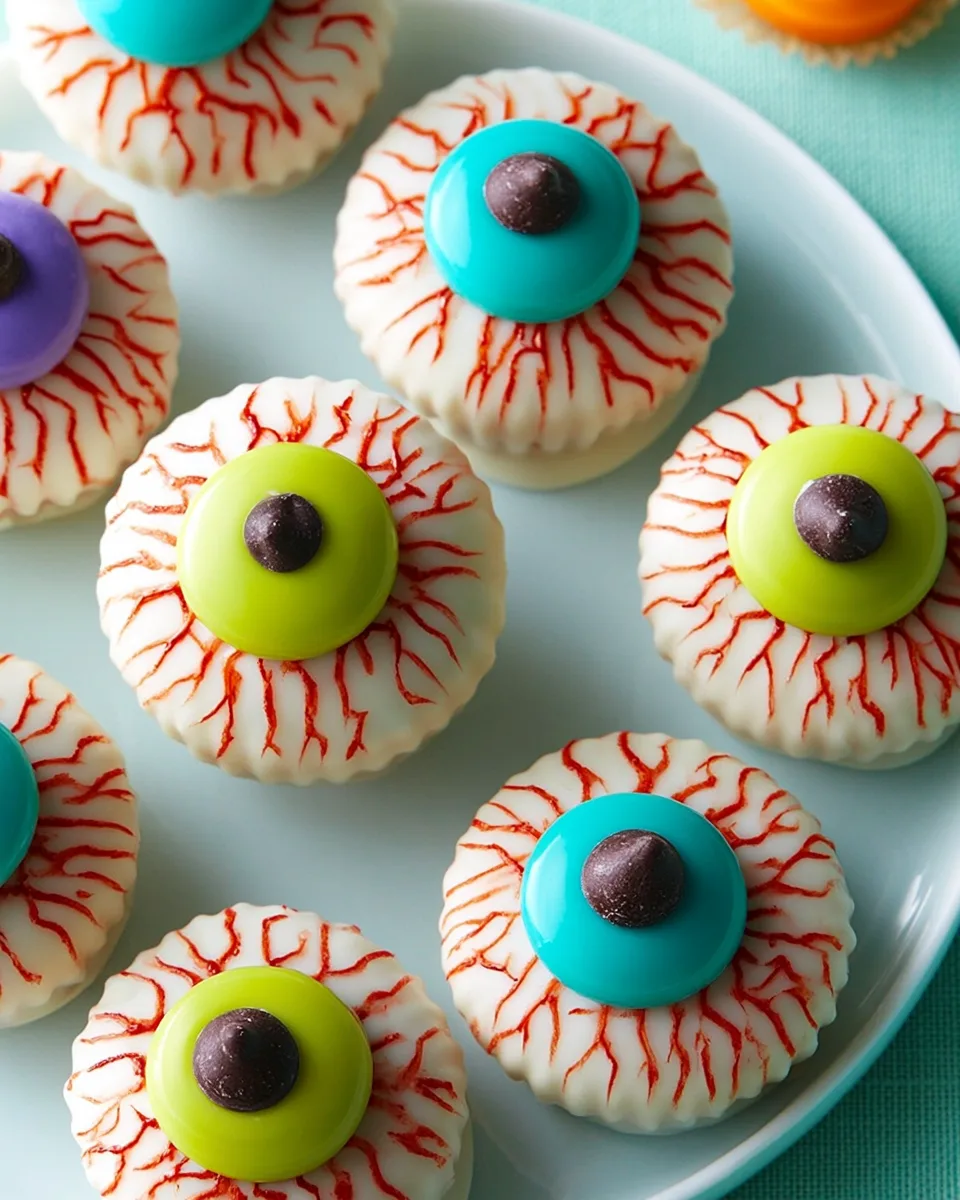
Imagine a cookie that stares right back at you — a glossy, bloodshot eyeball perched on a crunchy vanilla wafer, daring you to take a bite. These Eyeball Cookies are the ultimate Halloween party trick: creepy, cute, and ridiculously easy to make. With just a handful of ingredients and no oven time, you can whip up a batch of these spooky treats in under 30 minutes (plus a little chilling). Whether you’re hosting a haunted house party or surprising the kids with a frightful snack, these edible eyeballs will have everyone looking twice — and grabbing for more. Ready to give someone the evil eye? Let’s bake (or rather, dip and decorate)!
Why You’ll Love This Recipe
- No-Bake Magic: Zero oven time means less mess and more fun. Just melt, dip, and decorate — perfect for last‑minute Halloween prep or baking with little goblins.
- Spook-tacularly Simple: Only 5 main ingredients (white chocolate, vanilla wafers, food coloring, chocolate chips, red coloring) create a showstopping effect. Anyone can make these eyeballs look professional.
- Customizable Creepiness: Use green, purple, or even neon orange paste coloring for the iris. Adjust the bloodshot lines to be subtle or gory — it’s your monster.
- Kid‑Friendly & Party‑Ready: Each tiny cookie is only 36 calories, making them guilt‑free munchies. Serve at school parties, Halloween buffets, or as a ghoulish garnish for milkshakes and cupcakes.
Ingredients
- 5 ounces white baking chocolate, chopped (divided into 4 oz and 1 oz)
- 20 to 25 vanilla wafers (such as Nilla Wafers)
- Paste food coloring in any spooky color (green, purple, or orange)
- ½ cup semisweet chocolate chips
- Red liquid food coloring
How to Make Eyeball Cookies
- Melt & Coat: Place 4 ounces of white chocolate in a microwave‑safe bowl. Microwave in 30‑second intervals, stirring after each, until smooth and fully melted. Take a vanilla wafer and dip it completely into the melted chocolate, letting the excess drip off. Place coated wafers on a baking sheet lined with wax paper. Repeat with all cookies. Chill in the refrigerator for 10–15 minutes until the white chocolate is firm.
- Create the Iris & Pupil: Melt the remaining 1 ounce of white chocolate (same microwave method). Stir in a tiny dab of paste food coloring — just enough to get your desired eerie shade (green or purple is classic). Using a toothpick or small spoon, place a small dot of colored chocolate in the center of each chilled cookie. Immediately press one semisweet chocolate chip into the center of the colored dot, pointy side down, to resemble a pupil. Work quickly so the colored chocolate doesn’t set before the chip goes in.
- Add the Bloodshot Effect: Dip a clean toothpick into the red liquid food coloring. Starting from the edge of the chocolate chip (the pupil), draw thin, wavy lines outward toward the cookie edge. Add a few short branches for a realistic “burst vessel” look. Repeat for all cookies.
- Final Chill & Set: Return the baking sheet to the refrigerator for another 15–20 minutes, or until the chocolate is fully set and the red lines are dry. Store in an airtight container in the fridge until serving.
How to Serve Eyeball Cookies
These creepy cookies are incredibly versatile. Here are five fun ways to present them:
- Classic Platter: Arrange on a black or orange cake stand surrounded by gummy worms and plastic spiders for a graveyard snack table.
- Cupcake Toppers: Place one eyeball on top of a frosted chocolate or pumpkin cupcake — instant edible decor.
- Milkshake Garnish: Stick a skewer into an eyeball and rest it on the rim of a vanilla or strawberry milkshake for a “spooky shake.”
- Ice Cream Sundae: Nestle a few eyeballs into a bowl of vanilla ice cream with hot fudge and sprinkle with crushed Oreo “dirt.”
- Party Favors: Pack three or four eyeballs in a cellophane bag tied with a purple ribbon. Attach a tag that says “I’ve got my eye on you!”
How to Store Eyeball Cookies
Store your finished Eyeball Cookies in an airtight container, layered between sheets of wax paper or parchment. Keep them in the refrigerator for up to 5 days. The white chocolate coating stays firm and shiny when chilled. If you need to transport them, place the container in a cooler with an ice pack — these cookies do not like heat. For longer storage, you can freeze them for up to 1 month: arrange in a single layer on a baking sheet, freeze until solid, then transfer to a freezer‑safe bag. Thaw in the fridge for about 30 minutes before serving. Avoid leaving them at room temperature for more than 2 hours, as the chocolate can soften and the red lines may smudge.
Frequently Asked Questions About Eyeball Cookies
- Can I use white chocolate chips instead of baking chocolate? Yes, but chips often contain stabilizers that make melting less smooth. Add 1 teaspoon of coconut oil or shortening per 4 ounces to help them melt evenly.
- What if I don’t have paste food coloring? You can use gel coloring (sold in small tubes). Avoid liquid food coloring for the iris — it will make the white chocolate seize and become grainy.
- Can I make these gluten‑free? Absolutely! Swap the vanilla wafers for gluten‑free vanilla cookies or almond‑based wafers. Check the chocolate for gluten additives.
- Why are my bloodshot lines bleeding into the white chocolate? The white chocolate must be fully set before adding the red food coloring. If it’s still tacky, the liquid redness will spread. Chill longer.
- Can I use milk chocolate instead of white chocolate for the base? Yes, but the “eyeball” look will be darker. Use milk chocolate chips, skip the iris step, and just press a white chocolate chip as the pupil for contrast.
- How do I get the iris color vibrant without using too much coloring? Start with a toothpick‑tip amount of paste color. You can always add more, but too much will make the chocolate oily and hard to work with.
- Can I make these vegan? Use vegan white chocolate (check labels for dairy) and dairy‑free vanilla wafers. Most semisweet chocolate chips are already vegan.
- What’s the best way to paint the bloodshot lines? Dip a wooden toothpick into red liquid coloring, then lightly drag it from the pupil outward. For thicker lines, use a fine‑tipped food‑safe brush.
- How many eyeballs does one batch make? Typically 20–25 cookies, depending on wafer size and coating thickness. For a party, double the recipe.
- Can I use the white chocolate melts (candy melts) from the baking aisle? Yes! They melt beautifully and don’t require tempering. Just follow the package instructions — no need to add extra oil.
Eyeball Cookies
Equipment
- Microwave-safe Bowl
- Baking Sheet
- Toothpick
Ingredients
Base
- 5 ounces white baking chocolate chopped, divided
- 25 vanilla wafers
Decoration
- paste food coloring any spooky color
- 1/2 cup semisweet chocolate chips
- red liquid food coloring
Instructions
- Melt 4 ounces of white chocolate in the microwave until smooth. Dip each vanilla wafer into the melted chocolate, letting the extra drip off. Place them on a baking sheet lined with wax paper and chill until firm.
- Melt the remaining 1 ounce of white chocolate. Stir in a tiny bit of paste food coloring to create your desired eerie shade (green or purple works great!). Spread a small dot of this colored chocolate in the center of each cookie, then press a chocolate chip into the middle to look like a pupil.
- For a scary bloodshot effect, dip a toothpick into the red food coloring and draw thin lines from the "pupil" outward toward the edges. Chill again until set. Store in an airtight container.