Get Ready to Wrap Up the Fun with Halloween Mummy Brownies!
Spooky season is upon us, and what better way to celebrate than with a treat that’s as delicious as it is delightful? Forget ghoulish gambits and tricky treats – we’re talking about the ultimate dessert that brings all the Halloween vibes to your kitchen: **Halloween Mummy Brownies**! Imagine fudgy, rich chocolate brownies, topped with a creamy, sweet “bandaged” frosting, and finished with adorable, spooky candy eyes. These aren’t just brownies; they’re edible works of Halloween art that are shockingly easy to make and guaranteed to be the star of any monster mash. Get ready to sink your fangs into a sweet masterpiece that’s fudgy, chocolatey, creamy, and undeniably irresistible!
Why You’ll Love These Halloween Mummy Brownies
These **Halloween Mummy Brownies** aren’t just a dessert; they’re an experience! Here are four fantastic reasons why you’ll fall head over heels for this recipe:
- **Irresistibly Fudgy & Rich:** We’re talking about a brownie base that’s moist, intensely chocolatey, and incredibly decadent. It’s the perfect foundation for our spooky masterpiece, satisfying even the most intense chocolate cravings.
- **Spooktacularly Simple & Fun:** Don’t let the impressive look fool you! Creating these mummy brownies is incredibly easy and a blast for all ages. From whisking the batter to piping the “bandages,” it’s a project that brings joy and delicious results without the stress.
- **Perfect for Halloween Parties:** These cute and creepy treats are an absolute showstopper! They’re individually decorated, making them easy to serve and a guaranteed conversation starter at any Halloween gathering, school party, or haunted house event.
- **Creamy, Dreamy Frosting:** The homemade white chocolate cream cheese frosting is the perfect counterpoint to the rich brownie. It’s smooth, sweet, and provides that delicious “bandage” texture that makes these **Halloween Mummy Brownies** truly unique and memorable.
Ingredients for Your Spooky Sweet Treat
For the Fudgy Brownies:
- 🍫 1 cup butter, melted
- 🍚 2 1/2 cups sugar
- 🍦 1 tbsp vanilla extract
- 🥚 4 eggs
- 🌾 1 1/2 cups whole wheat or all-purpose flour
- 🍫 1 cup unsweetened cocoa powder
- 🧂 1/2 tsp salt
- 🍫 Optional: chocolate chips for topping or mix-in
For the Creamy Mummy Frosting:
- 🍫 2/3 cup white chocolate chips or chopped white chocolate
- 🧈 1/2 cup cold butter
- 🧀 2/3 cup cold cream cheese
- 🌿 1 tsp vanilla bean paste or vanilla extract
For Decoration:
- Candy eyes for decoration
Detailed Steps to Create Your Halloween Mummy Brownies
Let’s get baking! Follow these easy steps to bring your **Halloween Mummy Brownies** to life:
- **Preheat & Prepare:** Start by preheating your oven to a cozy 350°F (175°C). Line a 9×13 inch baking pan with parchment paper or foil, leaving an overhang on the sides for easy removal. Spray lightly with non-stick spray to ensure no sticking.
- **Whisk the Wet Ingredients:** In a large mixing bowl, combine the melted butter, sugar, and vanilla extract. Whisk them together until the mixture is smooth and well combined.
- **Add the Eggs:** Crack in the eggs one at a time, beating well with your whisk or an electric mixer after each addition. This helps to create that desired fudgy texture.
- **Combine Dry Ingredients:** Sift or gently mix in the flour, unsweetened cocoa powder, and salt. Stir just until everything is fully combined and no dry streaks remain. Be careful not to overmix! If using, fold in optional chocolate chips now.
- **Bake to Perfection:** Pour the brownie batter evenly into your prepared pan. Place it in the preheated oven and bake for 25-35 minutes. The edges should be set, and a toothpick inserted into the center should come out with moist crumbs, not wet batter.
- **Melt the White Chocolate:** While your brownies are baking, get started on the frosting. In a microwave-safe bowl, melt your white chocolate chips or chopped white chocolate. Do this in 15-30 second bursts, stirring well after each burst, until smooth and fully melted. Let this cool completely to room temperature.
- **Whip the Frosting:** In a separate bowl, beat the cold butter with an electric mixer until it’s light and pale. Then, add the cooled melted white chocolate, cold cream cheese, and vanilla bean paste (or extract). Beat until the mixture is completely smooth, creamy, and lump-free.
- **Cool & Frost:** Once the brownies are baked, let them cool completely in the pan on a wire rack. Once fully cooled, carefully lift them out of the pan using the parchment overhang. Fill a piping bag fitted with a small round or star tip (or just snip the corner off a Ziploc bag) with your creamy frosting.
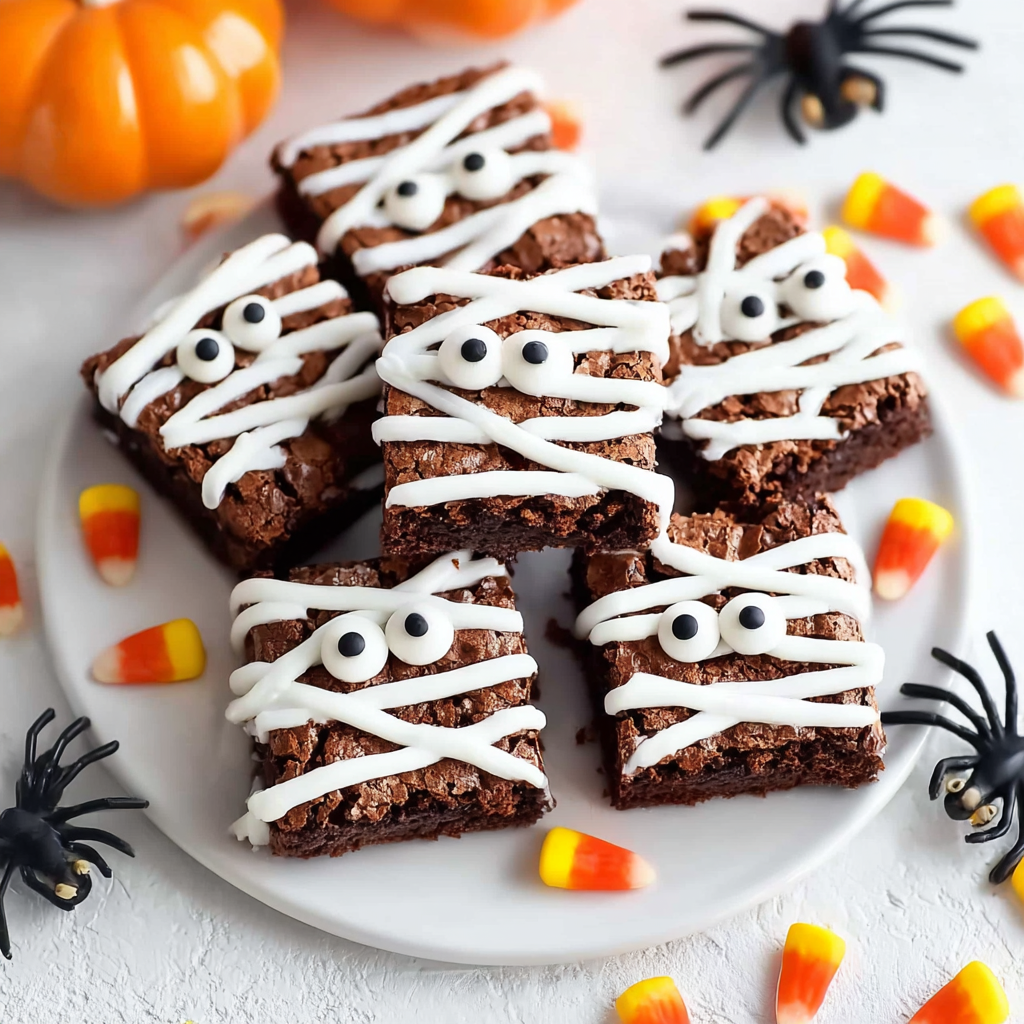
- **Create the Mummies:** Pipe zigzag lines back and forth across the brownies to resemble mummy bandages. Don’t worry about perfection; slightly messy lines add to the charm! Leave a small gap at the top for the “eyes.”
- **Decorate & Serve:** Gently place two candy eyes in the gap at the top of each “mummy” for that spooky effect. Cut your brownies into rectangles or squares, and arrange them on a Halloween platter for a delightful, spooky treat!
Creative Ways to Present and Serve Your Halloween Mummy Brownies
Once your **Halloween Mummy Brownies** are complete, the fun doesn’t stop! Their adorable and eerie appearance makes them perfect for creative serving ideas:
- **The Spooky Graveyard Platter:** Arrange your mummy brownies on a dark platter. Add crushed Oreo cookies around the base to mimic dirt. You can even stick small edible gravestone cookies or plastic spiders nearby for extra flair.
- **Individual Mummy Madness:** For a party, consider cutting the brownies into individual portions *before* decorating. This makes them easier to grab and ensures each guest gets a perfectly bandaged mummy. Place each mummy on a small Halloween-themed cupcake liner or plate.
- **Varying Mummy Sizes:** Don’t feel limited to uniform rectangles! Cut some brownies into smaller squares for mini mummies or larger, more dramatic pieces for a statement. You can even try cutting some into round shapes if you’re feeling adventurous!
- **”Unwrapped” Effect:** Pipe some of the frosting a little more haphazardly on some brownies, making it look like the mummy’s bandages are slightly unraveling for an even more authentic, spooky touch.
- **Serve with a Side of Spook:** Pair your brownies with a scoop of green-tinted vanilla ice cream (lime sherbet works too!) or a drizzle of raspberry coulis (blood effect, anyone?) for an extra festive touch. A glass of “witch’s brew” (green punch) completes the scene.
Storing Your Delightful Halloween Mummy Brownies
These **Halloween Mummy Brownies** are so good, they might not last long! But just in case you have some left, here’s how to keep them fresh and delicious for future cravings:
- **Countertop Storage (Short Term):** If you plan to eat them within 1-2 days, you can store the brownies in an airtight container at room temperature. Ensure they are in a cool, dry place away from direct sunlight. The frosting will hold up well for this short period.
- **Refrigeration (Best Method):** Because the frosting contains cream cheese and butter, refrigerating your **Halloween Mummy Brownies** is the best way to extend their freshness. Place them in an airtight container and store them in the refrigerator for up to 5 days. Let them come to room temperature for about 15-20 minutes before serving for the best texture and flavor.
- **Freezing for Later:** You can freeze these brownies, both frosted and unfrosted!
- **Unfrosted Brownies:** Wrap the cooled brownie slab tightly in plastic wrap, then again in aluminum foil. Freeze for up to 3 months. Thaw in the refrigerator overnight, then frost as desired.
- **Frosted Brownies:** Flash freeze the decorated brownies on a baking sheet until the frosting is firm (about 1-2 hours). Then, transfer them to an airtight freezer-safe container, placing parchment paper between layers to prevent sticking. Freeze for up to 1 month. Thaw in the refrigerator, then bring to room temperature before serving.
FAQs About Halloween Mummy Brownies
- **Can I use a different type of flour for the brownies?**
Yes, all-purpose flour works perfectly if you don’t have whole wheat flour. The texture will be slightly different but still delicious.
- **My frosting is too thin/thick. What should I do?**
If too thin, chill it in the fridge for 15-30 minutes. If too thick, add a tiny splash of milk or cream, a teaspoon at a time, until desired consistency is reached.
- **Can I make these brownies ahead of time?**
Absolutely! You can bake the brownies up to 2-3 days in advance and store them unfrosted at room temperature. Frost them on the day of serving for the freshest look.
- **What if I don’t have candy eyes?**
No problem! You can use mini chocolate chips for eyes, or even pipe small dots of melted chocolate or black frosting for a homemade eye effect.
- **Are these suitable for a nut-free allergy?**
This recipe does not contain nuts. However, always check the labels of your specific ingredients (chocolate chips, cocoa powder, candy eyes) for cross-contamination warnings if allergies are severe.
- **Can I add food coloring to the brownie batter?**
While you can, it’s not traditional for **Halloween Mummy Brownies**. The dark chocolate brownie provides a great contrast to the white frosting. Green or orange food coloring might work in the frosting, though!
- **How many calories are in one serving?**
Based on 12-24 servings, it’s approximately 250 calories per serving. This is an estimate and can vary with exact ingredient brands and portion sizes.
- **Can I use regular vanilla extract instead of vanilla bean paste?**
Yes, the recipe specifically states vanilla extract as an alternative. The paste just offers a more intense vanilla flavor and visible specks.
- **Do I have to use cold butter and cream cheese for the frosting?**
Yes, using cold ingredients helps the frosting hold its shape better, especially for piping, and creates a firmer, creamier texture.
- **My brownies seem dry. What went wrong?**
Overbaking is the most common culprit for dry brownies. Keep an eye on the bake time and remove them when a toothpick still has moist crumbs, not liquid batter.
Halloween Mummy Brownies
Equipment
- Large Bowl
- Whisk
- Baking Pan
- Parchment paper or foil
- Microwave-safe Bowl
- Piping bag
Ingredients
For the Brownies
- 1 cup butter melted
- 2 1/2 cups sugar
- 1 tbsp vanilla extract
- 4 eggs
- 1 1/2 cups whole wheat or all-purpose flour
- 1 cup unsweetened cocoa powder
- 1/2 tsp salt
- chocolate chips Optional, for topping or mix-in
For the White Chocolate Frosting
- 2/3 cup white chocolate chips or chopped white chocolate
- 1/2 cup cold butter
- 2/3 cup cold cream cheese
- 1 tsp vanilla bean paste or vanilla extract
For Decoration
- candy eyes for decoration
Instructions
- Preheat your oven to 350°F.
- In a large bowl, whisk together melted butter, sugar, and vanilla until smooth.
- Add eggs one at a time, beating well after each addition.
- Mix in flour, cocoa powder, and salt until fully combined.
- Line a baking pan with parchment or foil, then spray with non-stick spray.
- Spread the brownie batter evenly in the prepared pan.
- Bake for 25-35 minutes, until the edges are set.
- While brownies are baking, melt white chocolate chips in short bursts in the microwave, stirring until smooth. Let the melted chocolate cool to room temperature.
- In a bowl, beat cold butter until pale, then add cooled white chocolate, cream cheese, and vanilla. Mix until smooth and creamy.
- Once brownies are cooled, fill a piping bag with frosting.
- Pipe zigzag lines over the brownies to resemble mummy bandages.
- Decorate with candy eyes for a spooky effect.
- Cut into rectangles and serve on a Halloween platter or individual plates.
Notes
- Calories: 250
- Total Carbs: 35g
- Net Carbs: 25g
- Fats: 12g
- Protein: 4g