
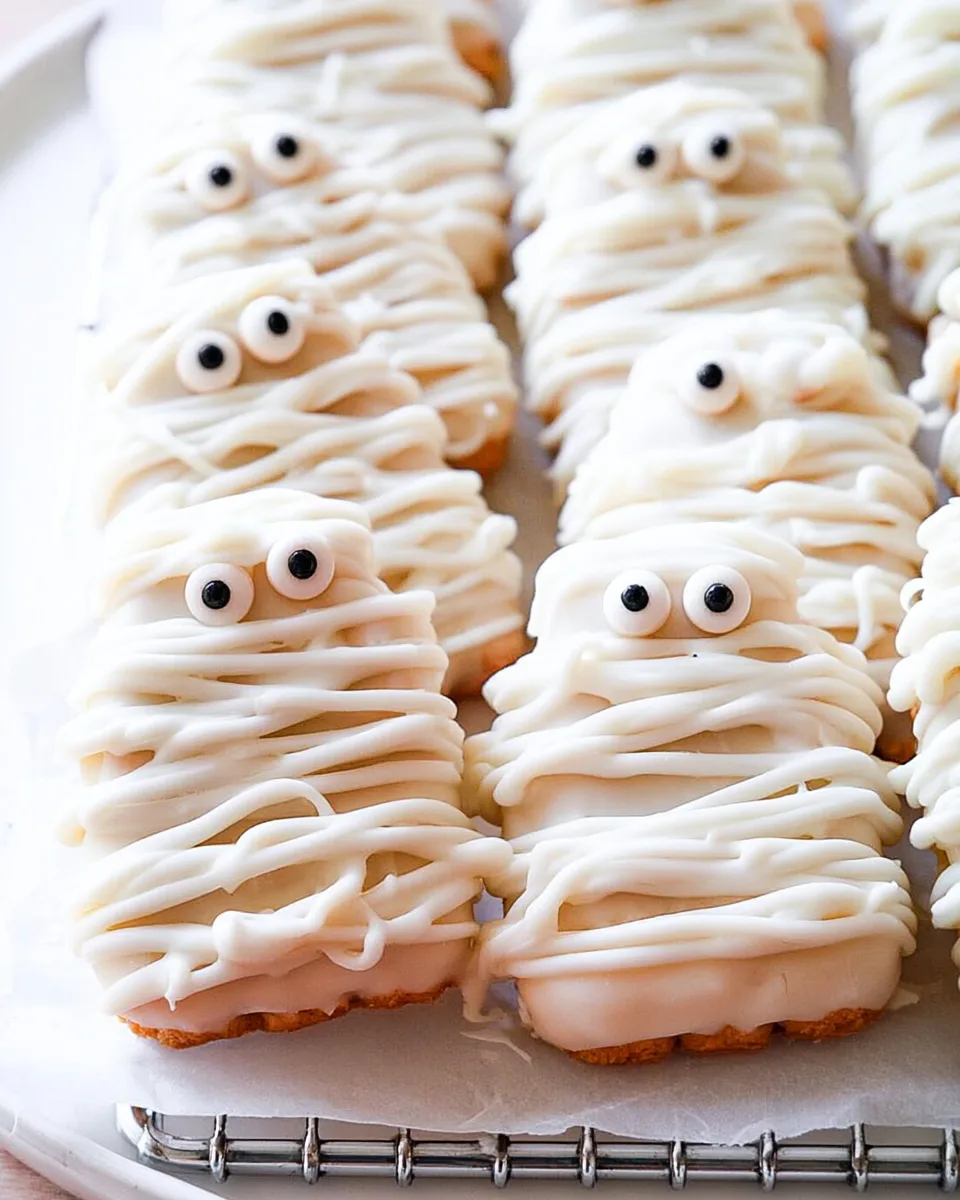
It’s that time of year again when ghosts and ghouls come out to play, and your dessert table deserves a starring role. Forget the same old candy corn; these mummies are here to steal the show with a crunch, a cream, and a whole lot of silly spookiness. They look like they just crawled out of a sarcophagus, but they take less time to make than carving a pumpkin. Imagine the crunch of a classic peanut butter sandwich cookie, dipped in a silky white chocolate shroud, with googly eyes peeking out from under frosting bandages. That is exactly what you get with these Halloween Mummy Nutter Butter Cookies. They are the perfect project for little hands and big appetites, requiring zero oven time and delivering maximum fright night fun. Let’s unwrap this simple, adorable treat that is guaranteed to vanish faster than a ghost at sunrise.
Why You’ll Love This Recipe
- No Oven Required: This is a completely no-bake recipe. You only need a microwave for the chocolate, making it perfect for hot days or when you need a quick treat without the heat.
- Kid-Friendly Fun: Children love helping with these cookies. The process is simple and messy in a good way, and the googly eyes add an instant giggle factor that makes it a great bonding activity.
- Quick & Easy Prep: With a total time of just 20 minutes, you can whip up a batch of ten spooky mummies in almost no time at all. It is ideal for last minute Halloween parties or classroom treats.
- Irresistible Taste Combination: The salty, crunchy peanut butter cookie pairs perfectly with the sweet white chocolate and creamy frosting. It is a flavor balance that pleases both kids and adults.
Ingredients with Measurements
You probably already have most of these items in your pantry. Keep it simple with just four key players for ten delicious mummies.
- White Chocolate Chips: ¾ cup (use a good quality brand for smoother melting)
- Nutter Butter Sandwich Cookies: 10 cookies (the classic shape is perfect for mummy bodies)
- Candy Eyes: 20 candy eyes (you can also use small white chocolate chips with a dot of black icing)
- White Cookie Frosting: 1 can (or about 1 cup of homemade buttercream frosting)
Step-by-Step Directions
Follow these simple steps to bring your mummies to life. The key is working quickly while the chocolate is still wet and then taking your time with the frosting bandages.
- Set Up Your Station: Place a cooling rack over a sheet of parchment paper. This catches drips and makes cleanup a breeze.
- Melt the Chocolate: Put the white chocolate chips in a microwave safe bowl. Heat in 30-second intervals, stirring well after each burst, until the chocolate is completely smooth and runny. Avoid overheating it, or it will seize.
- Dip the Cookies: Take each Nutter Butter cookie and dip only the top into the melted white chocolate. Let any excess chocolate drip back into the bowl. You want a thin, even coating.
- Add the Eyes: While the chocolate coating is still wet, gently press two candy eyes onto the top half of each cookie. Place them close together for a cute, cross eyed mummy look.
- Let the Chocolate Set: Carefully transfer the cookies to the prepared cooling rack. Let the chocolate set completely at room temperature, about 10 to 15 minutes. You can also pop them in the fridge for 5 minutes to speed things up.
- Create the Bandages: Once the chocolate is firm, use the white frosting to drizzle back-and-forth lines across the cookie body. Start from the bottom and work up, leaving the eyes visible. Let the frosting harden before serving for the best look.
Creative Ways to Present and Serve
These mummies are incredibly versatile. You can dress them up or down depending on your Halloween party theme. Here are a few fun ideas to make them the star of the spread.
- Graveyard Display: Stand the cookies upright in a shallow dish filled with crushed chocolate cookies (dirt). Add a few gummy worms crawling out for a graveyard effect. The mummies look like they are rising from the ground.
- Spooky Snack Board: Arrange the mummy cookies on a black or orange platter alongside other Halloween treats like pretzel bats, caramel apples, and candy corn. The contrast in colors makes the white mummies pop beautifully.
- Gift Wrapped Mummies: Place each cookie inside a small cellophane bag tied with a twist tie. Add a tiny tag that says “I’m wrapped up in you!” or “Happy Halloween!” for perfect party favors or classroom gifts.
- Dip Station: Serve the mummies with extra melted white chocolate or a bowl of warm caramel sauce for dipping. The combination of the crunchy cookie and the sauce adds an extra layer of indulgence for dessert lovers.
How to Store and How Long They Last
Proper storage ensures your mummies stay cute and crunchy for days. They are actually even better the next day after the flavors have melded together. Follow these simple guidelines for the best results.
- Room Temperature Storage: Place the cookies in an airtight container, layered between sheets of wax paper or parchment paper. Store them in a cool, dry place away from direct sunlight. They will stay fresh for up to 5 days at room temperature.
- Refrigerator Storage: If your kitchen is warm or you want to firm up the frosting even more, you can store them in the refrigerator in an airtight container. They will last for up to one week. Let them sit out for 5 minutes before serving to soften the chocolate slightly.
- Freezing Instructions: You can freeze the undecorated dipped cookies for up to 2 months. Wrap them individually in plastic wrap and place them in a freezer bag. When ready to serve, thaw them at room temperature, then add the frosting bandages and eyes. Do not freeze the cookies after the frosting is applied, as the frosting can become watery when thawed.
Frequently Asked Questions (10 Questions)
We have answered your most common questions about making these adorable Halloween treats. Check here if you run into any trouble or want to customize the recipe further.
- Can I use a different cookie instead of Nutter Butter? Yes, shortbread cookies or sandwich cookies like Oreos work well. If using dark chocolate cookies, the contrast with the white chocolate is very dramatic. Adjust the flavor accordingly.
- My white chocolate is clumpy and seized. What did I do wrong? This happens when moisture gets into the chocolate or if it is overheated. Always use a completely dry bowl and heat in short intervals. If it seizes, you cannot fix it, so you must start over with fresh chips.
- Can I use dark chocolate instead of white chocolate? Absolutely! Dark chocolate mummies look very cool and are less sweet. Use 70% cocoa dark chocolate chips and follow the same melting and dipping process. You can still use white frosting for the bandages.
- How do I make the candy eyes stay in place? The key is to press the eyes into the chocolate while it is still wet. If the chocolate sets too quickly, you can dab a tiny bit of the frosting underneath each eye to glue it down.
- Can I make these vegan or dairy free? Yes, use vegan white chocolate chips and a dairy free cookie like an Oreo (which is accidentally vegan). Use a vegan buttercream frosting for the bandages. The process remains identical.
- What if I don’t have white cookie frosting? You can easily make a simple icing with powdered sugar and milk. Mix 1 cup of powdered sugar with 2 to 3 tablespoons of milk until it reaches a drizzling consistency. You can also use melted white chocolate in a piping bag.
- Can I add extra decorations to the mummies? Definitely! Sprinkle a little edible glitter on the white chocolate before it sets for a magical effect. You can also add a small candy spider or a sprinkle bat on the base of the cookie.
- How do I avoid a mess when dipping the cookies? Use a fork to hold the cookie and dip it, letting the excess drip off over the bowl. The cooling rack over parchment paper catches all the drips perfectly, making cleanup very simple.
- Are these cookies safe for peanut allergies? Nutter Butters contain peanuts. For a peanut free version, use a sunflower seed butter cookie or a simple vanilla wafer. Ensure all other ingredients are certified peanut free as well.
- Can I make the bandages look more realistic? For a frayed bandage look, use a piping bag with a very small round tip. Pipe irregular lines that slightly cross over each other. You can also use a toothpick to drag some of the frosting for a messy, mummy look.
“`
Halloween Mummy Nutter Butter Cookies
Equipment
- Cooling Rack
- Parchment Paper
- Microwave-safe Bowl
Ingredients
- 0.75 cup white chocolate chips
- 10 Nutter Butter Sandwich Cookies
- 20 Candy Eyes
- White Cookie Frosting
Instructions
- Place a cooling rack over a sheet of parchment paper for easy cleanup.
- Melt the white chocolate chips in a microwave-safe bowl in 30-second intervals, stirring well after each, until completely smooth and runny.
- Dip the top of each Nutter Butter cookie into the melted chocolate, letting any excess drip off.
- While the chocolate is still wet, gently press two candy eyes onto each cookie.
- Transfer the cookies to the prepared cooling rack and let the chocolate set completely.
- Once the chocolate is firm, use the white frosting to drizzle back-and-forth lines across each cookie, creating the look of mummy bandages. Let the frosting harden before serving.