
The Dreamiest Low-Carb Dessert You’ll Ever Make (No Oven Needed!)
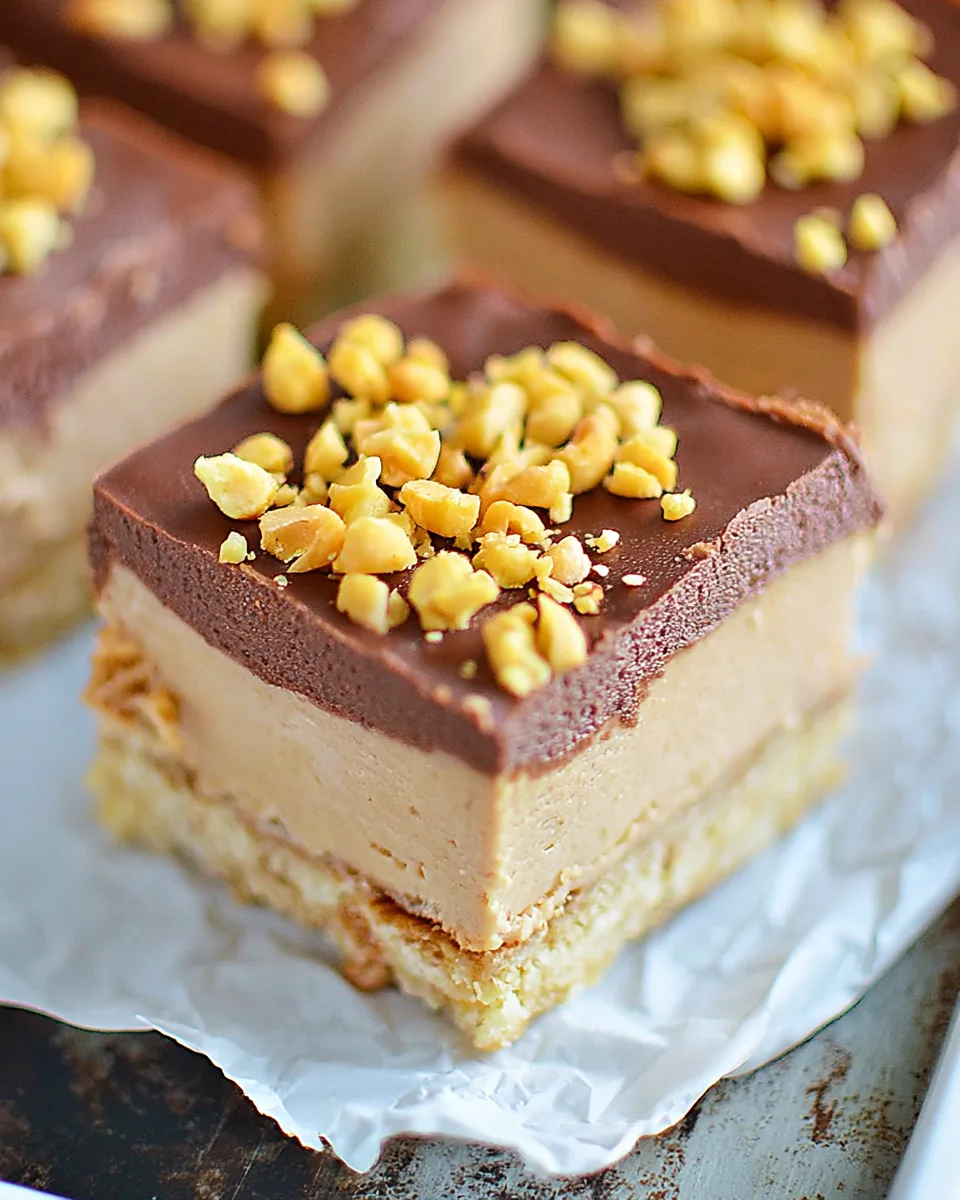
Close your eyes and imagine this: a buttery, nutty crust, a silky cloud of peanut butter cheesecake, and a rich chocolate ganache layer on top. Now, imagine eating that entire slice of heaven without blowing your carb count. Sounds too good to be true, right?
Welcome to the world of Keto No-Bake Peanut Butter Cheesecake Bars. These little squares of joy are the ultimate guilt-free indulgence. They require zero baking, come together in about ten minutes of active work, and taste like a million bucks. Whether you are a keto veteran or just dipping your toes into low-carb living, this recipe is about to become your new obsession. Get ready to treat yourself!
Why You’ll Love This Recipe
1. It’s a No-Bake Miracle
Nobody wants to heat up the house or stand over a hot oven for a dessert. These bars come together in a mixing bowl and a microwave. It’s the perfect summer treat or a last-minute craving crusher.
2. Perfect Keto Macros
With only 5g net carbs per bar and a whopping 40g of fat, these bars are designed to keep you in ketosis while satisfying your sweet tooth completely. They are diabetes-friendly and great for low-carb lifestyles.
3. Layers of Pure Bliss
The combination of a crunchy almond-coconut crust, a luxurious peanut butter cheesecake filling, and a velvety chocolate top is a textural masterpiece. Every bite has a different, delicious surprise.
4. Easy to Customize
This recipe is incredibly forgiving. You can swap nut butters, change the chocolate, or add toppings with ease. It’s a blank canvas for your keto dessert dreams, and it always turns out perfectly.
Ingredients with Measurements
🍰 For the Crust:
- 1 1/4 cups Almond Flour
- 1/3 cup Coconut Flour
- 1/3 cup Powdered Sugar Substitute (like Erythritol)
- 6 tbsp Butter, melted
🥜 For the Peanut Butter Cheesecake Layer:
- 8 oz Cream Cheese, softened
- 1/2 cup Creamy Peanut Butter (sugar-free/natural)
- 1/3 cup Powdered Sugar Substitute
- 1/2 tsp Pure Vanilla Extract
🍫 For the Chocolate Layer:
- 2/3 cup Sugar-Free Chocolate Chips
- 1/4 cup Heavy Whipping Cream
- 8 oz Cream Cheese, softened
- 1/3 cup Powdered Sugar Substitute
- 1 tsp Pure Vanilla Extract
🥜 For the Topping (Optional):
- 2 tbsp Roasted Peanuts, finely chopped
Detailed Step-by-Step Directions
Step 1: Build the Perfect Base. In a mixing bowl, stir together the almond flour, coconut flour, sweetener, and melted butter until you get a crumbly dough that holds together when pinched. Press this mixture firmly into an 8×8-inch pan lined with parchment paper (let the paper hang over the edges for easy lifting). Make sure it’s smooth and even. Pop the pan into the freezer to set while you make the filling.
Step 2: Whip Up the Peanut Butter Filling. In a separate bowl, blend the softened cream cheese, creamy peanut butter, vanilla extract, and sweetener together using a hand mixer. Beat until the mixture is light, fluffy, and completely smooth. Spread this rich, dreamy peanut butter layer evenly over your chilled crust. Return the pan to the freezer for at least 15 minutes to firm up.
Step 3: Prep the Creamy Chocolate Base. In a clean bowl, mix together the softened cream cheese, sweetener, and vanilla extract for the chocolate layer using a hand mixer. Set this mixture aside for a moment.
Step 4: Melt the Chocolate. Combine the sugar-free chocolate chips and heavy whipping cream in a microwave-safe bowl. Microwave in 30-second intervals, stirring well in between each burst, until the mixture is fully melted, glossy, and smooth. Don’t overheat it; just melt until combined.
Step 5: Combine the Chocolate Layer. Fold the melted chocolate into your reserved cream cheese mixture. Stir gently but thoroughly until the color is uniform and the texture is beautifully smooth and silky.
Step 6: Assemble and Chill. Pour the chocolate cream cheese mixture over the peanut butter layer and smooth the top with a spatula. Sprinkle the chopped peanuts evenly on top for a delightful crunch. Freeze the entire pan for 1 to 2 hours until completely firm. Once set, lift the parchment paper to remove the slab, slice into 12 squares, and enjoy your healthy, low-carb treat!
How to Serve and Present These Bars
The Classic Square: Slice them cleanly into neat 2-inch squares. Serve slightly chilled straight from the fridge for a dense, fudge-like texture, or let them sit at room temperature for 5 minutes for a creamier, softer bite.
Mini Cheesecake Bites: Use a small cookie cutter (like a heart or star) to cut fun shapes from the frozen slab. These are perfect for parties or lunchboxes. You can also press the crust mixture into a muffin tin lined with paper cups and layer the fillings to create individual cheesecake cups.
Drizzle of Fun: Before serving, drizzle a little extra melted peanut butter or sugar-free caramel sauce over the top. A sprinkle of flaky sea salt (like Maldon) over the chocolate layer takes the flavor to a whole new level of gourmet.
Parfait Style: Crush a bar into a glass and layer it with fresh whipped cream and a few berries. It’s a gorgeous, deconstructed dessert that feels incredibly elegant but takes zero extra work.
How to Store It and How Long It Lasts
These Keto No-Bake Peanut Butter Cheesecake Bars are incredibly storage-friendly. Because they are egg-free and baked, they hold up beautifully in the cold.
Refrigerator: Store the bars in an airtight container in the fridge for up to 10 days. They will stay firm but creamy. This is the best way to keep them ready for a quick snack.
Freezer: These bars freeze like a dream. Wrap each individual bar tightly in plastic wrap or place them in a single layer in a freezer-safe container. They will last for up to 3 months. You can eat them directly from the freezer (they taste like a frozen peanut butter cup!) or let them thaw for 5 minutes for a softer texture.
Pro Tip: Always keep them chilled. If left at room temperature for too long (over an hour), the crust may become soft and the layers might slide. Serve cold for the best structural integrity and flavor.
FAQs: Everything You Need to Know
1. Can I use regular peanut butter instead of sugar-free? Yes, but be aware that regular peanut butter contains added sugar, which will increase the total carb count of the bars. For the best keto results, stick with natural, sugar-free peanut butter.
2. Can I substitute the almond flour or coconut flour? You can try using an all-purpose keto flour blend (like one from King Arthur or Bob’s Red Mill), but the texture will change slightly. Coconut flour is essential for absorbing moisture; do not omit it or replace it 1:1.
3. What sweetener works best for this recipe? Powdered Erythritol, Monk Fruit blend, or Allulose work wonderfully. Allulose gives the creamiest, least gritty texture. If using granulated sweetener, grind it into a powder first for the smoothest result.
4. I don’t have a microwave. Can I melt the chocolate on the stove? Absolutely! Use a double boiler (a heatproof bowl set over a pot of simmering water) and melt the chocolate chips with the heavy cream, stirring constantly until smooth.
5. How do I make this recipe dairy-free? Use a dairy-free cream cheese alternative (like Kite Hill or Tofutti) and substitute the butter with coconut oil or vegan butter. Use canned coconut cream instead of heavy whipping cream.
6. Can I skip the chocolate layer? Yes, you can double the peanut butter layer instead and simply top it with a chocolate drizzle. The bars will still be delicious and low-carb.
7. My crust is too crumbly. What went wrong? The butter might not have been mixed thoroughly enough. Make sure the melted butter is evenly distributed. If the dough still feels dry, add one more tablespoon of melted butter and re-press.
8. How do I get clean, perfect slices? Use a sharp chef’s knife and wipe it clean with a hot, damp cloth between each cut. For the cleanest lines, let the bars sit at room temperature for 3 minutes before slicing.
9. Are these bars good for meal prep? Absolutely! They are one of the best keto meal prep desserts. Make a batch on Sunday, slice them, and have a healthy treat ready for the whole week.
10. Can I add protein powder to this recipe? You can add a scoop of vanilla or chocolate collagen or keto-friendly protein powder to the filling, but it will make the texture thicker. Start with a small amount and adjust the sweetener as needed.
Enjoy every single rich, low-carb bite of your homemade Keto No-Bake Peanut Butter Cheesecake Bars!
“`
Keto No-Bake Peanut Butter Cheesecake Bars
Equipment
- 8x8-inch Pan
- Hand Mixer
- Mixing Bowls
Ingredients
Crust
- 1 1/4 cups Almond Flour
- 1/3 cup Coconut Flour
- 1/3 cup Powdered Sugar Substitute
- 6 tbsp Butter, melted
Peanut Butter Cheesecake Layer
- 8 oz Cream Cheese, softened
- 1/2 cup Creamy Peanut Butter
- 1/3 cup Powdered Sugar Substitute
- 1/2 tsp Pure Vanilla Extract
Chocolate Layer
- 2/3 cup Sugar-Free Chocolate Chips
- 1/4 cup Heavy Whipping Cream
- 8 oz Cream Cheese, softened
- 1/3 cup Powdered Sugar Substitute
- 1 tsp Pure Vanilla Extract
Optional Topping
- 2 tbsp Roasted Peanuts, chopped
Instructions
- Create the Base: In a mixing bowl, stir together the almond flour, coconut flour, sweetener, and melted butter until you get a crumbly dough. Press this mixture firmly into an 8x8-inch pan lined with parchment paper. Freeze to set.
- Whip up the Peanut Butter Filling: Blend the cream cheese, peanut butter, vanilla extract, and sweetener until smooth. Spread over the chilled crust and return to freezer.
- Prep the Creamy Chocolate Base: Mix together the second portion of softened cream cheese, sweetener, and vanilla extract; set aside.
- Melt the Chocolate: Combine chocolate chips and heavy whipping cream. Microwave in 30-second intervals until melted and glossy.
- Combine the Chocolate Layer: Fold the melted chocolate into your cream cheese mixture and stir until smooth.
- Assemble and Chill: Spread the chocolate layer over the peanut butter layer. Sprinkle with peanuts. Freeze for 1-2 hours until firm. Slice into 12 bars.
Notes
Calories: 417 kcal | Total Carbs: 8g | Net Carbs: 5g | Fats: 40g | Protein: 9g