
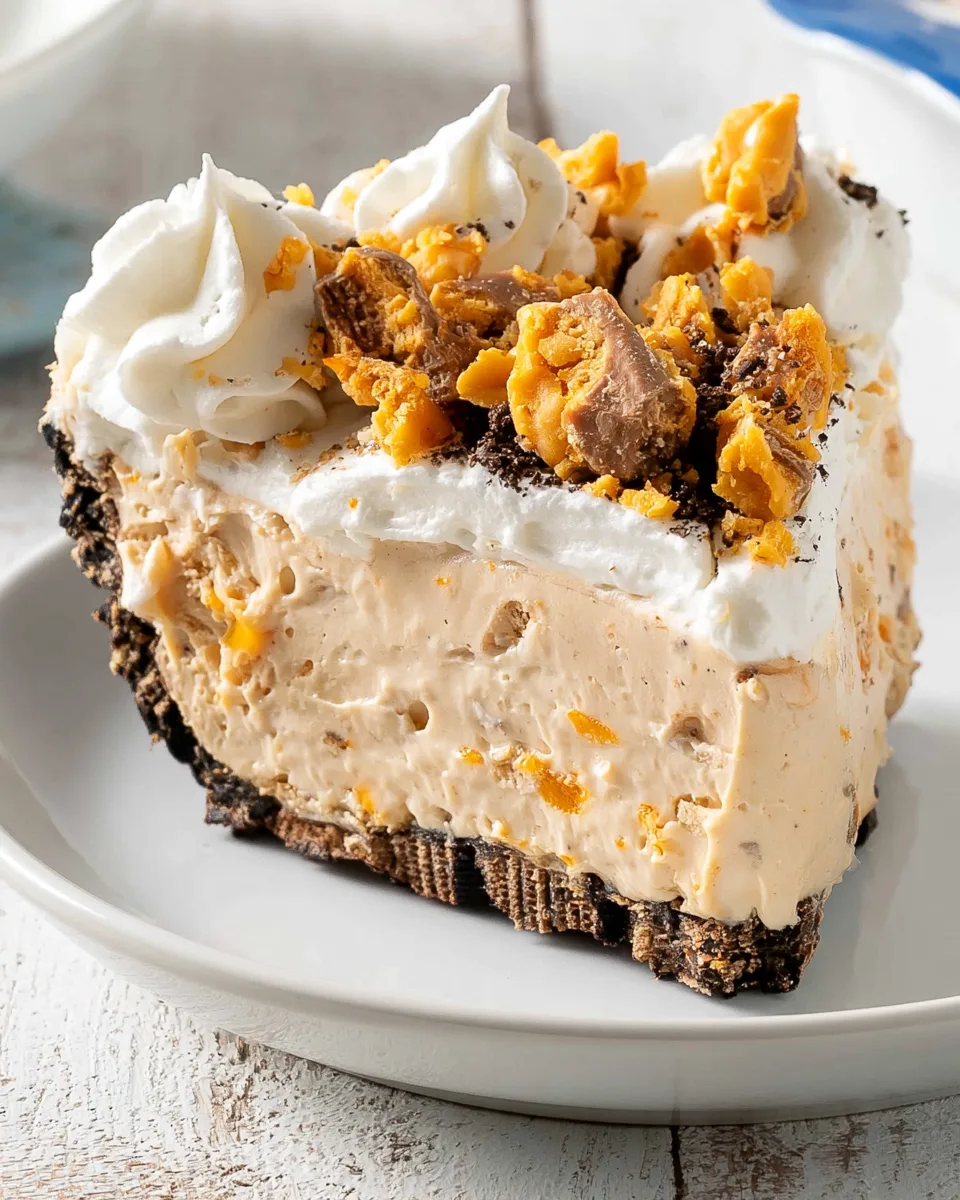
Introduction: The Dessert That Steals the Show
Imagine a dessert that requires zero oven time, yet delivers a crunchy, creamy, peanut-buttery punch that rivals any bakery creation. That’s the Simple No-Bake Butterfinger Dream Pie. It’s the kind of pie that walks into a room and instantly becomes the center of attention. With an Oreo crust that crumbles perfectly against a cloud-like filling studded with buttery, crispy Butterfinger pieces, this pie is pure magic. Whether you’re short on time, low on baking energy, or just craving something ridiculously delicious, this pie has your back. No complicated techniques, no waiting for butter to soften (well, except the cream cheese), and no watching the oven like a hawk. Just a few simple steps, a little patience while it chills, and you have a dessert that tastes like you spent hours crafting it. Ready to blow some minds? Let’s dive into the easiest, most addictive no-bake pie you’ll ever make.
Why You’ll Love This Recipe
1. Absolutely No Oven Required
When the weather is hot or you’re just too tired to bake, this pie is your best friend. You use the food processor for the crust, a mixer for the filling, and the fridge does all the hard work. No preheating, no baking sheets, and absolutely no sweat.
2. The Perfect Texture Combination
You get a crunchy, chocolatey Oreo crust, a silky-smooth peanut butter cream cheese layer, and delightful crunchy bits of Butterfinger throughout. Every single bite has a little bit of everything, which is exactly what a dream pie should be.
3. The Butterfinger Factor
Butterfinger candy bars bring that unique, flaky, peanut-buttery crunch that elevates this pie from “good” to “can’t stop eating.” Combined with creamy peanut butter in the filling, it’s a double dose of peanut butter heaven that will satisfy even the biggest craving.
4. Make-Ahead Magic
This pie needs at least 4 hours to chill, which makes it the perfect make-ahead dessert. You can prepare it the night before a party, potluck, or holiday dinner. Just pull it out of the fridge when you’re ready to serve, add your garnishes, and shine like the dessert hero you are.
Ingredients with Measurements
- 🍪 24 Oreo cookies
- 🧈 7 tablespoons melted butter
- 🧀 1 (8-ounce) package cream cheese, at room temperature
- 🍚 1 cup confectioners’ sugar (powdered sugar)
- 🥜 ¾ cup creamy peanut butter
- 🍬 1 cup chopped Butterfinger candy bars (about 12 Fun Size bars)
- ☁️ 8 ounces thawed whipped topping (like Cool Whip)
- ☁️ Extra whipped topping for garnish (optional)
- 🍬 Additional chopped Butterfinger candy bars for garnish (optional)
Detailed Step-by-Step Directions
Step 1: Make the Crust
Place the Oreo cookies into a food processor and pulse until they become fine, even crumbs. With the processor running on low, slowly pour in the melted butter. Continue blending until the mixture looks like wet sand and holds together when pinched.
Step 2: Press and Chill
Transfer the crumb mixture into a greased 9-inch pie dish. Using a flat-bottomed glass or your fingers, press the crumbs firmly into the bottom and slightly up the sides of the dish. Place the crust in the freezer for 20 minutes to set while you prepare the filling.
Step 3: Cream the Base
In a large mixing bowl, combine the softened cream cheese, creamy peanut butter, and confectioners’ sugar. Beat with an electric mixer on medium speed until the mixture is beautifully smooth and creamy, with no lumps remaining. Scrape down the sides of the bowl as needed.
Step 4: Add Candy Crunch
Using a rubber spatula, gently fold in the 1 cup of chopped Butterfinger candy bars. Make sure the pieces are evenly distributed throughout the peanut butter mixture. Be gentle to avoid crushing the candy into a powder.
Step 5: Lighten Up
Carefully fold in the thawed whipped topping. Use a gentle, folding motion until the whipped topping is just combined and no white streaks remain. Overmixing can deflate the airy texture, so stop as soon as it looks uniform.
Step 6: Fill the Pie
Spoon the luscious filling into your chilled Oreo crust. Spread it out evenly with a spatula, making sure it reaches the edges. Place the pie in the refrigerator for at least 4 hours, or until it is firm and set. Overnight is even better.
Step 7: Serve and Enjoy
Once thoroughly chilled, remove the pie from the refrigerator. If desired, garnish with extra whipped topping and a sprinkle of chopped Butterfingers just before serving. Slice with a sharp knife, wiping it clean between cuts for perfect pieces. Enjoy your homemade treat!
Different Ways to Present and Serve
This Simple No-Bake Butterfinger Dream Pie is incredibly versatile. For a classic look, serve chilled slices on dessert plates with a dollop of whipped cream and a few extra Butterfinger crumbles on top. Want to dress it up? Drizzle melted chocolate or caramel sauce over each slice before serving. You can also cut the pie into small squares and serve them as bite-sized treats at a party. For an over-the-top sundae, skip the crust, layer the filling and crushed Butterfingers in a glass, and top with whipped cream and hot fudge. If you’re feeling festive, press the crust mixture into a springform pan for a taller, cheesecake-style pie that slices beautifully. No matter how you serve it, this pie is guaranteed to disappear fast.
How to Store and How Long It Lasts
This pie stores incredibly well, making it a fantastic make-ahead dessert. After the pie has fully set (at least 4 hours), cover it tightly with plastic wrap or aluminum foil, or transfer it to an airtight cake carrier. Store it in the refrigerator for up to 4 to 5 days. The crust will stay wonderfully crunchy, and the filling will remain creamy and delicious. You can also freeze this pie for longer storage. Wrap the fully chilled pie (ungarnished) tightly in a layer of plastic wrap followed by a layer of foil, and freeze for up to 2 to 3 months. To serve, thaw it overnight in the refrigerator. Add your fresh garnishes of whipped topping and chopped Butterfingers after thawing for the best presentation. Note that the candy pieces may soften slightly after freezing, but the flavor will still be amazing.
FAQs
1. Can I use a different type of cookie for the crust?
Yes! While Oreos give a classic chocolate flavor, you can substitute them with chocolate graham crackers, vanilla wafers, or even Nilla wafers for a different taste. The amount of butter may need slight adjustment if the crumbs vary in density.
2. Can I use chunky peanut butter instead of creamy?
Absolutely. Chunky peanut butter will add extra texture and more peanut pieces to the filling. It works perfectly and makes the pie even crunchier.
3. How do I soften cream cheese quickly?
If you forgot to take it out of the fridge, place the wrapped cream cheese in a bowl of warm (not hot) water for about 15 to 20 minutes. You can also microwave it in 10-second bursts on low power until it softens, but be careful not to melt it.
4. Can I make this pie completely dairy-free or vegan?
Yes. Use vegan cream cheese, vegan butter (or coconut oil), and a dairy-free whipped topping. Check that your Oreos are labeled vegan (standard Oreos are). Choose a peanut butter that doesn’t contain dairy.
5. Can I skip the crust and make it a crustless pie?
You can, but the crust adds wonderful structure and flavor. If you skip it, the filling is rich enough to stand on its own. You can serve it as a mousse-like dessert in individual cups or bowls.
6. Why is my filling not setting?
The most common reason is that the pie hasn’t chilled long enough. It needs at least 4 hours, but overnight is safest. Also, ensure your cream cheese was at room temperature so it blended smoothly. If the mixture was too warm when you added the whipped topping, it may be less firm.
7. Can I use homemade whipped cream instead of Cool Whip?
Yes, but the pie will be less stable and should be served the same day. Whip 1 ½ cups of heavy cream with 3 tablespoons of powdered sugar until stiff peaks form, then fold it into the filling. Homemade whipped cream will not hold its structure as long as a stabilized whipped topping.
8. Can I add chocolate chips or other mix-ins?
Definitely. Feel free to add mini chocolate chips, chopped toasted peanuts, or even a swirl of caramel or chocolate fudge. Keep the total volume of mix-ins to about 1 cup so the pie doesn’t become too chunky.
9. How do I get clean, neat slices?
Use a sharp chef’s knife, and wipe it clean with a damp paper towel between each cut. For extra clean slices, you can chill the pie for an additional hour after it’s set, or even pop it in the freezer for 20 minutes before slicing.
10. Can I use a different candy bar?
Absolutely. This recipe works wonderfully with chopped Snickers, Reese’s Peanut Butter Cups, Heath bars (toffee), or even crushed pretzels for a salty twist. Just substitute an equal amount of your favorite crunchy candy or add-in.
Simple No-Bake Butterfinger Dream Pie 🥧
Equipment
- Food Processor
- 9-inch pie dish
- Large mixing bowl
- Electric Mixer
- Spatula
Ingredients
CRUST
- 24 Oreo cookies
- 7 tbsp melted butter
FILLING
- 1 (8-ounce) package cream cheese at room temperature
- 1 cup confectioners' sugar powdered sugar
- 3/4 cup creamy peanut butter
- 1 cup chopped Butterfinger candy bars about 12 Fun Size bars
- 8 ounces thawed whipped topping like Cool Whip
- Extra whipped topping for garnish (optional)
- Additional chopped Butterfinger candy bars for garnish (optional)
Instructions
- CRUST:
- 1. Start by placing the Oreo cookies in a food processor and blend until they become fine, even crumbs.
- 2. While the food processor is running on low, slowly pour in the melted butter until well combined. Press this delightful crumb mixture firmly into the base and slightly up the sides of a greased 9-inch pie dish. Pop it into the freezer for about 20 minutes to chill while you prepare the filling.
- FILLING:
- 3. In a large mixing bowl, combine the softened cream cheese, creamy peanut butter, and confectioners' sugar. Beat them together with an electric mixer until the mixture is beautifully smooth and creamy.
- 4. Gently fold in the chopped Butterfinger candy bars, ensuring they are well distributed throughout the creamy mixture.
- 5. Carefully fold in the thawed whipped topping until just combined. You want to keep that light and airy texture!
- ASSEMBLE & CHILL:
- 6. Spoon the luscious filling into your chilled Oreo crust, spreading it out evenly with a spatula. Then, place the pie in the refrigerator for at least 4 hours to set up perfectly.
- 7. Once thoroughly chilled and firm, remove your magnificent pie from the refrigerator. For an extra touch of deliciousness, garnish with additional whipped topping and a sprinkle of chopped Butterfingers just before serving. Slice and enjoy your homemade treat!
Notes
- Calories: 685
- Total Carbs: 73g
- Net Carbs: 70g
- Fats: 43g
- Protein: 9g