
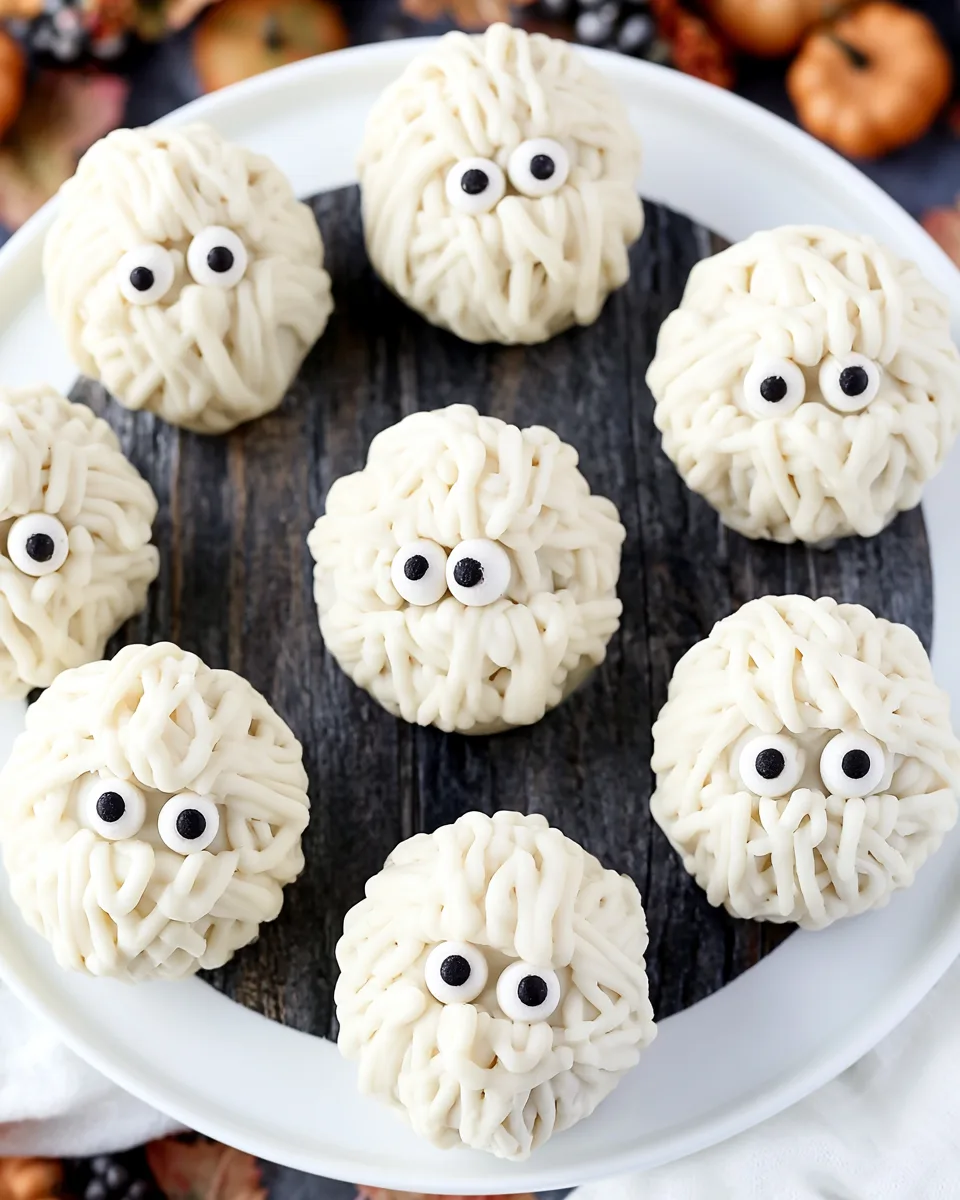
Introduction: Meet the Cutest Monster at the Halloween Party
Forget the gore and go for giggles with these 🧟♀️ Easy Halloween Mummy Bites. They are creepy, cute, and completely no-bake. Imagine a crunchy, sweet, and salty little ball wrapped in a white chocolate bandage, starring two tiny eyes that stare back at you. That is exactly what you get with this recipe. Perfect for last-minute Halloween parties, classroom treats, or a scary movie night snack. The best part? You don’t even need to turn on your oven. These little mummies come together in 20 minutes of active work (plus some chill time, which is mostly hands-off). Your kitchen will smell like vanilla and coconut, and your friends will think you spent hours on them. Let them think that. We know the truth: it takes one bowl, a freezer, and a little bit of drizzle to create a monster that everyone will love. No baking. No stress. Just pure, delicious mischief. Ready to wrap up some fun?
Why You’ll Love This Recipe
- No oven required 🍳: You don’t need to preheat a single thing. This is a completely no-bake recipe. If you own a microwave or a double boiler, you are already halfway there. Perfect for hot fall days or tiny kitchens without an oven. The freezer does all the heavy lifting.
- Dietary friendly 🌱: These mummies are naturally vegan and gluten-free (if you use certified GF rice crispies). Made with cashew butter and coconut oil, they skip dairy and eggs. You can serve them to almost anyone without worrying about dietary restrictions. Everyone deserves a Halloween treat.
- Amazingly simple for kids 👻: The steps are so easy that little ghouls can help. Rolling the balls, dipping them in white chocolate, and sticking on the eyes are all kid-friendly tasks. Just keep a warm water bowl nearby for sticky fingers. It is messy fun that ends in a delicious reward.
- Customizable creepy factor 🎨: You can change the eyes, the drizzling pattern, or even the filling. Use black sprinkles instead of candy eyes for a different look. Add a pinch of cinnamon or peppermint extract to the mix. Each batch can have its own personality. Your mummy, your rules.
Ingredients with Measurements
- 🌾 1 cup puffed brown rice crispies
- 🥜 ½ cup cashew butter (or any creamy nut/seed butter)
- 🍁 2–3 tbsp maple syrup (adjust for sweetness)
- 🥥 2–3 tsp melted coconut oil
- 🌿 1 tsp vanilla extract
- 🧂 pinch of sea salt
- 🍫 1 ¼ cup dairy-free white baking chips
- 🥥 1 tsp coconut oil (for coating)
- 👀 candied eyes or black sprinkles for the face
Detailed Step-by-Step Directions
- Prep your station: Line a baking tray with parchment paper. Set it aside. Keep a small bowl of warm water nearby to dip your fingers in if the mixture gets sticky.
- Make the sticky base: In a large bowl, stir together the cashew butter, maple syrup, vanilla, and melted coconut oil. Keep stirring until the mixture becomes smooth, creamy, and well combined. It should look like a thick, shiny caramel.
- Add the crispies: Fold in the puffed brown rice crispies. Use a spatula to mix until every grain is coated and the whole thing becomes tacky and holds together. If it feels too dry, add another teaspoon of maple syrup or coconut oil.
- Roll into balls: Scoop about 1 tablespoon of the mixture and roll it between your palms to form a smooth ball. Place it on the prepared tray. Repeat with the remaining mixture. Wet your hands in the warm water if the mixture sticks.
- First chill: Place the tray in the freezer for 15–20 minutes. You want the balls to be firm enough to hold their shape when dipped.
- Melt the coating: While the balls chill, melt the dairy-free white baking chips with 1 tsp coconut oil. Use a double boiler or a microwave (in 30-second bursts, stirring each time). Stir until completely smooth. Set aside about ¼ cup of the melted mixture for the final drizzle decoration.
- Dip the balls: Remove the balls from the freezer. Let them sit at room temperature for exactly 5 minutes. One at a time, drop a ball into the melted white chocolate. Use a fork to roll it around until fully covered. Lift it out, letting excess drip off, and place it back on the parchment tray.
- Second chill: Freeze the coated balls for another 15 minutes, until the white coating is hard and set.
- Wrap like a mummy: Take the reserved ¼ cup of melted white chocolate. Drizzle it in a zigzag pattern over each ball. You can use a small spoon or a piping bag for control. The lines should look like mummy bandages.
- Add the eyes: While the drizzle is still wet, press two candied eyes (or a dab of black sprinkles) onto each mummy. Gently push so they stick.
- Final set: Return the tray to the freezer for 15 minutes to let the drizzle harden completely. Then they are ready to serve and stare at you.
Different Ways to Present and Serve
Spooky platter: Arrange the mummy bites on a black platter with a few plastic spiders and some orange candy corn. Place them on a bed of shredded coconut (looks like mummy dust). Great for a buffet table.
Individual treats: Place each mummy bite in a mini paper cupcake liner. Wrap them in cellophane bags tied with orange twine. Perfect for party favors or classroom gifts. Add a tiny tag that says “Don’t unwrap the mummy!”
Dipping station: Serve the bites alongside small bowls of melted dark chocolate or strawberry sauce for extra dipping. Let guests decide if they want to double-dip their mummy. The crunch from the rice crispies goes well with a gooey dip.
Mummy graveyard: Crumble a few extra rice crispies on a tray. Stand the mummy bites up (they will stick slightly to the base). Place them in a line like a small army of undead treats. Add tiny tombstone cookies for a scene.
How to Store and How Long They Last
Store these mummy bites in an airtight container in the refrigerator. They will stay fresh and crunchy for up to 5 days. The white chocolate coating can soften at room temperature, so always keep them chilled. You can also freeze them for long-term storage. To do this, place them in a single layer in a freezer-safe container with parchment between layers. They will keep in the freezer for up to 3 months. When you want to serve them, let them sit at room temperature for 3–5 minutes. They will soften just enough to be bite-friendly but remain firm. Do not leave them out for more than an hour, especially in a warm room. The coconut oil in the coating can melt and make them sticky. Always store them cold.
FAQs – 10 Questions About Easy Halloween Mummy Bites
- Can I use a different nut butter? Yes. Almond butter, peanut butter, or sunflower seed butter all work. Just make sure it is creamy, not chunky, for the best texture.
- What if I don’t have maple syrup? You can substitute honey, agave nectar, or brown rice syrup. The sweetness level might vary slightly, so taste the mixture before rolling.
- Why did my mixture fall apart? It might be too dry. Add extra maple syrup or melted coconut oil one teaspoon at a time until it holds together when squeezed. Also, make sure your cashew butter is not too thick.
- Are these safe for school lunches? They are nut-free only if you use seed butter. The recipe uses cashew butter, which is a tree nut. For nut-free schools, use sunflower seed butter and check all labels.
- Can I make them gluten-free? Yes. Use certified gluten-free puffed brown rice crispies. Some rice crispies contain malt flavoring, so check the box.
- What can I use instead of candied eyes? Black sprinkles, mini chocolate chips, or even tiny dots of black frosting work. For a spooky look, use red sprinkles for bloodshot eyes.
- My white chocolate seized. What happened? Water or steam likely got into the chocolate. Always melt in a dry bowl. If it seizes, add 1 teaspoon of coconut oil and stir slowly to bring it back.
- How do I get a smooth drizzle? Use a small piping bag with a tiny tip, or dip a fork in the melted chocolate and wave it over the mummy. Practice on parchment first.
- Can I skip the coconut oil in the coating? It helps thin the white chocolate and gives a shiny finish. If you skip it, the coating will be thicker and harder to dip. Use it for best results.
- How far in advance can I make them? You can make them up to 3 days ahead. Store them in the fridge in an airtight container. The eyes might soften slightly, but the flavor stays great.
“`
Easy Halloween Mummy Bites
Equipment
- Baking Tray
- Parchment Paper
- Mixing Bowl
- Double Boiler or Microwave
Ingredients
Rice Base
- 1 cup puffed brown rice crispies
- 0.5 cup cashew butter
- 2 tbsp maple syrup
- 2 tsp melted coconut oil
- 1 tsp vanilla extract
- 1 pinch sea salt
Coating & Decoration
- 1.25 cup dairy-free white baking chips
- 1 tsp coconut oil for coating
- 24 candied eyes
Instructions
- Line a baking tray with parchment paper and set aside.
- In a large bowl, stir together the cashew butter, maple syrup, vanilla, and melted coconut oil until smooth and creamy.
- Fold in the puffed rice crispies until everything is well coated and sticky.
- Roll about 1 tablespoon of the mixture into small balls using your hands. Keep a bowl of warm water nearby to prevent sticking.
- Place the balls on the lined tray and freeze for 15–20 minutes until firm.
- Melt the white baking chips with 1 tsp coconut oil. Reserve about 1/4 cup of the melted mixture for decorating.
- Dip each ball into the melted chips until fully covered, place back on the tray, and freeze for 15 minutes.
- Drizzle the reserved melted chips over each ball in a zigzag pattern and press two candied eyes into the drizzle before it hardens. Freeze for 15 minutes to set.